This assumes you have a regular score on screen already. We also suggest you perform basic editing like quantizing, to make the score as legible as possible as regular notes, before converting into Tablature.
1. If you only want to convert a section of the Track/Part, use the To menu to specify this. You might for example only convert the notes within the Cycle, the selected notes, etc. But please note the following:
P You might make only a few of the notes into tablature notes, but the entire system will be shown in Tablature mode with respect to how many note lines are used, etc.3. Select Tablature from the Score menu’s “Staff Functions” submenu.
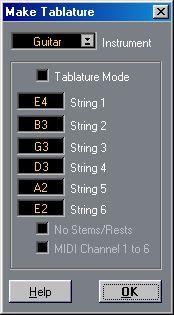
4. Select one of the predefined instruments from the pop-up menu.
5. Activate “Tablature Mode”.
6. If you are not using one of the predefined instruments, set the open tuning of each string using the six value fields.
If one string isn’t used, set it to Off, the lowest value.
7. If so desired, activate the “No Stems/Rests” and “MIDI Channel 1-6” features. No Stems/Rests will give you a score where the notes have no stems and where all the rests are hidden. The “MIDI Channel 1-6” feature is described below.
8. Click OK.
The Tablature now appears. You will get as many note lines as you have activated strings. All the notes will now have a fret number instead of their regular note heads.
9. Edit the Score, if needed.
Generally you can make Display Quantize settings, add symbols etc as with any Score. However, editing the actual notes is a little bit different from regular notes. See below.
Normally, the program automatically decides on which string to display a note, by looking at the pitch and then putting the note at the lowest possible string. While looking at the pitch and then putting the note at the lowest possible string. While 6” is automatic, at least if you make the right preparations.
1. Many guitar synthesizers are able to transmit each string on a different MIDI Channel. If you have such an instrument, set it up so that the highest E string transmits on MIDI Channel 1, the B string transmits on MIDI Channel 2 etc.
2. Record the piece. Quantize and edit it as desired.4. Now, the notes will automatically appear on the right string.
For example if you played a “B” on the low E-string, it will appear as a “7” on that string, not as a “2” on the A-string.
The following table describes all the changes made to your staff when you automatically create Tablature. This will help you adjust or “undo” anything you like changed. Details about the functions are found in the “Manual Creation” section, below.
Score:New Clef
Note heads have numbers
Staff settings – Clef
Staff Options – Tablature Mode Staff Options – Tablature Mode The Tablature clef is selected Activated
Activated