When it comes to note lengths, Score Edit is special in that it doesn’t necessarily display the notes with their actual length. Depending on the situation, you may want to change the “physical length” of the notes or the “display length”.
P Remember that the appearance of notes and rests in the Score is determined by the Display Quantize settings in the Staff Settings dialog. Depending on the Display Quantize “Notes” and “Rests” values, notes may be displayed as if they were longer than they really are (see page 10).
By using the Note Tool1. Select a Note value that you wish to apply to the Note.
This can be done by clicking a note value icon in the Score Toolbar, by selecting a new Quant value or by pressing keys on the computer keyboard.
You can set the length of notes without switching to another tool. This method also allows you to set a note to an “uneven” length (five sixteenth notes, nine eighth notes, etc). Proceed as follows:
1. Set the Snap value to the smallest “denominator” of the length you wish to set. For example, if you want to change the length to five 1/16th notes, you would set Snap to 16.2. If you want to set the length of several notes at the same time, select the notes. For this to be possible, the option “Tools work on all selected Events” must be activated in the Preferences–General–Editors dialog.
3. Hold down [Ctrl], point on a note with the arrow tool and press the mouse button. A small length slider appears.
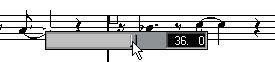 The length is shown to the right, as sixteenth notes and ticks.
4. Drag the slider to the desired length value.
The Snap value determines which lengths you can select.
5. Release the mouse button.
By using the Score Toolbar
1. Select the notes you want to change.
By using the Info Line
You can also edit Length values numerically on the Info Line. The same rules apply as when changing the pitch of notes (see page 108).
Lengthening a Note by Gluing two Notes together
You can create unusual note length values by gluing notes of the same pitch together.
1. Insert the notes you want to glue together (if they don’t already exist). 2. Select the Glue Tool from the Toolbox.
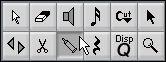 The Glue Tube in the Toolbox.
3. Click on the first note.
This note will now be tied to the first note after it, that has the same pitch.
P Make sure you have a display note/rest quantize value that allows you to display notes of the created note value.
By gluing together a quarter note, an eighth note and a sixteenth note...
Changing the length by using Functions
If you pull down the Functions menu and open the MIDI Functions submenu, you will find another submenu called “Note Length”. This contains various Functions for changing the length of notes, as described in the Menu and Dialog Reference document.
• As with all editing functions, the To pop-up menu and/or selection determines which notes are affected.If you want to change the displayed length of notes without affecting how they play back, the first thing to try is to adjust the Display Quantize, either for the whole Staff or for a separate section, using the Quantize tool (see page 78). But you can also make length adjustments to individual notes in the Note Info dialog:
1. Double click on the head of the note.The Note Info dialog opens.
2. Locate the “Display Len” setting.
By default, this is set to “Auto”, meaning that the note will displayed according to its actual length (and the Display Quantize settings).
To set the Display Length to “Auto” again, scroll the value down to zero.
4. Click OK to close the dialog.
The note will now be displayed according to it’s Display Length setting. However, the Display Quantize settings still apply!