P You can also convert existing Tracks into polyphonic voices automatically, using the Merge All Staves function.
1. Open the Staff settings dialog for the staff.
2. Select Polyphonic from the Staff Mode pop-up.
3. Click the Edit button.
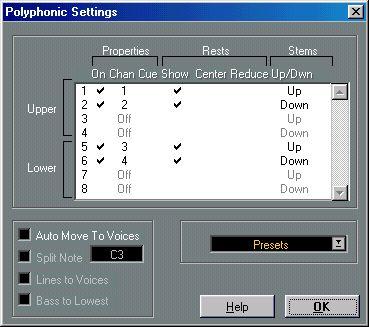
The Polyphonic Settings dialog.
The Polyphonic Settings dialog appears. It consists of eight rows with one voice in each. They are numbered and therefore we refer to them as voices 1 to 8.
4. To activate a voice, click in its “On” column, so that a tick mark appears. There are four voices on each staff, for a total of eight. If you activate at least one “upper” voice and one “lower” voice, you will get a split (piano) staff.
5. If you have particular reasons to use specific MIDI Channels, change the “Chan” settings for the voices.
The program automatically sets each voice to a different MIDI channel. If you don’t have good reasons to make changes, leave the settings as they are.
P Please note the warnings about changing the MIDI Channel settings, on page 130. Also note that if two Voices are set to the same MIDI Channel, the lower will be treated as if it was turned off.
6. Click in the “Rests–Show” column to decide for which voices you want rests displayed. A tick mark indicates that rests will be shown for a voice. Often you will only want rests to be shown for one voice per staff, see below.
7. If you have activated “Rests–Show” for a voice, but don’t want rests to be shown in empty bars, click in the “Rests–Reduce” column for that voice.
This is especially useful for Cue Voices, see page 172.
8. Click in the “Rests–Center” column to determine at which vertical positions rests should be shown (for voices with “Rests–Show” activated).
When this option is activated for a voice, the rest will be put in the vertical center of the staff, when it is not, the rest will get a vertical position based on the pitch of the notes.
9. Decide for a stem direction for each voice, by selecting from the pop-up in the Stems column.
If you select Auto, the program will make decisions about which stems go in which direction (just as when not using polyphonic voices). Regardless of which option you show, you can always force stem direction for individual notes by using the Flip Stem function, see page 150.
P There is a special Stem feature for voice 1: If you set this to Auto, the stem direction will depend on the pitch of the note as usual - except if there are voice 2 notes in the bar, because then the voice 2 stems will automatically be set to Up!
10.If you want the notes in a voice to be smaller than regular notes, put a tick mark in the Cue column for the voice.11.Decide if you want to use Auto Move To Voices.
This is described in detail below. If you want to use it, activate one or more of the options below.
When you close Staff settings, a dialog box may appear saying “Some notes do not belong to any voice and may be hidden, Correct/Ignore”.
This dialog appears when you have set up polyphonic voices without using “Auto Move To Voices”, and there are notes with MIDI Channel settings which do not match any of the active Voices.
If you click the “Correct” button, these notes will be moved to active voices. if you click “Ignore”, nothing will be changed, and some notes will be hidden. However, they are not lost, they appear in all other editors and will appear again in Score Edit if you for example use “Auto Move To Voices”.
The Presets pop-up menu in the Polyphonic Settings dialog contains three very usable setups. Instead of making settings by hand, you can select one of the Presets, thereby saving some time. The Presets are:
Variable SplitThis sets up the dialog for two voices, one on each staff, each with auto stem direction. This is a good starting point for a piano staff when the fixed split option doesn’t suffice.
Optimize Two VoicesWith this Preset, only Voices 1 and 2 are activated with settings like this:
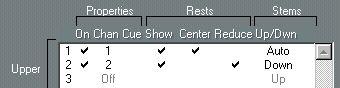 This way the first voice behaves as in Single Staff mode, but if there are notes in the second voice, the stems of the first one are set to up.
Optimize Four Voices
This is like “Optimize Two Voices”, but with two staves. Voices 5 and 6 are activated as well, with the same settings as Voices 1 and 2. This is the recommended way to write piano music.