1. Open the Staff Settings dialog.
See page 68 and page 118 for details.
2. Click the “Staff Options...” Button.
3. To turn off beaming, activate No Beams.
Using the Time Signature Dialog
The Time Signature for the piece naturally affects grouping. But you can control this yourself by creating a composite Time Signature used only for Grouping: 1. Open the Time Signature Dialog.
2. Set up the Numerator with the Grouping you desire.
If you for example want eighth notes in two groups of three and one group of two, enter 3+3+2.
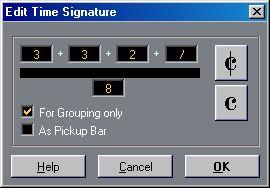 The Time Signature dialog with “For Grouping Only” activated.
5. Click OK.
P
Please note that the “For Grouping Only” only refers to how the numerator is divided. Any changes you make to the “sum” of the Numerator number or the denominator will result in a change of actual Time Signature in the piece. If you need a grouping which can’t be entered in the current time signature, you will have to group notes manually, see below.
Grouping a number of Notes
1. Select at least two notes, where you want the beam to begin and end. You can also select notes in between these two if you wish, it doesn’t matter.
2. Group the notes, either by selecting “Group” on the Do pop-up menu or by clicking the Group icon on the Score Toolbar.
 The Group icon
You can choose individually for each Group whether you want it to be shown with regular beaming or as “Repeats”:
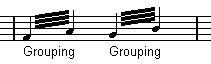
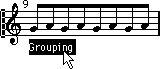
1. Display the “Show Invisible” Filter Bar in the Score window (by clicking the “F” button in the lower right corner) and make sure the “Grouping”checkbox is activated. Now, you will see the text “Grouping” below all created Groups.
2. Double click on the “Grouping” text for the Group you want to make settings for. A dialog box appears.
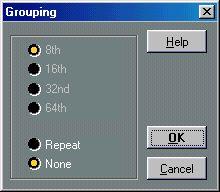 3. Use the two radio buttons at the bottom of the dialog to select whether you want regular beaming (“None”) or Repeats.

In this example, the “Repeat” feature is used to display two pairs of sixteenth notes, as two eighth notes with “repeat bars”. Note that the second and fourth sixteenth note have been hidden - the playback is not affected!
4. If you selected “Repeat”, use the radio buttons to select the note value for the repeats. 5. Click OK to close the dialog.It is possible to use the Grouping feature for notes that are not displayed with beams (quarter notes, half notes, etc). The result is “spectacle bass” symbols, commonly used for indicating tremolo, etc.
• Double clicking on the “Grouping” text opens the Grouping dialog, allowing you to adjust the “note value” for the symbols.
If you have made a Grouping as described above, and wish to remove this, proceed as follows:
1. Pull down the Score menu and select “Show Invisible” from the Global Settings submenu.
The Show Invisible dialog appears.
2. Make sure “Grouping” is activated and close the dialog.
Now, you will see the text “Grouping” below all created Groups. This can also be achieved by activating the “Grouping” checkbox on the “Show Invisible” Filter Bar.
The Grouping is removed.
• If you need to remove all Groups from the score, hold down [Shift] and double click on the first “Grouping” text.
This selects all “Grouping” symbols, so you can delete them all at once by pressing [Backspace].
There is no special “Ungroup” command, simply because it isn’t needed. A Group can consist of one note if you wish. In other words...
• To remove one note at the end of a Group, select it and proceed with Grouping as above.
• If you select notes in the middle of a beam and then Group, three Groups are created.
Before and after Grouping.
Automatic Grouping
The Program can also run through the score and create Grouping for you. Proceed as follows:
1. Select all notes (for example by using the Select All command on the Edit menu). 2. Select “Auto Grouping” from the Do pop-up menu.
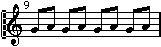
You can also do this by holding down [Ctrl] and clicking the Group Icon on the Score Toolbar. In 4/4 you will for example get two groups of eighth notes per bar, in 3/4 you will get one group per bar, etc.
Before and after using Auto Grouping in 4/4. Cross Staff Beaming
To create a beam that extends from one staff to another, proceed as follows: 1. Set up a Split or Polyphonic Voicing system or open the Score Editor with more than one Track.
2. Set up a beam of notes (using the Group command) and adjust the pitches of them so that they are correct even though some of the notes are on the wrong staff. You want to use the Info Line to edit the pitches if they are very low or high.
3. Select the note(s) that should appear on the other staff.
4. Select “Move To Staff” from the Staff Functions submenu on the Score menu. Select a Staff from the submenu that appears.
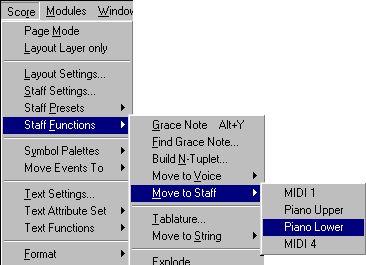 The notes are “graphically” moved to the selected system, but keep their actual pitch.
Before and after moving a note to the lower staff. 5. If needed, adjust the beam appearance (see page 168).
Cross staff beaming with the beam in the middle.
The Move To Staff operation does not actually move the note to another Track. It only makes it “look” like the note belonged to the other staff.
There are two settings for groups under a beam, “Beam subgroups” and “16th Subgroups”, both found among the Staff Options (accessed from the Staff Settings dialog). If Beam Subgroups is activated, the program displays subgroups after four sixteenth notes under a beam. If you also activate 16th Subgroups, subgroups appear after only two sixteenths.
Beam Subgroups Off, On and On with 16th Subgroups activated.
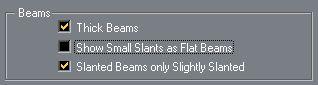 In the Preferences–Scores–Beams and Bars dialog, you will find three options for how Beams should appear:
• Thick Beams.
Activate this if you want beams to be displayed as thick lines.
• Show Small Slants as Flat Beams.
When this is activated, beams that would be only slightly slanted will be displayed flat.
Without and with “Show Small Slants as Flat Beams”.
• Slanted Beams only Slightly Slanted.
Activate this if you only want a slightly slanted beam even though there might be a significant pitch difference between the notes under the beam.
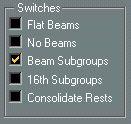
In the Staff Options dialog, you will find a couple of settings for Beams as well. Activate This: Flat Beams
No BeamsHandles appear.
Beam handles. 3. Drag the handle up or down.
Dragging a handle and the effect it has.
Mixed Staff Direction
By dragging the beam handles you can put the beam between the note heads: Putting the beam between the notes.