• When a note is of an “uneven” length, that cannot be displayed without tying together two or more notes of different note values.
• When a note crosses a bar line.
• When a note crosses a “group line” within a bar.
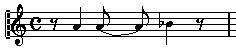
The last case requires some explanation: Cubase VST uses a “cutting mechanism” that automatically creates tied notes depending on the length and position of the notes. For example, a quarter note is cut in two and tied, if it crosses a half note beat, and an eighth note is cut in two and tied, if it crosses a quarter note beat:
 This quarter note is cut. This eighth note is cut.
However, this isn’t always what you want. There are three ways to affect the cutting mechanism:
When the Syncopation option in the Staff Settings dialog is activated, Cubase VST will be less prone to cut and tie notes. For example, the second quarter note in the figure above would not have been cut if Syncopation had been activated.
The Syncopation setting in the Staff Settings dialog affects the whole Track, but you can also make Syncopation settings for separate sections in the score, by inserting Display Quantize Events (see page 78).
By inserting time signature changes, you can change the way notes are cut. This is done in the same way as when you specify how beamed notes should be grouped
- see page 162.
 With a regular 4/4 time signature.
 With a composite time signature (3+2+3 eighth notes).
1. Select the Cutflag tool.
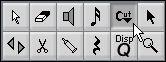 2. Set the Snap pop-up menu to an appropriate value.
As usual, this determines where you will be able to click.
3. Click in the bar containing the note(s) you want to cut manually, at the position you want them cut.
This inserts a Cutflag Event in the bar at the position you clicked. If you press [Ctrl] while clicking, a Cutflag Event is inserted for all staves. If you hold down [Alt], a Cutflag Event is inserted for all voices in a polyphonic staff.
 When you click at the position 2.2.1.0, a

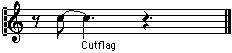 As a result, the regular cutting mechanism is disabled and
 The following rules apply to Cutflag Events:
• If a bar contains a Cutflag Event, the automatic cutting mechanism is disabled within that bar.
As described on page 160, you can set the direction of the tie manually in the Note Info dialog. You can also flip the direction of one or several ties, by selecting their notes in the score and [Ctrl]-clicking the Flip icon on the Score Toolbar.
 The Flip icon.
Flat Ties
If you prefer ties to be displayed as flat lines, rather than regular “curved” ties, activate the option “Flat Ties” in the Preferences–Scores–Modern Style dialog.