• With permanent alteration to the MIDI data. This is the “drawing” mode to use when you want to build the tuplet from scratch. It doesn’t put any demand on the notes’ positions before the tuplet is created.
• As Display Quantize. This is the method you use when the tuplet is recorded and plays back as you want it, but it is not displayed correctly.
1. Insert as many notes as the tuplet consists of.
This would typically be 5, 7 or 9. If the Tuplet contains rests, simply leave space for those, but make sure the current Display Quantize value allows them to be shown.
Five sixteenth notes, about to be converted to a quintuplet.
2. Select all the notes that make up the tuplet.
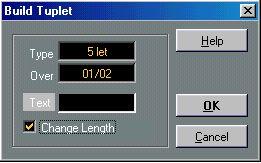 4. Set the type of tuplet in the Type field.
“5let” means a quintuplet, “7let” means a septuplet etc.
5. Set the length of the entire tuplet using the “Over” field.
6. Activate Change length, if you need it.
If you do, the program will alter the length of all notes so that they are exactly the note value the tuplet indicates. If you don’t, the lengths of the existing notes won’t be affected in any way.
7. If you want any other text than the standard above the tuplet, type it in the “Text” field.
The standard text is simply the number in the type field. If the tuplet is put under a beam (see page 179) the “Text” is put just above it. If there is no beam, the “Text” is found in the middle of a bracket.
8. Click OK.
The tuplet appears. The notes have now been moved to the tuplet positions and their length might have changed.
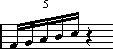 The tuplet just after being created.
9. If needed, edit the lengths and pitches of the notes in the tuplet.
You can also make various settings for the appearance of the tuplet - see below.
In this case, these are notes that play back correctly but aren’t displayed as a tuplet (yet).
2. Pull down the Do pop-up menu and select “Insert Tuplet”.
A dialog appears. This is essentially the same dialog as with the “Build NTuplet” function, but without the “Change Length” option.
4. Click OK.
Now the tuplet is displayed correctly. You can make additional settings for how the tuplet should appear, as described below:
P Lengths and positions in a Tuplet group are probably best edited using the Info Line. Or at least with Snap set to Off!
Double Click here.
2. The Build Tuplet dialog appears.
3. Adjust the settings as needed.
You may change the Type and Over fields, but this will affect the display of the current tuplet, so be careful.
If the Tuplet is a quarter note long or shorter, the notes will be automatically grouped under a beam. If it is longer you have to perform the grouping manually. See page 162 for details.
Tuplet Display OptionsIn the Preferences–Scores–Additional Settings dialog you will find the following settings for Tuplets:
Display Tuplets without Brackets and
Always Show Tuplet Brackets
Show Tuplet Brackets as “Slurs”
These two options are mutually exclusive - turn one on and the other is turned off. When Display Tuplets without Brackets is activated, tuplets never have brackets. When the otheroption is active, tuplets always have brackets. When neither option is activated, tuplets may have brackets, depending on the position of the beam (above or under the note heads).