Routing a channel to a certain output is a two stage process. First you route channels to buses, and then you route buses to outputs. For logic reasons we will describe these two steps in reverse order!
1. Select VST Master Mixer from the Panels menu.
A window with as many stereo buses as your audio hardware has stereo outputs appears. You can also view the Master strip (but not the separate Output Buses, if any) in the VST Channel Mixers, by activating the Master On button.
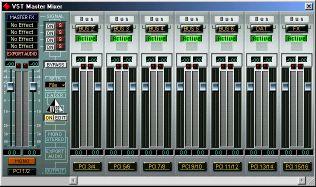 2. For each bus, select a stereo output from the pop-up menu at the bottom.
3. Activate the stereo buses you want to use, by clicking the corresponding Active buttons.
The leftmost bus, Master, is always active. Do not activate outputs that you won’t use, as they may consume processing power.
4. If desired, rename the various buses, by clicking on the Bus name fields at the top of each section.
Generally, it is always recommended that you label the Buses to reflect what’s connected to them.
• In the VST Channel Mixers you can route all kinds of channels to buses, using the menus at the bottom of the window.