A Drum Map consists of settings for 128 drum sounds, from now on called Sounds. You can have up to 64 Drum Maps in your Song at the same time. This allows you to create several different Drum Tracks, each with its own Drum Map (please note though, that each Drum Track only uses one Drum Map at a time). How to select, load and save Drum Maps for each Drum Track is described on page 207.
• There is always a Default Drum Map present in a Song.
• When you edit MIDI Tracks in Drum Edit (see the Getting Started book), the Default Drum Map is used.
Not all parameters are available when you edit MIDI Tracks in Drum Edit.
Parameter Description
Sound The name of the Sound.
Though this may seem a lot of parameters, only two are really important for understanding Drum Maps: The I-note and O-note values.
I-note
This is a certain key (MIDI note number) used for playing the Sound. Setting the Inote value will let you choose a key on your MIDI instrument (or drum pad or whatever) to play the Sound.
P Two Sounds cannot share the same I-note.This is the MIDI note number that the Sound actually outputs when played by you or played back by the program.
Say that you have a rack synth with some drum sounds in it. They are spread over the keyboard range in a way that is inconvenient for your playing style. First set the O-notes in the Drum Map so that they match the actual notes that play back the sounds on your instrument. If the instrument plays back the bass drum on the C2 key, then set the O-Note for the bass drum sound to just that, C2, so that the Sound plays the bass drum. Now you can rearrange the whole “drum kit” so that the fingering suits you, just by setting the right I-notes.
P Since you use the Drum Map in Cubase VST to redirect certain note numbers (the ones that you play, the I-notes) to other note numbers (the ones that are sent back into your MIDI Instrument, the O-notes), this assumes that you use Cubase VST’s Thru-mode (and your instrument is in Local Off-mode). See the Getting Started book for details.
About Output and MIDI ChannelYou can set separate Outputs and MIDI Channel for each Sound in a Drum Map. This allows you to use sounds from several different MIDI instruments or sound modules in the same Drum Map. There are a few things to note:
• For the MIDI Output Channel settings in the Drum Map to apply, you have to set the MIDI Channel of the Track (in the Track list) to “Any”.
Otherwise, all Sounds will be directed to the MIDI Output Channel set for the Track in the Track List.
“Inside” the program, the 128 Sounds each have a note number. This is neither the I-note nor the O-note value, but simply a note number used to sort and keep track of the Sounds. This may seem superfluous knowledge for you, but it is actually only this “real” note number that is recorded, and as soon as you open a Drum Part in another editor, the “real” note numbers will be revealed. The figure below shows how the Drum Map system works when you record a Drum Part:

When you play a key on your MIDI keyboard, etc...
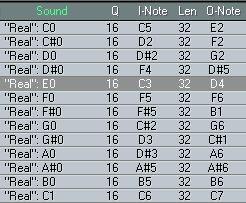
...the input is directed to the Sound with the corresponding I-Note.
Internally, the “real” note number for the Sound (here: E0) is recorded.
 Then, in order for you to hear anything, Cubase VST sends out the O-Note set for the Sound.
P If you open a Drum Track in List Edit, or open a Folder Track containing Drum Tracks in Key Edit, the notes will be shown with their “real” note numbers, which could make things rather confusing. Therefore we recommend that you edit Drum Tracks in Drum Edit only.