If you have a MIDI Instrument for which there are no Drum Maps included with Cubase VST, you might want to create your own Drum Map. The best way to do this is by editing an existing Drum Map:
1. Select a Drum Track, and set its MIDI Channel value to “Any”.This assures that the MIDI Channel settings in the Drum Map will be used. 2. Create and select a Drum Part.
3. Load and/or select a Drum Map that is as similar as possible to the drum sound layout in your MIDI Instrument.
If there are Drum Maps available for older instruments from the same manufacturer, it might be a good idea to select one of these. If you cannot find any similar Drum Maps, use the “General MIDI Drum Map”, which is compatible with the General MIDI standard.
P The General MIDI Drum Map is included with Cubase VST, and is automatically installed in the “Library Files” folder within your Cubase folder. It is also the Default Drum Map in the Startup Song.
• It is also possible to start “from scratch” by using the “New Empty Map” command on the Drum Map pop-up menu in the Inspector.
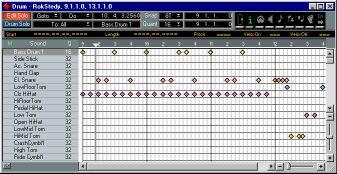
This creates a new Drum Map, with all Sounds listed in the order of the note numbers, and in which the I-Note for each Sound is the same as the O-Note.
The Drum Editor is opened.
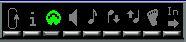
5. Click on the Speaker icon on the Status Bar.
When this is activated, a note will be sent out every time you change a value in the editor. This is essential when setting up and selecting Drum Sounds.
6. Drag the Divider all the way to the right, so that all columns are visible.
7. Hold down [Alt] and set the “Chn” column for a Sound to the MIDI Channel you want to use for drums in your instrument.
Holding down [Alt] causes all Sounds in the Drum Map to be set to the same MIDI Channel. You can later change MIDI Channel for individual Sounds if you wish.
8. Choose a Sound and change its O-Note value until you find a sound you want to include in your Drum Map.
Each time you change the O-Note value, the new note is output. A quick way to set O-Notes is to use the MIDI Input function (see page 212).
P If you want your Drum Maps to be as “compatible” as possible, try to match the Sounds, so that a Kick Drum Sound in the original Map is a Kick Drum Sound in the new Map, etc.
9. Double-click in the Drum Name column and type in a suitable name for the Sound.
10.Repeat steps 8 and 9 until you have all the sounds you want in your Drum Map.
• If you want to incorporate sounds from several different instruments (or several drum kits from a multitimbral instrument) in the same Drum Map, set the Output and Channel values for each Sound so that the right instrument is addressed.
To avoid redoing this over and over again, you can define Instruments just like you do in the Track Columns in the Arrange Window.P Again, for the MIDI Channel settings to be valid, the Track must be set to MIDI Channel “Any” in the Arrange Window.
11.When you have all the sounds you want, set the I-Note values for each Sound. Setting the I-Notes allows you to place your Sounds on convenient keys on the keyboard. A quick way to set I-Notes is to use the MIDI Input function (see below).
P
Please note that two Sounds cannot have the same I-Note value! When you change an I-Note value, Cubase VST will automatically make sure that no double I-Notes occur, by swapping I-Note values between Sounds.
Therefore it is a good idea to decide upon the I-Note settings for all Sounds before you start making the settings.
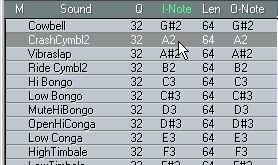
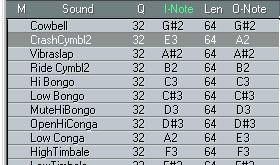
For example, if you change the I-Note value for a Sound from A2 to E3...
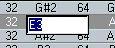
...the Sound that previously had the I-Note E3 will now get the I-Note A2.
• You may move and re-sort the Sounds in the editor if you for example want to have your snare drum sounds gathered on consecutive rows.
This is done by dragging the rows in the list, just like re-arranging Tracks in the Track list. Changing the order of the Sounds in the list does not affect the I-Note, O-Note or “real” note values - it is just a display feature, to make editing easier.
You now have a basic Drum Map. You may want to set the Q and Len parameters and the four pre-defined velocity values when editing or inputting notes in Drum Edit. This can be done for some or all of the Sounds, as described on page 215 in this chapter.
1. Click on the MIDI connector symbol on the Status Bar to activate it.
 2. Select the Sound for which you want to adjust a parameter, by clicking in the Sound column.
The heading is highlighted.
4. Play a note on your MIDI controller.
The note number (I-Note, O-Note) or velocity value (Lev. 1–4) changes accordingly. If you do not get it right, try again.
• The four velocity values (Lev. 1-4) are always ordered so that Lev. 1 has the lowest value and Lev. 4 the highest.
See page 215.