In this section we deal with the “mechanics” of adding the Volume/Pan changes. You will learn how to change the volume and panning of individual Events and how to create dynamic changes of the same parameters.The relation between the volume you put in for an Event and the volume control in the VST Channel Mixer window is described in detail on page 472.
For the Events to display any Dynamic data, the Dynamic Events item on the View pop-up menu must be ticked. To select whether volume or pan should be shown in the Events, pull down the pop-up menu immediately right of the Edit Solo button and select the corresponding option.
 The third option, M-Points, is described on page 373.
 Even though we are talking about volume and pan for Events here, in fact the dynamic data affects the segment that the Event plays. This means that if you have Ghost Events (that play the same segment), any changes you do to the volume/pan curve for one of the Events, will be reflected in the others.
• If you haven’t yet edited the Volume curve for an Event, it consists of one single straight line.
That is, the volume is constant for the entire length of the Event. The default value is 0.0 dB.
• For Pan, there is no default value!
This means, that if you haven’t yet edited the Pan curve for an Event, there is no curve shown at all. Instead the Panning set for the channel in the VST Channel Mixer window is used. As soon as you insert a Pan value in the Dynamic Events display, a Pan curve is created.
P
The volume curve ranges from 0.0 dB down to –infinity. If you need to go above unity gain (amplify the sound), use the VST Channel Mixer faders (which can be automated using the Write function; see page 473).
Adding new points to the curve
1. Set the Snap value as desired.
4. Click somewhere in the “curve area” or press the mouse button and drag up down to find the right point.
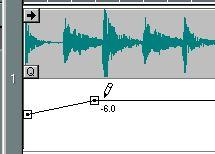
A value label appears, indicating the Volume (in dB) or Pan position.
 Editing points
• If you want to move or change the vertical position of an existing “breakpoint”, click on it with the Pencil and drag it up/down or sideways.
The Snap value applies for which positions you can move the value to.
• Note that if you [Shift]-click a point, it takes a second or two for the value to appear. This is an intended functionality to help view the current value without accidentally changing it. To bypass this functionality, make a rapid movement with the mouse.
Applying the same Curve to all Grouped EventsIf you have a number of Grouped Events, you might want them all to have the same curve:
1. Select the Pencil from the Toolbox.
2. Hold down [Ctrl].
You might also want to hold down [Alt] (to create new breakpoints) and/or [Shift] (to restrict movement to vertical), as described above.
The entire curve is now copied to all the Events in the Group.
Deleting Volume/Pan Points
• To delete a “breakpoint”, click on it with the Eraser tool.
• Pressing [Alt] while deleting will erase all the following breakpoints.