This function allows you to adjust the volume of the audio, by specifying the desired maximum level in the recording. The program then scans the audio to find the current maximum level, compares that with the desired maximum level, and raises (or lowers) the level of the whole recording accordingly.
Typically, this can be used for increasing the level of a recording that was made at too low a level, without the risk of introducing clipping (digital distortion) by raising the level too much.
• Normalizing does not change the dynamics in the recording, since all levels in the whole recording are changed by the same amount!
In fact, the principle is the same as when adjusting the audio level in the VST Channel Mixer, except that with Normalizing, you cannot raise the level above 0dB. Do not confuse Normalizing with “Maximizing” or “Multiband Compression” functions, which affect the dynamics of the recording!
1. Select Normalize.
The program scans the file to find the maximum amplitude, and then displays a dialog for setting the maximum level.
P Note that the settings you make are used for all audio you have selected for processing!
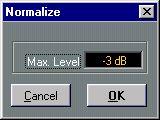 In this example, the loudest signal in the resulting file will have a level 3 dB below maximum.
3. When you click OK, the file gets processed.
In this example, the loudest signal in the resulting file will have a level 3 dB below maximum.
3. When you click OK, the file gets processed.
P Please note that the level of any background noise is raised just as much as the rest of the signal. If you have the option to re-record the file with correct level settings, this is in many cases a better option than using Normalize.
The Pitch Shift dialog appears.
 The Pitch Shift dialog.
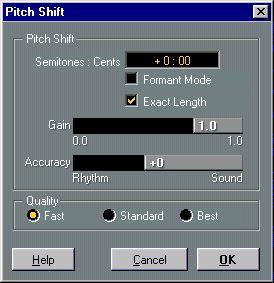
2. Specify the amount of Pitch Shift by adjusting the “Semitones: Cents” value. A cent is one hundredth of a semitone. The maximum Pitch Shift range is +/– one octave (12 semitones).
3. Make settings for the other parameters in the dialog.These are: Parameter
If this is activated, the processed file will have the exact same sample length as the original. If it is deactivated the resulting file length may differ by a few milliseconds.
If you don’t need this length accuracy, you should leave this option deactivated, for a slightly improved audio quality.
This parameter allows you to lower the volume of the pitch shifted material. This can sometimes be necessary, as the pitch shift process may raise the volume, introducing clipping in the processed file.
Set this parameter according to whether the rhythmic feel of the audio material has a high priority or not.
If you set this to a low value (drag the slider to the left), the timing and rhythmic feel will be preserved as accurately as possible. If you set it to a high value, the tonal quality gets priority, allowing slight changes in timing.
Allows you to select one of three Quality modes for the processing: Fast, Standard and Best. As indicated by the names, the higher the Quality, the slower the processing. For most uses, the Standard mode is probably sufficient.
4. Click OK.The audio is pitched shifted.
About Audio Quality
In order to get the best possible audio quality when you pitch shift an audio file, please follow these rules:
• The smaller the change, the better the resulting sound quality.
• The amount of change that can be applied varies drastically with the complexity of the audio material. For example, pitch shifting a complete stereo mix one octave up will most certainly make it sound unnatural.
• If you have the possibility to process individual files rather than a mix, this is preferred.
1. Select the file or segment you wish to Time Stretch.
The Time Stretch dialog appears.
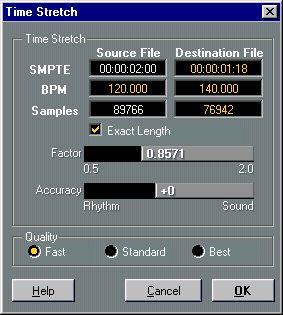 3. Specify the amount of Time Stretch.
This can be done in several ways:
• By defining a new length in the SMPTE “Destination File” field.
The length of the currently selected item is displayed in the “Source File” field (in the format hours: minutes: seconds: frames).
• By defining a new tempo (in beats per minute) in the BPM “Destination File” field. For this to make sense, you also need to tell the program the original tempo in the BPM “Source File” field. This method is useful if you have e.g. a drumloop of known tempo and want it to fit the current Song tempo, etc.
• By defining a new length in the Samples “Destination File” field.The original sample length is displayed in the “Source File” field.
• By specifying a stretch factor using the Factor slider.
Note that regardless of which method you use, the other fields will automatically be adjusted when you make settings. This makes it easy to see the resulting stretch factor when converting to a new tempo, etc.
4. Make settings for the other parameters in the dialog. These are: Parameter Exact LengthIf this is activated, the processed file will have the exact same sample length as the original. If it is deactivated the resulting file length may differ by a few milliseconds.
If you don’t need this length accuracy, you should leave this option deactivated, for a slightly improved audio quality.
Set this parameter according to whether the rhythmic feel of the audio material has a high priority or not.
If you set this to a low value (drag the slider to the left), the timing and rhythmic feel will be preserved as accurately as possible. If you set it to a high value, the tonal quality gets priority, allowing slight changes in timing.
Allows you to select one of three Quality modes for the processing: Fast, Standard and Best. As indicated by the names, the higher the Quality, the slower the processing. For most uses, the Standard mode is probably sufficient.
5. Click OK to Time Stretch or Cancel to exit.In order to get the best possible audio quality when you perform time correction on an audio file, please follow these rules:
• The smaller the change, the better the resulting sound quality.
• The amount of change that can be applied varies drastically with the complexity of the audio material.
• If you have the possibility to process individual files rather than a mix, this is preferred.
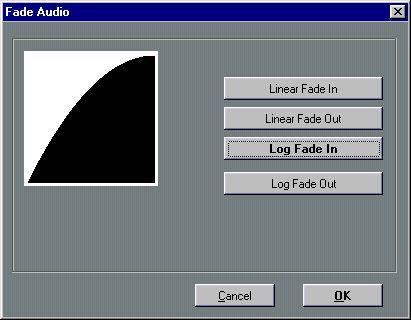
The Fade Dialog can be seen as an extension of the regular Fade In/Out functions on the Audio Functions submenu. You can choose between Linear Fade in/out (the same as in the other Fade functions) or Log Fade in/out (which produces a logarithmic, slightly “rounded” Fade curve). It is also possible to “draw” fade curves with the mouse directly in the window!
• Note that the fade you set up in the dialog affects the full length of each audio selection!
If you want to make a quick fade in at the beginning of a long Audio Event, you should split the Event with the Scissors tool at where you want the fade to end, and then only perform the Fade operation on the short first Event.