As described on page 410, one of the segments in the file is indicated in a special way. This is called the active segment. You can display any of the file’s segments in this way:
1. Pull down the Segment pop-up menu.

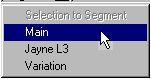 The Wave editor’s segment menu holds a list of the File’s segments.
2. Select the desired segment.
Adjusting segment start and end points in the Wave editor has advantages:
• When you adjust segment points in the Audio editor, the points always snap to ticks.
• In the Pool, you can adjust segments down to an accuracy of one single sample, but you have no graphical feedback.
• In the Wave editor you can adjust segments graphically and with single sample resolution.
By dragging the Inset handles, you can adjust the start and end points for the segment, just as in the Audio editor (see page 359), but with single sample resolution. If you need to, you may zoom in closely on the waveform for more precision.
Converting the Selection into a new segment
1. Create and adjust the selection as described on page 413.
Playing back in a loop is a great way of finding points that make musical sense.
3. Pull down the segment pop-up menu and select “Selection To Segment”. The new segment will get the name of its audio file, but with an index number at the end of the name. If the file is named “Guitar” and there already are segments named “Guitar1”, “Guitar2” and “Guitar3”, the new segment will be named “Guitar4”.
Moving the segment within the fileYou can also adjust the segment’s start and end points simultaneously, that is, essentially “move” the segment within the file.
1. Select the Hand tool from the Toolbox.
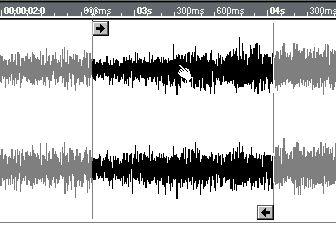 Moving the segment with the Hand tool.