Apart from the “regular” audio channels, Cubase VST provides eight stereo Groups. As mentioned on page 423, you can route several audio channels to the same Group, to mix them with a single set of controls and add the same EQ or effects to all of them. This section describes the VST Groups and how to use them.
2. Locate the audio channel you want to route, and pull down the pop-up menu at the bottom of its channel strip.
On the pop-up menu, the Groups are listed after the available Output Buses (see page 423).
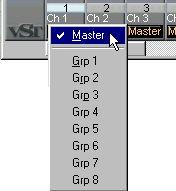 In this case, only one Output Bus is available (Master).
3. Select one of the eight Groups.
The output of the audio channel is now redirected to the selected Group.
P The Groups are in stereo, which means that the pan setting for the audio channel is taken into account when you route the channel to a Group.
3. Pull down the Send Routing pop-up below the Send level knob and select one of the Groups on the list.
Note that the Send is routed to one side of a Group.
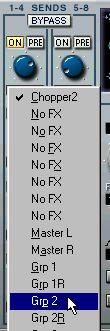 4. Adjust the volume with the Send level knob.
 The Group strips are displayed to the far right in the window.
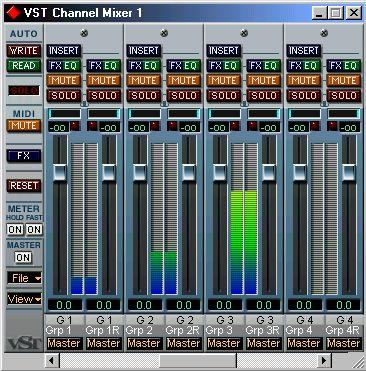 The Group channel strips are displayed in blue, to distinguish them from the regular channel strips.
• The Groups are always in stereo.
As with stereo channel pairs, all controls are “ganged” - dragging one fader will automatically move the other as well. If you want to make independent settings for a channel “side”, hold down[Alt].
• You can route the output of a Group to an Output Bus or to another Group with a higher number.
You cannot route a Group to itself or to Groups to the left of it in the VST Channel Mixer. Routing is done with the pop-up menu at the bottom of each channel strip, independently for each “side” of a Group.
This is because Inputs are never connected directly to a Group.
• Group channel strips have no VST Dynamics panel.
In this example, we have four Audio Tracks you want to “treat as one”. For example, this could be four recordings of background vocals, which you want to mix as one entity:
Audio Channel 1 Pan L30, Output to Group 1• EQ active
• Output to Master
• Post-fader send
Since you are applying EQ to a stereo submix (two channels) rather than to each individual Audio Channel (four channels), you will save processor power. Also, any EQ and Effect settings you make will affect all four channels - you don’t have to copy settings. To set up the routing like this, proceed as follows:
1. Play back the four audio channels together and set up volume balance and panning. In the diagram above, each channel has been panned differently, to spread the background vocals in the stereo image.
2. For each of the four audio channels, pull down the pop-up menu at the bottom of the channel strip, and select “Grp 1”.
This routes the output of the audio channels to the Group instead of to an Output Bus.
3. Pull down the Panels menu and select VST Channel Mixer 1, and scroll to the right until you see the Group channel strips.
If you cannot see the Group channels, you may need to select a Mixer View that contains Groups, as described on page 468.
5. Pull down the Output Routing pop-up menu at the bottom of the channel strip and select “Master”.
This routes the output of the Group to the Master Bus.
7. Select and activate the “Reverb” effect.
How to do this is described on page 442.
8. In the VST Channel Mixer, click the EQ button for Group 1.
The Channel Settings window for Group 1 opens.
9. Activate and set up equalization for the Group.
The parameters are described on page 431.
10.Activate an effect send, and route it to the “Reverb” effect.
See page 442.
11.Activate playback, and use the Group 1 faders to set the level of the combined background vocal recordings.
The two level faders for a Group are automatically “ganged” so that they move together when you drag one of them.