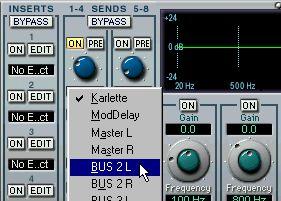
The eight effect sends for each audio channel or Group can be routed independently to any of the built-in VST effects, to one of the sides in a Group or directly to one of the Buses, for use with external effects, etc. This is determined by the Send Routing pop-up menus in the Channel Settings window:
 P
Note that this routing is individual for each effect send on each channel. Also, note that since the effect sends are in mono, you route the send to one of the “sides” of a Bus.
P
Note that this routing is individual for each effect send on each channel. Also, note that since the effect sends are in mono, you route the send to one of the “sides” of a Bus. 1. Open the Effects window.
2. Select an Effect and activate it.
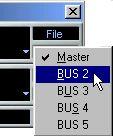 This pop-up menu contains all the active Buses. The Master Bus will always be available. 4. Select one of the Buses to route the output of the effect there.
 In this example, we will set up an Audio Track for playback, route one of the effect sends to an individual output, connected to an external (mono) effect, and record the output of this effect on another Audio Track. During recording, this Track will be monitored, and some built-in VST reverb will be added to the monitored sound:
Audio: VST Channel Mixer: Output Buses:Setting up the audio channel for playback
1. Make the physical connections between your audio hardware and the external effect device.
Connect an auxiliary output on your audio hardware to the input on the external effect. Then connect the output of the effect to an input on your audio hardware.
3. Pull down the Output pop-up menu for Bus 2 (at the bottom of the Master Mixer window) and select the desired output on your audio hardware.
This should be the output pair containing the output you connected in Step 1.
5. Open the VST Channel Mixer and click on the EQ button for the audio channel. The Channel Settings window opens.
6. Click on the On and Pre buttons for the first effect send, so that the indicators in the buttons light up.
Make sure the Bypass button isn’t activated.
8. Use the Send Level knob to set an appropriate signal level for the external effect. You may want to play back the audio at this point, to check the connection and the input signal level on your effect device.
9. Go back to the VST Channel Mixer and click on the Mute button for the audio channel. Since “Pre” is activated for the effect send, this will not affect the signal to the external effect.Setting up another audio channel for recording
The Audio Input window appears.
2. Activate the Input to which you connected the external effect device. Leave the other Inputs deactivated.
3. Close the Input window and return to the Arrange window.
This Track should be set to another audio channel than the playback Track.
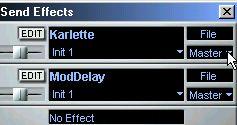
5. Open the VST Send Effects window, select and activate the WunderVerb3 effect.
6. Pull down the Output Routing pop-up menu for the Effect and select the Master Bus.
7. Open the VST Channel Mixer, locate the audio channel selected for recording and click on its FX button.
The Channel Settings window for the channel appears.
8. Activate one of the Effect sends by clicking its On button.
The Pre button should not be activated. Also, make sure that the other Effect sends are deactivated, to avoid any accidental feedback loops.
11.Return to the VST Channel Mixer, hold down [Ctrl] and click on the Input button for the recording channel.
Make sure the correct Input is selected on the pop-up menu that appears.
12.Click on the Input button so that the indicator in the button lights up. Now, the recorded sound will be monitored (provided that Monitoring is set to “Tape Type” or “Record Enable Type” in the Audio System Setup dialog).
13.Try playing back the audio, and set levels for sends, monitoring, etc.14.When ready, perform the recording.
The audio from the playback Track will be routed through the external effect and recorded on the recording Track, and you will monitor the result with some reverb added.