• Multi Track Recording allows you to record several players at the same time and have their performances appear on one Track each.
• If audio channels you are about to record are not directly related, but you still want to record them at the same time, you might prefer to record them on one Track each.
• If you have a keyboard or other MIDI Controller that can transmit on several MIDI Channels, Multi Track recording allows you to record different MIDI Channels onto different Tracks.
• Multi Track recording also allows you to “layer” several MIDI sounds, and record them on one Track each.
• When using Tape Tracks, Multi Track recording should be activated, so that you can set more than one Track on the tape recorder to record ready. This is described in the separate Tape Tracks document.
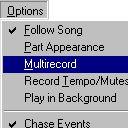
2. From the menu that appears, select “Active” so that it is ticked.
Multi Track Recording is now turned on, and a new Track column appears, labelled “R”. This is used in different ways for different Recording Modes, as described below.
3. Pull down the menu again and select one of the “modes” on the lower half, Merge, Channel Split, Input Split or Layer.
Which of these “modes” you should select depends on what type of recording you want to make. They are all described on the following pages.
 deactivate Multi Recording.
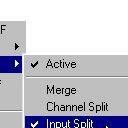


 This part of the menu is where you select one of the modes.
When Multi Recording is active, a
This part of the menu is where you select one of the modes.
When Multi Recording is active, a 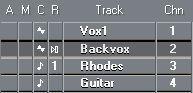
2. Create as many Audio Tracks as desired and set them all to different channels. The number of Tracks you can record on is limited by the number of inputs you have access to. If you only have two audio inputs, you can only record two different audio sources.
3. Make sure all Tracks are set to separate audio inputs.
This is done by holding down [Ctrl] and clicking on the Input button in the Inspector, and selecting an Input from the pop-up menu that appears.
4. Click in the “R” column for each Track, to set them up for recording.
5. Enable recording for each Track by clicking the Record Enable button in the Inspector.
Using Merge mode is like recording with Multirecord turned off.There is no reason to use this mode for MIDI recording only. It is primarily used to record audio onto several Audio Tracks and with Tape Tracks (for setting multiple Tracks on the tape recorder to Record Ready Mode).
Here is how MIDI recording works in Merge mode:• Recording only happens on one MIDI or Drum Track at a time, just as when Multi Track Recording is turned off.
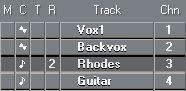
• Recording happens on the Track where you last activated recording in the “R” column (see illustration on the previous page).
This is the preferred mode if you either have several MIDI Instruments all connected to the same input, or if you have a MIDI Controller that can transmit on more than one MIDI Channel.
1. Set up your MIDI instrument(s) so that they transmit on different MIDI channels, preferably on consecutive MIDI Channels, starting at 1 (1, 2, 3, etc.).3. Set up the Tracks you plan to record on so that they transmit on the
desired MIDI Channels and Outputs.
This does not have to be the same MIDI Channels as your instruments are set to transmit on. You can for example make a Track record information coming in via MIDI Channel 2, while it plays back on MIDI Channel 11.
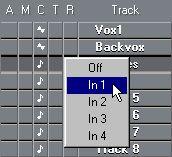
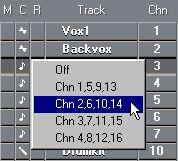 The Multi Rec pop-up when
 • The first option (Off) deactivates recording for this Track.
• Selecting the second option makes this Track record all information coming in on MIDI Channel 1, 5, 9 and 13.
• Selecting the third option makes this Track record information coming in on MIDI Channel 2, 6, 10 and 14.
• The fourth and fifth options work just as the previous, but with the remaining MIDI Channels.
• So, to separate four different players by MIDI Channel they should transmit on for example MIDI Channel 1, 2, 3 and 4, respectively.
 The “R” column displays the first Channel of the four that the Track records on.
5. Set up the other Tracks you wish to Record on.
Recording different players onto different Tracks (Input Split Mode)
1. Connect the instruments (up to four), each one to a MIDI input of its own. 2. Activate Multi Recording in Input Split mode (see the beginning of this chapter for details).
 Menu Option MIDI Input used
Off None (No recording on this Track). In 1 The first MIDI Input.
In 2 The second MIDI Input.
In 3 The third MIDI Input.
In 4 The fourth MIDI Input.
Exactly which is the first and second etc MIDI Inputs in your system is decided by Windows. If you only have one MIDI interface the numbering will most likely be the same as on the interface. If you have several interfaces only experimentation can tell which is which.
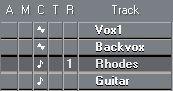 After selecting an Input, the “In” number is displayed in the “R” column.
5. Select a MIDI Input for the second Track.
Continue in the same way with the third and fourth Track.
Using Multi Track Recording to layer sounds
In Layer Mode you record the same information onto several Tracks (up to four). If each of the Tracks you record on is set to transmit on a different MIDI Channel and Output you can play and record with up to four different sounds at the same time.
1. Set up the Tracks you plan to record on so that they transmit on the desired MIDI Channels and Outputs.You can record on a maximum of four Tracks.
4. Activate Recording as usual.
The same information now gets recorded onto four different Tracks. While you record you will hear the sounds of all four of the instruments set to play back from those Tracks.
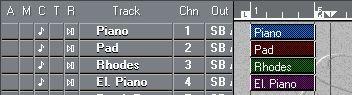
When four Tracks are activated in Layer mode...
...the same information gets recorded on all four Tracks...
• You can only activate Multi Recording on up to three MIDI Tracks simultaneously.
Cycle Modes and Multi Recording
As described in the Getting Started book, you can record in various Cycle Modes. You can also apply recording functions like Key Erase, Delete last version etc.
• During Multi Recording, these Modes and Functions only apply to the Active (selected) Track, not to all Tracks that you record on!
With the Merge Tracks option on the Structure menu you can merge a Multi Track recording into one Track set to channel “Any”. This can also be a handy way to assemble several separate recordings (e.g. the different voices in a backing vocal arrangement) into one easily handled unit in the Arrange window. See page 78 for details.