Let’s say that you are recording a drum kit on four channels: a stereo mix of the entire kit, plus two separate channels for bass drum and snare (provided your audio hardware can record four simultaneous inputs). If you use an “Any” Track for this recording you will be able to record all four channels onto one Track and subsequently handle all four as one entity. This simplifies editing in the Arrange window and in the Audio editor.
• If the audio channels you are about to record are not directly related, but you still want to record them at the same time, you might instead prefer to record them on one Track each, using Multi Track Recording.
See page 46.2. Open the VST Channel Mixer and make sure that each audio channel is set to a separate Input.
This is done by [Ctrl]-clicking on the Input button at the top of each channel strip, and selecting an Input from the pop-up menu that appears.
4. Open the Inspector for the Track and set it to channel “Any”.
A number of Record Info buttons appear. Exactly how many depends on the number of audio channels in your audio recording system (see page 536).
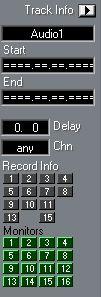 A Track set to “Any” in a 16 channel system.
• There is also a group of Monitor buttons in the Inspector, as many as there are audio channels.
These work just like the Monitor button for a single channel Track, allowing you to manually turn monitoring on and off for each audio channel.
P If stereo inputs are used, a maximum of two audio channels - one odd, one even - can be monitored at once. If you for example are monitoring a channel with odd number, and click on another odd-numbered channel button, monitoring will be deactivated for the first channel.
5. For the channels you plan to record on, click the corresponding Record Info button in the Inspector.
The Record Info buttons will change color to indicate their status, as described below.
When you later open the Audio Editor you will find that the recorded audio channels have been automatically Grouped. More on this on page 384.
As you noted above, it is the “Any” channel setting that is the clue to the Track being able to play back on more than one channel. If you later set the Track to a specific Channel number you will only hear one of the recorded files.
• An audio channel box is red if the channel is record enabled.
P Please note that it may be perfectly OK to record on a channel that already is in use (displays a yellow or blue border). This depends on where in the Song the channel is in use.