1. Select a Snap value (using the Snap pop-up on the Function bar) to decide for a spacing between the Events.
Do not use a higher value than needed, since this will make it harder to perform detailed editing on the recording afterwards. Often quarter notes will suffice, but experiment to find a value that suits you.
3. Position the mouse pointer over the tempo scale to the left of the tempo graph. Watch the Tempo box on the Status bar, it will show the Tempo represented by the mouse position, see page 552 in this chapter.
4. Click the mouse button to insert one tempo Event, or drag up and down to create accelerandi or ritardandi.
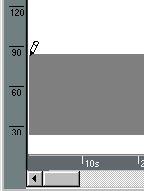
5. When the mouse button is down you record tempo changes, when it is up you don't. Use this is as a way of punching in/out.
The display does not get updated while the mouse button is down.
P The recording you make overwrites any earlier recordings at the same positions (The Master Track editor always records in “Replace Mode”).
• You get a better view over the actual position in the Song, since you can watch the Part display while you are changing the tempo.
• You can use this for setting out “markers” for tempo changes and then edit in the actual tempo values in the Master Track afterwards.
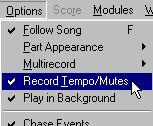
When the “Record Tempo/Mutes” item is on (checked) on the Options menu, and Cubase VST is put into Record mode, it records any tempo changes and puts them in on the Master Track.
 P
Make sure you don't overwrite (Replace) any regular recording when Cubase VST is put into Record mode. To make certain, select an empty Track.
P
Make sure you don't overwrite (Replace) any regular recording when Cubase VST is put into Record mode. To make certain, select an empty Track.Tempo Recording works just as regular recording, using the Locators, with punch in and out at any time and so on, but...
• The Master Track is always in Replace mode, that is, the recording always replaces the existing tempo Events.
Once in Record mode, change the tempo value on the Transport bar. Each time you change it, the new setting is recorded. Recorded tempo changes appear in the Master Track, where they can be edited as usual.
P For the recorded tempi to have any effect on playback or future recordings you must of course activate the Mastertrack (press [M] on the computer keyboard).Remember that it is only tempo changes that are recorded, you may have to set an initial tempo directly in the Master Track. Also remember that this type of recording does not use the Snap value, and is therefore harder to edit than a recording made directly in the Graphic editor.