The Process Tempo dialog, located on the pop-up Do menu, is the equivalent of a fit time calculator. It is used to numerically change a set of tempi by a specific amount or to fit a certain cue. Since this function uses numbers, it might feel complicated when you first try it. We will try to guide you through it. Here's the main procedure:
• The Process Tempo dialog adjusts existing tempi so that a region of bars (for example eight bars) will fit a certain time span (for example “6 seconds and ten frames”).
• Since the function does not create any tempi of its own, you have to put them in before you start. If you want a smooth tempo change, create a ritardando or accelerando. If you want more direct changes, only input one or a few Events. Also note that the adjustment is made overall for all the tempi in the range, which means they keep their relative tempo differences. In other words, a steep ritardando will still be a steep ritardando after the processing.
• The adjustments themselves are made in a dialog where you can change only two things: either you simply set an overall scale factor (for example 70% of the original tempo) or you set an end time for the range, so the number of bars that you selected will now end at precisely that position.
Here are the details:
1. To use this function, select one or more tempi that make up a range of bars, but do not include the last tempo in the Song!
(if the last tempo is selected, Process Tempo will be greyed out on the menu). All the tempi within the selected range will get processed, whether they are all selected or not.
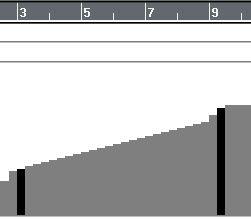 This selection will Process all Tempi between bar 3 and 9.
2. Select Process Tempo from the pop-up Do menu.
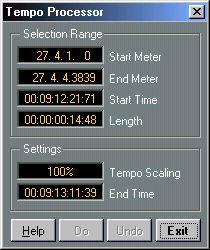
A dialog box appears.
3. The Start and End Meter values in the “Selection Range” section are only display values. They show you the range of the selection you made.
4. The Start Time and Length fields in the same section are also just display values. Start Time shows you the Time position of the beginning of the selection. End Time shows you the time position of the end of the selection. This last value will change when you...
5. ...set the amount of change either by adjusting Length or Tempo Scaling in the “Settings” section of the dialog. In either case the other value and the Length value will get updated to show you how the change will affect the bars the selection encompasses.
6. When you are done with all the settings, click Do.
The changes take effect immediately. You can also click Undo to revert to what you had before.
A more intuitive way of fitting tempi to time based cues is using Hitpoints, see page 581.