When this option is activated on the Option pop-up menu, lines will extend from the Time Hits up over the Tempo Graph and onto the Meter Hit strip. When these lines are dotted, the Time Hits currently do not match any certain meter positions, when they are solid, they do.
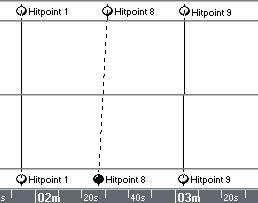 In this figure, the Time Hit in the middle doesn’t match, but the other two do.
So how do you tell the program what “matching” means, in your particular case? There are two settings for this, the Snap value and the Tolerance pop-up (in %) beside it.
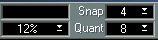
If you for example set Snap to 4 and Tolerance to 12%, this means that all Time Hits that are positioned within 12% from a quarter note are considered matching and will be shown in solid black.
Let's say you have a short video spot for which you want to find one tempo that fits as many visual cues as possible. You have a video tape recorder with time code that you can feed to Cubase VST to achieve synchronization. Proceed as follows:
1. Activate the Master Track by clicking on the Master button on the Transport bar. 2. Use the Synchronization dialog to set things up so that Cubase VST starts exactly where the music should start in the spot.5. Decide for a Snap setting and a Tolerance.
Raising the Tolerance will give you a larger number of Matches, but they will be of lower precision. However, you might gain from increasing the Tolerance initially to find as many matches as possible. You can later link the Time Hits to absolute Meter positions and then use Straighten Up to automatically create a perfect fit. See page 583.
9. Watch the Tempo Match lines as you change the tempo.
Whenever one of them turns solid, you have found a match. Change the tempo up and down until as many of the Hits match as possible. Also note where they match. For example, if you have Snap set to “4”, a match on the second quarter in a bar may not be as “useful” to you as a match on the down- or up-beat.
1. Set things up just as described above and set the tempo to the lowest you could possibly be satisfied with.
The Master Track editor always raises the tempo when trying to find matches.
Auto-scan can only vary one Tempo Event at a time.
3. Also select (hold down [Shift]) the Time Hits that you want to find a Match for. The function will only check the selected Time Hits for a match, no other Hits.
To use Tempo Scan, exactly one Tempo Event and at least one Time Hit must be selected. 4. Select Auto Tempo Scan from the Do pop-up menu.
The program now raises the tempo gradually and looks for matches. If it finds a match for all selected Hitpoints, it stops. You will have to select Auto Tempo Scan repeatedly to step through all the possibilities.
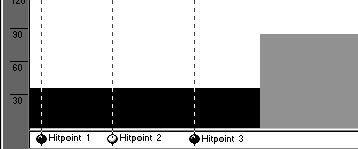
If no match can be found for all selected Hits, the program will show you the last of the best matches, that could be found. If you for example have three Hitpoints selected and the program can only find a match for two of them, it will show this.
P The more Hitpoints you have, the longer the scan will take. Please be patient...If you have found a tempo that you would like to use, but not all Hits match, or you think you have raised the Tolerance too far, you can automatically insert tempo changes to create a perfect match:
1. Use Tempo Match (with or without Auto Tempo Scan) to find a tempo that gives an adequate match, as described above.3. Select all the Time Hits involved.
4. Select Mirror & Link from the Do pop-up menu.
7. Select Straighten Up from the Do pop-up menu.
A dialog box will ask you if you are prepared to insert Tempo changes. Click OK. You will now find that the tempo varies (probably just slightly) between the Hits.