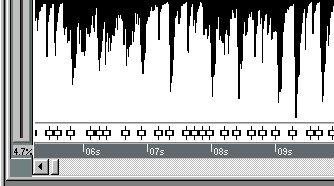
Match points, or M-Points, are “markers” within an Audio Event, used to indicate significant positions in your Audio file - often all “beats” in the recording. In this editor, the Match Points are shown in the area below the waveform, where Time Hitpoints usually are shown.
Match Points
• Use the Get M-Points function.
• Duplicate other M-Points and move the duplicates to desired positions.
• Convert Time Hitpoints to M-Points.
A dialog box opens. The parameters are explained in the table below.
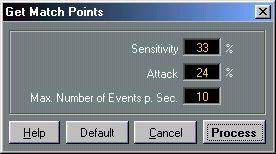 Sensitivity
• If you don’t want to experiment with different settings, click the Default Settings button.
The program scans the audio and inserts Match Points.
As already mentioned, there is no actual “add M-Points” function in the Match Audio/Tempo editor, and you cannot draw in M-Points like you can in the Audio editor. Instead you can do the following:
Duplicating an existing Match Point
1. Click on a Match Point to select it.
2. Set Snap to a suitable value.
Since you will most likely want to be able to place the Match Point anywhere in the waveform, “Off” might be a good choice for Snap.
4. Drag the outline to where you want the new Match Point and release the mouse button.
A duplicate of the Match Point is created and placed where you indicated. You may move it later.
1. Set Snap to a suitable value.
Since you will most likely want to be able to place the Match Point anywhere in the waveform, “Off” might be a good choice for Snap.
A new Time Hitpoint is created (see the Hitpoints chapter in this document). 3. Select the Hitpoint with the Arrow tool.
4. Pull down the Audio pop-up menu and select Hitpoint to M-Point.
The selected Time Hitpoint is converted to a Match Point, which you later can move to another position if you like.
Match Points can be moved by clicking on them and dragging to the left or right. Remember that the Snap value affects to which positions you can move the Match Point (in most cases it will be best to turn Snap off when you move Match Points).
If you want to move a Match Point to a certain position in the audio, you can use the following method for better accuracy:1. Press the mouse button with the pointer positioned on the Match Point.
2. Move the pointer to the position in the waveform where you want the Match Point to appear.
Since you can “aim” directly in the waveform display, it is easier to find the correct position than when you drag the Match Point in the strip below the waveform display.
3. Release the mouse button.
The Match Point is moved to the selected position. This function can also be used with Hitpoints.
There are two principal ways to delete Match Points:
• Click on the Match Point with the Eraser tool.
or
• Select the Match Point(s) and press [Backspace] on the computer keyboard.
Cut, Copy and Paste
You can use these features on Match Points, as you can on other items in Cubase VST. When you Paste, Match Points are Pasted in beginning at the Song Position.