This means changing the length of the audio file, to make it fit the playback tempo. One reason to do this (instead of matching the tempo to the audio) might be that your Song contains other audio files that already match the tempo, or that you simply are perfectly satisfied with the playback tempo you have.
There are two ways to match the audio to the tempo:• Use Hitpoint Match mode to find the closest time stretch match, and tell the program to time stretch the whole Event by one fixed stretch factor.
This may be sufficient if you are working with rather short Events and audio with a fairly steady tempo. The method is described below, under the heading Fixed Time Stretch.
• Use Hitpoint Link mode and tell the program to quantize the audio Event. This means that the Match Points in the audio are quantized (moved to coincide with the Meter Hitpoints) and the audio material between the Match Points are stretched/contracted accordingly. This method works with long Events and audio with fluctuating tempo. It is described on the following pages under the heading Quantizing Audio.
For this to work, the audio should have a fairly steady beat, and the Match Points should be evenly distributed, for example on the quarter notes. However, it is sufficient if Match Points are inserted in the first two or three bars of the Event (i.e. they can be seen in the editor window at the same time).
1. Activate Master on the Transport Bar.In our example, this would be 4 (quarter note).
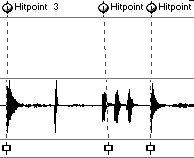
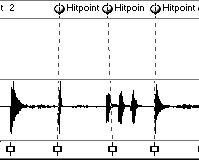
3. Pull down the Options pop-up menu and select Show Hitpoints Match. This will display vertical lines rising from the Match Points. If the position of the Match Points coincide with the Snap value, the lines will be fully drawn; if the Match Points are “off” the Snap value, the lines will be dotted (see the chapter “Hitpoints”).
4. Set the Tolerance pop-up to a fairly high percentage.
The higher the Tolerance percentage, the more “off” the Match Points are allowed to be and still be considered Matching.
Now, the object is to find a stretch factor for the audio where as many as possible of the M-Points are matching (shown with fully drawn vertical lines). This is done by visually stretching the waveform in the window, using the slider to the left.
5. Select a Stretch percentage range from the pop-up below the slider. This determines the maximum stretch range with the slider. If you for example select 4.2%, you may visually stretch the waveform ± 4.2%, with zero stretch in the slider’s middle position.
6. Move the slider and try to find the position where as many as possible of the vertical lines are fully drawn (matching).
To reset the slider to middle position (zero stretch), hold down [Ctrl] and click anywhere on the slider.
P As you move the slider, you will note that the waveform image is stretched (slider above middle position) or contracted (slider below middle position). This is only a visual help for you, to make it easier to find a match, and does not affect the actual Audio Event at this stage.
7. When you have found the best possible match, pull down the Audio pop-up menu and select Slider to Time Stretch.
This instructs the program to process the Audio Event using the Stretch factor set with the slider.
For this to work, Match Points should be inserted through the whole Event, and preferably evenly distributed, for example on every quarter note. It is possible to create a tempo map for an Audio Event with a lot of “syncopated” Match Points, but this will require you to insert and move Meter Hitpoints by hand (see step 5 below).
P Do not put Match Points too close! This might give rise to large stretch factors when quantizing, which in turn may produce a result that is not musically desirable.In our example, this would be 4 (quarter note).
3. Set the Left and Right Locators so that they encompass the Event.
Meter Hitpoints are inserted above the tempo curve, spaced according to the Snap setting.
5. If your Audio Event contains Match points that are not positioned on quarter notes, you need to insert Meter Hitpoints on the corresponding places as well. Also, if for some quarter notes in your Audio Event, there are no Match Points (for example in long breaks, pauses, etc), you have to delete the Meter Hitpoints on the corresponding positions.
This is because you will later perform a “link one by one”, where each Match Point is linked to exactly one Meter Hitpoint. If there is a Hitpoint or a Match Point “missing”, the wrong Match Points will be linked to the wrong Hitpoints.
P It is perfectly possible not to use the “Link One by One” function, and instead link the Hitpoints to the Matchpoints “by hand” as described in the chapter “Hitpoints”. If you choose to do this, the number of Hitpoints does not have to be the same as the number of Match Points.
6. Pull down the Option pop-up menu and select Show Hitpoint Links.7. Pull down the Do pop-up menu and select Link One by One.
Now, the program attempts to link each of the Meter Hitpoints to a Match Point, starting from the first one. If everything is OK, you should get a number of roughly vertical lines (if you made a good estimation of the audio tempo in step 2 above). If the angle of the lines changes abruptly from one line to the next, this indicates that there are dramatic tempo changes in the audio. If there are no such changes in the audio, the links are not correct and you need to insert or delete Meter Hitpoints. Repeat steps 5 to 7 until the links seem OK.
8. Pull down the Audio pop-up menu and select Quantize Audio.
This instructs the program to move each M-Point in the Audio Event to the position of the corresponding Meter Hitpoint, and timestretch the material in between.
If some parts of the Audio are in timing but some are not, a special situation arises. For example, let’s look at a drum loop where one beat is “off” but the rest is correct. When you now use Quantize Audio to put the faulty section right again, you must be careful to not also accidentally move parts of the correctly timed audio:
Here, the beat in the middle is played too early (note that the link line is dotted). If you perform a Quantize Audio with these three links, the faulty beat will be moved to a correct position.
But, Cubase VST will also stretch the audio to the left of the faulty beat (to fill up the gap when the beat is moved to the right). In our example, this will mean that this correctly timed beat is moved to the right, and will be out of timing!
In this example, the correct beat closest to the left of the faulty one is linked instead.
When you Quantize Audio, this section will be stretched. But since there are no actual beats within the section, this will not affect the rhythmic “feel” of the audio.
The essence of this is:P Always put one Match Point before and one after the sections you want to quantize, at the nearest beats (or other musical “events”) that are in timing, and “straight-line” link both these Match Points to meter hitpoints!
It may seem that an easy way to avoid the problem above would be to simply draw two Match Points immediately before and after the faulty beat, and very close to it, so that no important, correctly timed audio was affected. This is not a good idea! Putting Match Points too close might give rise to very large stretch factors when quantizing, which in turn may produce a result that is not audibly desirable.