• MIDI interfaces with built-in synchronization capabilities.
• Time Code (SMPTE) to MIDI Time Code converters.
• VITC (Vertical Interval Time Code, used in video editing systems) to MTC converters.
• MIDI devices (like other sequencers or disk based recording systems) which generate MIDI Time Code.
• Cubase VST is synchronized to the time code. In other words, the device transmitting the time code (for example the video deck or hard disk recording system) is the master and Cubase VST is the slave).
• The time code synchronization signals do not control Cubase VST’s tempo directly. Instead, the time code replaces Cubase VST’s internal “clock on the wall” type of clock, as displayed in the Time Position box on the Transport Bar. Cubase VST still follows the tempo set either on the Transport Bar or in the Master Track. However, if the time code coming in slows down or speeds up, this will affect Cubase VST’s internal clock and thereby the tempo (since the “minutes” in the “beats per minute” setting now varies).
2. If you are not using ASIO Positioning Protocol, pull down the From Input pop-up menu and select the input to which the time code is coming in.
Cubase VST is now expecting a time code synchronization signal from the specified port.
This tells Cubase VST to not expect MIDI Clock signals.
4. Use the pop-up in the dialog box to tell Cubase VST what Frame Rate to expect from the incoming code (see page 624 in this chapter).
Sync to time code activated
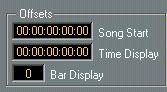
 5. Use the Song Start value to set which frame on the external device that should correspond to the beginning of the Song (position 1.1.1.0 in Cubase VST).
 6. Close the Synchronization dialog.
Set this to the time code position where you want the Song to start from the beginning.
This is actually not necessary, but probably preferable.7. On the Transport Bar, activate Sync by clicking on the button with the same name, or by pressing [X].
Cubase VST is now expecting MIDI Time Code to come in via the specified port.
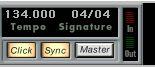
Sync activated on the Transport Bar.
8. If you want the tempo to follow the Master Track, activate Master on the Transport Bar.
9. Start the tape (or video, or...) that contains the time code. Cubase VST starts playing when it receives MIDI Time Code with a position “higher” than, or equal to, the Song Start frame.
You can wind the device that sends the MTC to any position and start from there.P When the device with the time code is stopped, you can use the Cubase VST transport controls as you normally do, when it is not synchronized.
If you synchronize Cubase VST to Time Code you should also look into the Time Display Offset described on page 629 and Sync Options described on page 632.