1. Create a Style Track.
This is done by creating a Track as usual, and changing its Track Class to Style Track, using the “C” column.
2. In the Inspector, activate the Style Track by setting the Mode pop-up menu in the Inspector to anything but Off.
Don’t select Slave unless you have a Chord Track.

There are two ways to select Styles from the Inspector:
• Pull down the Style pop-up menu and choose one of the available Styles.
or
• Click on one of the filled buttons below the pop-up menu.
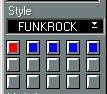 The button of the selected Style has a different color than the other buttons.
P Arrange windows that are open, or Set Aside on the Windows menu will also appear in the Style list. These can only be selected using the pop-up menu, not the buttons. Loading Styles
To load a ready-made Style (or one that you have previously created and saved yourself), proceed like this:
1. Click on an empty Style button.
A file selection dialog appears.
2. Select a file and open it.
Style files are normal Arrangements, but some data in the file is ignored when it is loaded as a Style (the Notepad, the Master Track, etc).
When you save your Song all the Styles are saved with it. You can also save Styles individually, see page 44.
Removing Styles
If you hold down [Alternate] and click on a Style select button, this "slot" is emptied.
OffSimply turns the Style Track off completely.
Slave
Makes the Style Track play the chords present on the Chord Track. See page 56.
Listening
In this mode, Cubase VST interprets the chords you play on the keyboard and uses this information to select a chord for the Style.
Please note that it is not the actual chord you play that is used, but rather the name of the chord that Cubase VST "extracts" out of your playing. For example, it doesn’t matter if you add an extra octave note or a root bass note, etc. No matter how you play it, the chord is interpreted as a major chord, and it is this interpretation that affects the Style Track.
P However, it does matter in what inversion you play the chord, as described on page 36.In this mode, you simply press one finger on the keyboard, and the program decides itself which chord should be used, and if it should be major or minor, etc. Exactly how these decisions are made by the program, is determined by the Easy Mode Scale and Easy Mode Key settings in the Style Track Edit window (see page 45 in this chapter).
RolandSame as above, but uses the “one-finger” (or actually two-finger) system used on Roland keyboards. See page 63 for details.
Yamaha
Same as above but for Yamaha, JVC and Technics keyboards. See page 64.
Casio
Again same as above but for Casio and Hohner keyboards. See page 64.
If the Master button on the Transport bar is “deactivated”, Cubase VST will use the Tempo stored in each Style. If you wish to set a Tempo yourself, activate the Master Track, open the Master Track editor and change the tempo.
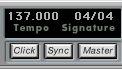 The Tempo stored in the Style is used.
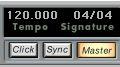 The Tempo set in the Master Track is used.
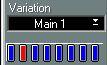
• There are always eight Variations.
• Style number 1 is always an Intro. This is always automatically followed by Style number 2.
• Style number 7 is always a "break". When this variation has played to its end, the program automatically returns to the variation that played before the break. (This does not apply in Random Select mode – see below – or when Play Snap is set to off – see page 51.)
• Style number 8 is always an Ending. When this has played to its end, the program stops.
• The Variations are always available on a pop-up menu in the Inspector. Use this pop-up menu to select a Variation.
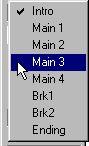
• If there are 8 Variations “or less” in the Style, the Styles also appear as buttons below the pop-up menu. Click on one of them to select it.
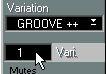
• If there are more than 8 Variations, they instead appear like this, where you can scroll through the numbers to select them.
Selecting Variations via MIDI
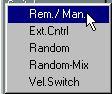
• If the Switch parameter in the Inspector is set to ”Rem./Man.”, you can use your MIDI keyboard or other controller as a remote control, to select Variations via MIDI.
Using Velocity Switch to select Variations
When the Switch parameter in the Inspector is set to “Vel. Switch”, the amount of velocity you use to play the keys on the keyboard (when selecting chords) is used to determine which variation will be used. If you use the one finger chord modes, you can use the same single finger to select both chords and variations!
Random switchingTwo Switch settings in the Inspector allow the “computer” to select Variations:
• Random
When you select this option, the program switches between the variations automatically, at random.
• Random-Mix
As Random, but the program also mixes between the Tracks. For example this may result in the bass playing variation 3 at the same time as the piano is playing variation 5.