 The Remote Mode is used to set up remote control of the selection of Variations, but there are also other controls that can be used in a live performance.
The Keyboard display
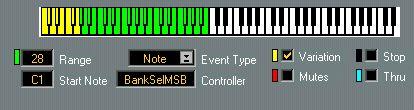
If you turn all options on, you will note that the displayed keyboard has several distinct areas indicated graphically. These correspond to different “remote commands”, described below.
If the Variation option is On, eight keys (shown in yellow) are used to
switch Variations.

If the Mute option is On, the eight red keys are used to mute and unmute the Tracks in the Style. The Range parameter
determines the number of keys (counted from the Start Note) that are used for chord input.

If the Stop option is On, one key (shown in black) is used to stop
the Style Track playback.
 The “normal” keys to the right
 are used for melody lines, etc. If the Thru option is On, the Chord Input keys will function as melody keys too.
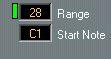
StartnoteYou may shift the entire set of keyboard "control zones" up and down the keyboard by changing the Startnote value. You would typically set Start to the lowest key on your keyboard.
RangeThis value determines how many keys on the controlling MIDI Instrument will be used to change chords. Exactly where on the keyboard these “chord keys” will be situated, depends on the Startnote value, and on the other controlling options (if these are activated or not). The resulting key range is shown on the keyboard display with a “light grey” pattern.
EventtypeThis parameter allows you to switch between two different ways to remote control the Style Track. The options are:
• Note (MIDI Notes are used for remote control).
• Prg (MIDI Program Change messages are used).
How Program Change messages are used is described on page 55.
Controller
If the Switch setting in the Inspector is set to Ext. Control, you can use MIDI Control Change messages to switch between variations:
• Set Controller to the Control Change number you plan to use.
Preferably select a Continuous Controller (like a modulation wheel or Data Entry slider) since a Controller switch (such as a sustain pedal) will only toggle between the first and last Variation.
This is a checkbox, determining if change of Variations should be remote controlled or not.
• If Variation is checked, the key area used for Variations will be shown in a “middle grey” pattern on the keyboard display.
The keys correspond to one Variation each, with the first Variation on the leftmost key.
When Mute is activated (checked), a range of eight keys indicated with dark grey can be used to mute/unmute the Tracks in the Style (the Tracks can be seen in the list at the top of the window). Use this for creating variations when playing live or to create breaks (by for example muting the drums).
StopIf you check this box, the "Stop" key is activated. When active, this is the lowest key of all the "remote keys", and its position on the keyboard is indicated in reverse video; that is, if it is on a white key it is black and vice versa.
• If you press the Stop key on your MIDI controller, the Style Track will be stopped. This can be used to turn the Style Track off completely, to create a break or to end a song. When you select a variation again, the playback commences as before (you may select a new style while the program is in "off" mode).
Thru“Above” (to the right of) all other key areas is a range of normal black/white keys. These will always transmit regular MIDI notes on MIDI Channel 1. You can use this to add a melody to the Style Tracks output, by setting up a sound that receives on this Output and MIDI Channel.
If you have the Thru setting in the remote section turned on, the Chord Input keys will also be Thru-put on the same MIDI Channel and Output. This can for example be used to layer a pad sound onto the chords from the Style.
Using Program Change for remote controlYou can control the "Stop" function, plus Variation selection and Mute via Program Change, not only via your MIDI keyboard (as described above). For example you may have a master keyboard with buttons that transmit Program Change, or you might use a MIDI equipped foot control.
• Click on the Eventtype value field to change it to “Prg”.This enables remote control by Program Change messages.
Now, the first Program Change numbers will control the Remote Functions as follows. Exactly which number is used for what follows the same logic as the keys on the keyboard, the lowest number (Program Change 1) is always used for the Stop function if it is activated, after this follows Variations and then Mutes, if they are in turn activated. The table below shows all the possibilities:
FunctionsOff only
Variation only
Mute only
Off + Variation
Off + Mute
Mute + Variation Off+Mute+Variation
1 None None None 1-8 None None None 1-8
1 2-9 None
1 None 2-9 None 1-8 9-16
1 2-9 10-17
• If Status is set to “Note”, Program Change numbers 1 to 15 are used.
• If Status is set to “Program”, the first fifteen Program Change numbers "above" the ones already used (see table above) will be used.