 2. Create a new Arrangement.
 1. Create as many Tracks as your Style needs.
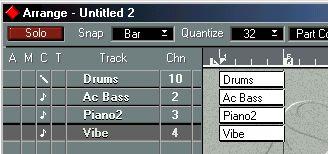
You might for example create one Track for drums, one for a bassline, etc. (MIDI and Drum Tracks can be used.)
2. Name the Tracks.
By naming the Tracks, you also name the Tracks of the Style. Make it a habit to always name the Tracks after the instrument they play.
The Inspector settings you do for the Tracks will be the settings the Style will use, the settings that are displayed in the Style Tracks Edit window:
1. Set each Track to the desired MIDI Output.
2. Set each Track to the desired MIDI Channel.
If you are creating Styles for others to use, we recommend that you put the drums on MIDI Channel 10. Otherwise you can use any Channel you wish.
3. Set a Program Change value and Volume for each Track.
If you are creating Styles for others to use, we recommend you to stick with General MIDI Program numbers. This will make it easy for GM users to use the Styles right away. Other users can always map the sounds as they like.
P
Avoid other Inspector settings, like Transpose and Delay. If you wish to for example Transpose or Delay a Part, use the editing functions to permanently change the recording instead.
Setting Up for Drums
For rhythms and drum patterns in the Style, we recommend you to always use Drum Tracks and the General MIDI Drum Map that comes with the program. In fact, if you only create Styles for your own use, you might skip this rule. But on the other hand, if you plan to mix and match Styles that you have created and that somebody else did, it might be just as well following it. Steinberg Styles always use the General MIDI Drum Map.
Creating Parts for the first Variation1. Create empty Parts on each Track, for the first Variation. These Parts must be of equal length.
You might for example create one two bar Part on each Track.
 P
Parts used in Styles should never exceed 64 bars in length.
P
Parts used in Styles should never exceed 64 bars in length.If you don't, the Style will play back in the wrong key when you use it.
• Do not play any chord changes!
Remember that you are creating a model for an arrangement, not the entire arrangement.
• Add all tensions to the chords that could possibly fit the arrangement. Style Tracks can never add any notes by itself, so if you never add that “9th”, it will never be played, even if you (or whoever is using the Style) input a “9” chord.
However, even if you add a tension, it will be left out or transposed when it doesn’t fit the current scale and the Parameter settings. Therefore, it is better to add tensions than to leave them out.
• If possible, Quantize your Styles.
This ensures that switching between Variations in for example the middle of a bar will be smooth and will not lead to any “cut off”, “flam” or double notes.
• If you anticipate that Random switching between Styles will be used, or if switching between Variations in the middle of a bar will be frequent, don't make the Variations too different.
In fact, you will probably find that less difference between Variations will also make general musical sense.• You may insert Program Change commands and Volume Events into the Parts (as Events), but if your Style will be used by anyone else, please note that you do not know when the “user” will switch from one Variation to another, which means he/she might then enter into a new Variation with the wrong Program or Volume.
Checking and EditingP Make sure you change the Inspector settings for the whole Track, not for each Part! Also, avoid settings like Transpose and Delay (Transposition and Delaying should be done by permanently changing the recording in an editor).