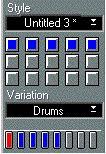
 Your new Style currently only has one Variation.
3. Set the Style Track to Listening mode (or Easy mode or one of the other “one-finger” modes, if you prefer).
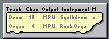 The Tracklist Mode icon.
6. Take a look at the Tracks in the Style Track Edit list.
You will see that they are named like, and have the same settings as in the Arrange window where you recorded them.

7. If you want others to be able to use your Style, you probably should click in the “M” column to activate Mapping for the Tracks.
This is described on page 47.
8. Set each Track to the right Mode.
The Mode governs how the Track will be played back. When you create a “new” Style, all Tracks will be set to Slaved, except the first Track, which will be set to Mapped if it is a Drum Track and Normal if it is a MIDI Track. This is because the program assumes that the first Track holds the drums and the rest Parts with regular tonality.
Normal
Transpose2 The output is not modified at all. No transposition, no mapping to notes, no nothing. The Track just plays back as it was recorded. Use this for drum and percussion Parts which are not playing back via the drum map (see below).
The output of the Track is played back via the current Drum Map, just as with regular Drum Tracks. It is not transposed or modified in any other way. This is the type we recommend for your drum and percussion Parts.
This is the most common Mode for regular Tracks like bass, piano etc. It will transpose them to the chord and modify their output to the tonality (the scale). In this mode, the output from the Track is modified to the tonality, but not transposed! Use this for lines like arpeggios which are to be relatively “fixed” in pitch. The output is transposed to the Key of the last recognized Chord, but the notes are not mapped to the tonality or modified in any other way.The output is transposed to the Key of the last recognized Chord and mapped to the tonality of the scale.
The difference between this mode and Slaved is that the Track does not look at the contents of the chords that are coming in, instead it simply gets transposed and then “constrained” to the notes in the current scale.
If you have for example a bass line on a Track, this might play back closer to the original in Transpose2 mode than in Slaved, since more notes are normally “allowed”.