Studio Module – Guided Tour Getting to know the Studio Module
This chapter will show you how to retrieve all the settings in your instruments in one go, and store it all on disk. It will then show you what information the Studio Module was able to extract out of those dumps, and how you can use it to make everyday work in Cubase a lot smoother.
This chapter will talk specifically about devices which you might or not might have. However, what we say about one multitimbral synthesizer will apply to most other multitimbral synths; what we say about one effect unit will apply to most effect units, etc.
1. First make sure you have set up your devices and have tested them all. 2. Also make sure you have done your homework when it comes to Total Recall "patches". You should have the default "All" setting, plus one more for every day use, which has less Data Types activated for each device.
• The following text assumes that you are currently facing your regular Arrange window.
3. Pull down the Modules menu, select "Studio Module" and from the list that appears, "Total Receive...". If you created a "custom" "Total Recall Patch", another list appears asking you if you want to use that or the default ALL one. Since this is the first time you do this, you should probably select "ALL" to create a full safety copy of all the settings in all devices.
4. A file selector now appears, where you are prompted to type in a name (maybe today's date is a good choice?) and find a location for the file that is being created.
P
This file might be relatively big, so don't try to store it on an already half full floppy. Do not store it in the STUDIO.DAT directory either. The best alternative is probably to use a directory created specially for your data dumps.
The program will now switch in one device at a time and collect all settings for each one. If your Setup is defined so, you might be prompted to make new MIDI Patchbay settings or to initiate a dump from a devices front panel. If you encounter any problems during this procedure, please look up page 158.
P
This function can only be used when Cubase is stopped.
When the dump is done, you return to the Arrange window. Now let's see what the Studio Module has managed to do:
1. Select an empty Track.
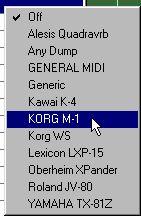
2. Press the mouse button in the Instrument column and select “Studio Module Instruments”.
A pop-up menu appears listing all your devices.
 3. Select one. If this device can handle several types of Patches (see below) yet another list appears.

For a while, lets assume you have a Korg M1. Then this list will contain items for “Programs, Combis and Child 1 to 8” (the eight Programs you can access from within a Combi).
While this naming is specific to the M1, the principle applies to all multitimbral synthesizers, as follows:
• Selecting Combi will do three things: set the M1 to Combi Mode, set the Track to the Output of the M1 and the MIDI Channel to the global MIDI Channel of the M1. This way you will be able to select Combis from that Track. A Combi in an M1 is a selection of up to eight sounds (called Programs in the M1) that are each set to receive on a certain MIDI Channel.
• Selecting Program will put the M1 into Program Mode (one Program at a time), and set the Track to the Output and MIDI Channel used to play and select one Program at a time.
• Selecting Child 1 to Child 8 will set the M1 to Combi mode and make the Track output to one of the Programs in the current Combi. This is the most advanced and powerful option, so let's leave it for a while. It is described in detail on page 141. You can of course try it if you want it, the only trick is to get the MIDI Channel setting right. If you have a multitimbral synth which always receives on a fixed set of MIDI Channels, this option will work as expected right away. The specific thing about the M1 (and many other synths) is that the user can set the MIDI Channels in the Combi him/herself, which makes things slightly more complicated.
4. To keep things clear for now, select the option that lets you play a single sound on your synthesizer. On the M1 this would be "Program".
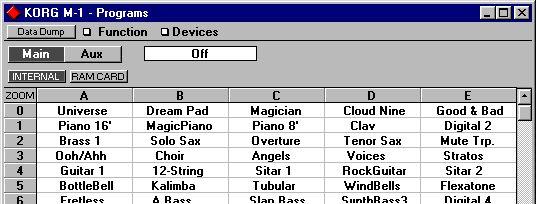
5. Click the Patchname pop-up in the Inspector. This launches the Studio Module's Patch Manager (if the device has Patches, otherwise the Data Dump window appears. If this happens, click Exit and try again with another device).

• In the Studio Module we call individual settings in a device Patches. A Patch can be a sound, a collection of sounds for a multitimbral setup, an effect setting in a reverb, etc. The definition is: any individual setting that can be selected via MIDI using Bank Select or Program Change messages, or in some cases, System Exclusive messages. In your equipment, a Patch might be called Program, Voice, Tone, Timbre, etc. No two manufacturers seem to have the same naming...
• The Patch window will display all the Patches in the device you have selected for the Track, by name (if the device uses names) in rows and columns. These names were extracted out of the device during the Total Recall. By clicking on one of them, the corresponding Patch gets selected in device, and you can try it out directly by playing your keyboard as you would normally when recording into Cubase (make sure you still have that same Track selected!). Furthermore, the Track will now be permanently set to play this Patch, until you change this. Let's have a look at this:
6. Close the Patch Manager, so that you return to the Arrange window. There are two ways to display the Patch selected for a Track: you can open the Inspector and check the Patchname field when the Track is selected (do not select any Part!).

7. You can also click the “heading” in the Instrument column, which opens a pop-up menu. Select "Patchname" from the menu, and a column is added to the left of the Instrument column which displays the selected Patch for each Track (you have only selected a Patch for one Track yet!).
8. If you wish, you can create another Track or select a new empty one. Then click in the Instrument/Patch column to select a device for that Track and double click to see all the available Patches for this Instrument.
When you are in the Patch Manager window, take the time to try out two other features:
• If the memory in your device is divided into Banks (each Bank contains a number of Patches), this will be indicated by a row of Bank buttons to select from.

• Although Memory Cards are supported, they require some special handling. For more details, see page 121. • A Patch can be renamed by holding down [Alt] and double clicking on a name (just as a Part), assuming the device supports renaming. This does not send out the new name to the actual device, you have to do that specifically (see page 116).
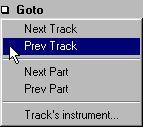
• By using the pop-up Goto menu (or the up/down cursor keys on the computer keyboard) you can pass between the Tracks that you have assigned Instruments to, and the Patch Manager will get updated and show the available Patch for each Track.

• If you double click on a Patch, a Macro Editor will be opened, if one exists for this particular device. Here you can make adjustments to the Patch. The details can be found on page 131.
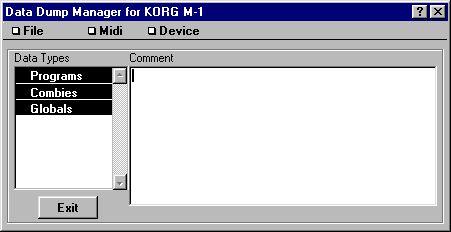
Finally, let's have a brief look at the last window in the Studio Module, the Data Dump Manager. This is accessed by clicking on the Data Dump button at the top left in the window.

In this window you can get and send data from individual devices. If you for example changed some setting using the front panel of your synthesizer, you can update the Patch Manager by selecting this device from the device menu and then select "Receive..." from the pop-up MIDI menu. Close this window by clicking the Exit button.
Following these instructions you have barely scratched the surface of all the possibilities this ingenious piece of software offers! Please read through the following chapters at least once and try out the possibilities in each section.


