Read as much as you wish of this text, and don’t feel intimidated by its technical nature. If you don’t wish to get into heavy MIDI-hacking, skip the details on the Input Line and the different types of messages and concentrate on the Status and Extra menus and the Learn function, since these features alone allow you to make an Object without typing a single number!
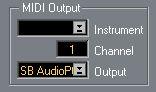
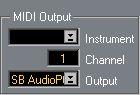 Each Object can transmit to a different MIDI Channel and Output. The combination of Channel and Output can of course be handled as an Instrument, as usual. P
System Exclusive messages don’t have a MIDI Channel value.
Each Object can transmit to a different MIDI Channel and Output. The combination of Channel and Output can of course be handled as an Instrument, as usual. P
System Exclusive messages don’t have a MIDI Channel value. 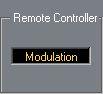
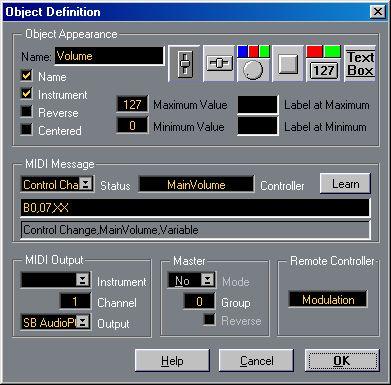
The Objects can be controlled (“played”) via MIDI using MIDI Controller messages, as described on page 10. This field is used to select the Controller you wish to use for external control of this Object.
P Observe that which MIDI Channel the Controller is coming in on is irrelevant. You therefore have to give each Object different Controller numbers.Remote Controllers either work on all Objects or on selected ones only, see page 10.
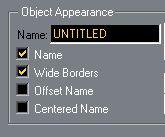
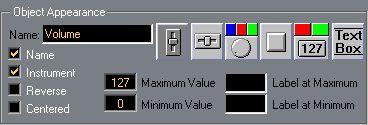 Name
NameThis is simply the Object’s name. You edit the name directly in this field. Twelve characters are maximum.
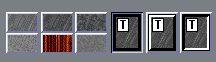
Object type
The six icons represent the different types of Objects, as described on page 7. For more info on Text Objects, see below.
You can set a minimum and maximum value for any “playable” (non-text) Object. The maximum range is 0 to 127. The minimum range is two adjacent numbers, for example 6 and 7 for all Objects except Switches.
• Many System Exclusive functions change between 0 and 1, so you could make up an On/OffSwitch that sends out these values when you click on it.
• Another example: Controller switches (like Sustain Pedal) should have 0 for off and 127 for
on. Use a Switch for this with 0 and 127 as min and max settings.
• If the Object type is a Switch, you can set the same min and max value, which allows you to
send out exactly the same message each time you click on the switch. Use this for Static Controller messages like Mode Changes or for specific System Exclusive messages that should always be the same.
If you wish you can also label the min and max values in the two small name-fields to the right of each value. These names are then shown beside the end positions for the faders and the dial.
The Name and Instrument checkboxesBy clicking in these two fields you can decide if the Object’s name (as entered at the top of the dialog box) and Instrument setting (Output and MIDI Channel) should be displayed with the Object or not.
CenteredFor Dials you can decide if you want the center value indicated graphically above the knob. Some Controller messages, like Pan and Balance, are convenient to think of as having center values (for example “no panning”) and changes that go “up or down” (pan left, pan right) from that position. For those you should select Centered Mode.
ReversedThis parameter makes it possible to make an Object go “backwards”, like for example a fader with the highest value at the bottom, and the lowest at the top. For On/ Off switches this parameter is used to decide which value should be sent out when the switch is pressed/not pressed.
About overlapping Text Objects
Putting different style Text Objects on top of each other allows you to create backgrounds with various looks.
Selecting Borders and Fills
If you select the text Object icon, options for borders and fill patterns appear. Click on the combination of these that you desire.
 Creating a 3-D Background
If you want a background that looks like the rightmost of the three border options, proceed as follows:
1. Create a text Object slightly smaller than the total background. Use the rightmost border option and fill pattern grey for this Object. Also make sure “Wide Borders” is unchecked.
2. Make up another text Object, slightly bigger than the first one. Select the leftmost border type and grey pattern and uncheck “Wide Borders” again if needed. Click OK. 3. Move the Objects, size them and Bring them To Front and Send Behind until it looks as desired.
 A “3D” background made up of two overlapping text Objects.
Show Title, Wide Borders, Centered Name and Offset Name
When Text is selected,
these check boxes get
a slightly different
functionality.
• If ”Name” is ticked, the name of the Object is displayed inside it.
• By checking different combinations of “Centered Name” and “Offset Name” you can have the name put in the top left or top right corner, in the middle or in the center along the top border.
•“Wide Borders” allows you to select between thin and wide borders.
 A text Object with Wide borders.
 The Input and Info Lines
The Input Line
 The Info Line
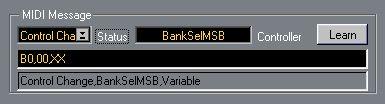
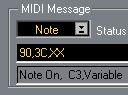
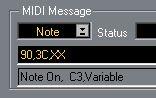
The Input Line is the core of the Object. You use it to decide what MIDI messages the Object should send out.
If you are a real MIDI hacker you can just type in the message on the Input Line (the top line).
1. Click once on the Input Line.
P You must insert commas after each complete byte (each two characters).
The Info Line
The decoded version of the message is shown on the Info Line with and as much as possible is interpreted into text so that it is fairly easy to understand.
Numbers are always shown in regular decimal format on the Info Line (not in hexadecimal as on the Input Line). This allows you to use the Input and Info Lines for automatic conversion from hexa-decimal to decimal.

 The Status and Extra menus
If you are not used to typing hexa-decimal numbers (who is?), there is a pop-up menu and a value field there to help you. On the Status menu you find a list of the possible Status Bytes, as described below. Select one and it appears on the line. Beside this is a value field that changes name depending on the selected Status Byte. This helps you to fill out the rest of the “form”. What you find when scrolling this value depends on what kind of Status Byte you have selected or typed in, as described for each MIDI Message later in this text.
LearnSometimes you may not know exactly which controller number or note number you want an Object to send out. For example on a MIDI Controlled mixing console, each fader may send out a message that could either be a certain note number with different velocities or some Controller number with different values. In these cases, the Cubase VST Learn function will help you out. This method works with Notes, Controllers and System Exclusive messages. It can be applied to many situations.
1. Check that the unit’s MIDI Out is connected to Cubase VST.2. With the Object dialog box open, move the fader, play the key, turn the knob, or do whatever you need to do on your MIDI device to input a couple of examples of the MIDI message you want the Object to send out.
3. Click on Learn.
On the input line you should now have a complete message, with the right Note number, Controller number, or a System Exclusive “string”, with an XX inserted at the correct position.
P The MIDI Channel setting is not “Learned”, you have to set that yourself when applicable.Only some synthesizers send out System Exclusive messages when you edit parameters on the front panel. If it does, this would then be the same message that you should send in to the unit to change that parameter via MIDI. This allows Cubase VST to automatically learn how such a message should be built up.
• The sending of Sys Ex messages from a unit can normally be turned on or off. Make sure it is turned on.
• To send out the right message you must select the parameter to be changed, and change its value a couple of times up and down.
• Do not confuse transmission of System Exclusive data with the Controller messages that are normally sent out just because you move the Data Entry knob or slider, or use the Up and Down or + and – keys on a unit (Controller number 6, 96 and 97).
• If the learning of the System Exclusive message has worked, you should probably find the manufacturers name in the decoded version of the message displayed on the Info Line.
Everything on the Input Line is in hexa-decimal format. This means that only numbers 0 to 9 and characters A to F (which means 10 to 15 in decimal notation) can be entered. You can type upper case (A-F) or lower case (a-f) letters, it doesn’t matter which. When hexa-decimal numbers are indicated in this manual, the number (or letter) is followed by a subscript “16". 127 (decimal) is consequently written like this: 7F16. There are other ways of indicating hexa-decimal format also, (for example by a prefix $ or a suffix H or h) but the subscript format is used in the following text.
A table for conversion between Decimal, Hexa-Decimal and Binary formats is found on page 49. Different manufacturers use different formats (decimal, binary, hexadecimal) in their documentation, so use this table to convert to hexa-decimal when you are copying messages from an operation manual or similar.
Each two characters between commas on the Input Line represent a byte, a number between 0 and 255. The idea of using hexa-decimal format is that it only takes two “digits” to represent all values between 0 and 255.
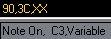
The Value ByteThe bytes on the Input Line form the MIDI message sent out. Somewhere in your message you must enter XX (or xx). This is the variable, the value that changes when you use the Object. If the Object for example is a fader, this will be the position of the fader, the value that changes when you Play it.
Let’s say that you type in “90,3C,XX” and move the fader handle from position 8 to 9. This will make the fader send out 903C0916. The first two bytes are the ones you typed in, the third byte is the new position of the fader.
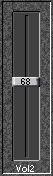
When you move the handle, its value (in this case “68”) is inserted into the message at the position of the “XXs”.
 How MIDI messages are organised
• All MIDI messages begin with a Status Byte, a code telling what type of message it is.
• After the Status Byte come one, two ore more data bytes. These are always between 0016 and 7F16 (0 to 127 decimal).
• Most MIDI messages contain a MIDI Channel number as a part of the Status Byte. If the message on the Input Line is one of those, the Object will always send out its messages on the MIDI Channel selected at the top of the dialog box. Just as when you set a playback MIDI Channel for a Track in the Arrange window.
If the message type has a MIDI Channel, the MIDI
Channel setting is inserted as the second digit in
the Status Byte. In this case, “90” means a Note On
message (denoted by the 9) on MIDI Channel 1
(denoted by the 0).
 Error Checking
When you have typed or used the menus (or a combination of both techniques) to enter a message, you should click the mouse or press [Return] to let the program check for errors. Such errors could be: Other characters than the ones allowed, more than one Status Byte, no XX (variable) field, and so on. A dialog box will inform you so that you can correct the mistake.
Note On messages start with 9016. Note Off messages start with 8016. The Status Byte menu always enters Note On status (9016).
After the Status Byte should follow a note number (which key) and a velocity number. These both range from 0 to 127 (0016 to 7F16) and you can replace either one with the variable XX.
Status Byte

Sending out streams of Note Ons from for example a fader to your synthesizers, may not be such a good idea, since this will turn on a lot of notes without turning them off. But some MIDI mixing systems use Note messages to control volume and other functions, with for example one note number for each fader and the velocity value representing the fader’s position.
Poly PressureThis is a type of key pressure that is individual for each key. The first byte you get, when you select Poly-Press from the Status Byte menu, is A016.
After the Status Byte follows two data bytes, one that tells which key, and one that represents the amount of pressure. This can normally be used to control a number of parameters in a synthesizer, such as volume, vibrato or filter frequency. Use this instead of Channel Pressure (Aftertouch, see below) if you wish to have individual control of certain notes.
Status Byte
 The extra value field is not used for Poly Pressure.
Control Change
This is the most obvious purpose for the MIDI Mixer window. Controllers can be used for almost any function.
Controller messages start with B016 so this is what you get if you select CtrlChange from the Status Byte menu.
The second byte is the number of the Controller. If you have entered the Status Byte for Controllers, you can use the left/right mouse buttons to scroll through all Controllers in the value field to the right of the Status pop-up. Select the one you want.
The last byte in a Controller message is the value for the selected Controller, and this is probably where you will put your XXs, so that the Object can be used for adjusting the value of the Controller.
Status Byte

Controllers can be used for almost any purpose, some of them are defined by the MIDI standard and others are not. Many synthesizers and effect units (like reverbs) can be programmed to react to controller messages, and MIDI-controlled mixer systems use them for faders, knobs and other controls.
Figuring out exactly which Controller number does what may take some searching in the unit's operation manual, but the information should definitely be there. Often, for example on a signal processor, you can assign numbers to parameters yourself, like one Controller number for reverb volume, another for reverb decay, and so on. If you do this, start with the Controller numbers reserved for “user experimenting” 16-19 (1016-1316), and 80-83 (5016 to 5316) to avoid number conflicts with other units. Remember that you may use the same Controller number for two different purposes on two different units as long as they receive on different MIDI Channels.
Registered and Non-Registered Parameter NumbersThe devoted MIDI fan can also use the Objects to send out Register Parameter numbers (RPNs) and Non-Registered Parameter Numbers (NRPNs). Proceed as follows:
• To send a Registered Parameter number, input (in hex):
B0,65,MSB,64,LSB,06,DMSB,26,DLSB.
The LSB and MSB should be replaced by numbers. They form the number of the Registered Parameter. You should also replace either the DLSB or the DMSB with the XXs and the other with a number, depending on how you want to change the value.
• To send a Non-Registered Parameter number, input:
B0,63,MSB,62,LSB,06,DMSB,26,DLSB.
The abbreviations should be replaced as with the registered parameters.
These messages are normally used to make an external unit switch to another Program (sometimes called Patch, Timbre, Set, Instrument, Combination or something else). Their Status Byte is C016. Program Change messages only have one value (the Program Number), so after the Status Byte is where your XX’s go.
Status Byte

Aftertouch
This is often called Channel Aftertouch or Channel Pressure. The first byte is D016.
Status Byte
 Pitch Bend
If you have come this far in the text you probably knew what Pitch Bend was before you started reading! The status code should read E016 in the dialog box. The two values that come after this represent coarse and fine changes. The coarse value (the second data byte) represents the full swing of a Pitch Bend wheel with 0016 as full negative, 4016 as middle (no Pitch Bend) and 7F16 as full positive swing. Within each of these steps you can fine tune the bend by setting the first data byte to anything between 0016 and 7F16. To create normal Pitch Bend you would probably change the second byte, which means that the line should look like this: E0,00,XX.
Status Byte
 Sys Ex
System Exclusive messages are the only MIDI messages that don’t follow any specific standard. A System Exclusive message may contain a Channel number (or a similar value called a “device number”) but this may be found anywhere within the message and Cubase VST is therefore not able to find it and replace it with the Channel number set at the top of the dialog box.
If it applies, you have to enter the right Channel number directly, somewhere into the message.Sys Ex messages always start with F016, and after that comes a number which represents the manufacturer (Roland have 4116, Yamaha 4316 and so on, but this may be more than one byte). After this comes (almost) anything that the manufacturer has decided makes sense for their products. The whole message always ends with a F716 (End Of Exclusive, EOX).
Sys Ex is mostly used for two things, sending out and receiving complete Programs (Patches, Timbres...) to and from a unit, and for changing individual parameters. You probably could make a MIDI Mixer Object ask a synthesizer to give away a copy of all the settings in all Programs or something like that, but it isn’t really well suited for that. The System Exclusive messages you will send out from the MIDI Mixer window will probably be aimed at changing individual parameters.
It is hard to say how these messages should be built up, but here is some general rules:
• The whole thing starts with F016 (beginning of System Exclusive), followed by the manufacturers code.
• After this often comes a Device Number, which is almost the same as a MIDI Channel number. It is used if you have two units of the same model and wish to be able to address them individually. This number is often set with a parameter on the unit called “Global MIDI Channel” or “Device Number”, “ID Number” or something like that.
• After this comes a number the manufacturer uses to identify the model (Ensoniq has one number for the EPS, one for the SQ-80, yet another for the VFX and so on).
• What we have described up to now is often called the “System Exclusive header”. After that comes a code telling that you want to access parameters, followed by a number telling exactly which parameter, and finally a byte for the value of it (this is where your XX goes).
• And finally End of System Exclusive (F716). All in all a message of something between six and fifteen bytes.
To make this work, you must set the receiving unit to receive System Exclusive messages and make sure that any “Global MIDI Channel”, “Device Number” or “ID Number” is correct. Also save a copy of the programs in the unit before starting to experiment, since instruments have been known misbehave when sent incorrectly formatted data.
Information on how to build up System Exclusive messages is often found in the back of the unit’s operation manual (in fine print!). Otherwise, it can always be requested from the manufacturer. Either way, it is no light reading!
The Extra Menu for System Exclusive Messages
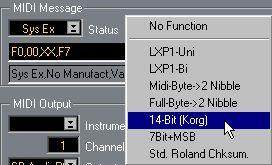
If you select SysEx from the Status Byte pop-up, the value field to the right turns into another pop-up menu, which works in a pretty special way. Due to MIDI’s nature, you can’t send data bytes with values higher than 127 (7F16). Many parameters on synthesizers vary between larger numbers than that (for example -99 to +99) so Cubase VST has a few tricks up its sleeve (or rather up the Extra menu) to make an Object able to send the full range of values for that parameter although the Objects max and min values are always 0 and 127. Let’s get technical:
Function
No Function
Lxp-Uni and Lxp-Bi
MIDI Byte -> 2 Nibble
Full Byte -> 2 Nibble
Description
The variable is not converted.
These two are for the Lexicon LXP-1. More information is found in the LXP-1 operation manual.
A byte formed as a MIDI byte (0 to 127 only) is converted into two nibbles (four-bit packages) each sent out in the MIDI format.
As above but the variable extrapolated to a full byte, i.e. a byte ranging from 0 to 255. This is then converted into two nibbles. The Ensoniq VFX uses this format.
The variable is extrapolated to a 14 bit “bi-polar” (allowing + and – settings) value for use with the Korg M- and T-series synthesizers.
The variable is extrapolated to a full byte (0 to 255) and the most significant bit is sent out with the first byte, and the rest of the value is sent out with the second byte. Oberheim uses this format with eg the Matrix synthesizers.
If you plan to use any of the data formats described above (except No Function of course), put the Variable (XX) in where the section of the Sys Ex message that changes with the Object begins. Enter 00 as next byte to make room for the extrapolated data as explained above and select one of the described types of conversion of the variable from the Extra menu.
Using ChecksumsSome synths need a checksum for each Sys Ex message. If you select "Std Roland Checksum", from the Extra menu, a checksum is automatically sent out Roland synthesizers.