Cubase with RocketPower is a version update for your Cubase VST application with added functionality for online collaboration. This section covers setting up Cubase VST with RocketPower, activating RocketPower and using RocketPower Features. Start by launching Cubase VST with Rocket Power.
Rocket Network menu items are located under
Panels>Rocket Network on the Macintosh and
under Modules>Rocket Network on Windows.
You will not see theRocketNetwork menu item
under Modules on Windows until after you click
the RocketPower button in your arrangement
window and log in.
All items in the Rocket Network
menu except ‘RocketPower’ and
‘Preferences…’will be disabled
until you enter a studio.
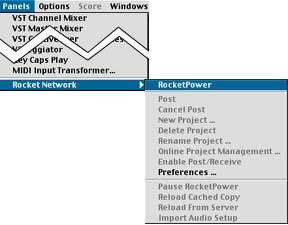 Mac Rocket Network Menu
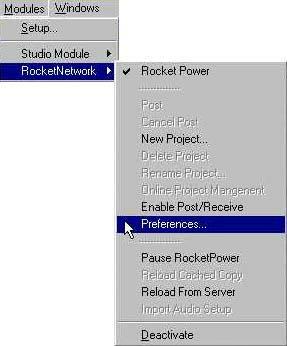 Windows Rocket Network Menu
 RocketPower
---
Post
Cancel Post
New Project…
Rename Project…
Delete Project
Online Project Management
Enable Post/Receive
Preferences…
---
Pause RocketPower
Reload Cached Copy
Reload from server
Import Audio Setup
activates RocketPower in Cubase & launches RocketControl
transfers any new data from your machine to the server cancels the Post command
creates a new project in the current studio
changes the name of the current project
deletes the project in the current studio
brings up the studio page in your web browser
activates Post and Receive in Cubase
opens the RocketPower preferences in Cubase
pauses Post and Receive commands
reloads the project from your local folder
reloads the project from data on the server
changes your plugin structure to match that of the project owner The Rocket Preferences and Audio Pool are used to manage the media you are using and the compression levels that you are posting and receiving. In the preferences you set your default qualities. In the Audio Pool you can manually override the default quality or download additional compression qualities. The compression qualities are important to consider in association with your bandwidth and with the level of project you are producing. If you are on a modem dial up you will probably want to work at preview level. If you are on a fast connection you may want to work at a higher quality from the start. For those on fast connections uploading source, you should also check ‘Low’so that those on slower connections can download the more compressed files. For final production make sure that everyone uploads their source files.
NOTE: Renderings are files of different compression created from source media. These renderings can be sent in place of the source media to save upload and download time. The source media is also considered a rendering.
Download Quality - Select the quality of files to receive Upload Quality – Select the renderings to send from your machine when Posting. (See RocketControl Preferences for more on compression ratios for each rendering quality) Default Midi Devices – Set your default GM (General MIDI) device.
Auto Allocate MIDI channel – Check this box to allocate channels to MIDI automatically, rather than keeping the sender’s channel assignment. Good for avoiding track conflicts in your local setup, but hard to keep tracks coordinated with fellow collaborators.
Auto Allocate Audio channel – Check this box to allocate channels to incoming audio tracks automatically. Good for avoiding track conflicts in your local setup, but hard to keep tracks straight with fellow collaborators.
Erase unused before Posting – Destructive edit on all audio not included in the arrangement when you post. CAUTION! Be sure you want to delete unused audio when using this setting.
Use Coloring and Sort by Owner – Check this box to have incoming tracks organized and colored by owner. Automatically Enable Post/Receive when entering a Studio
No - manually enable Post/Receive whenever you
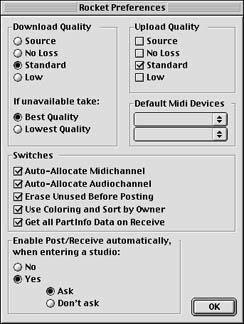
enter a Studio by clicking the receive button on the
Arrangement Window
Yes - automatic receive enabled
Ask - a dialog asking if you would like to receive the project appears on studio entry Don’t Ask - you will automatically receive the project on studio entry
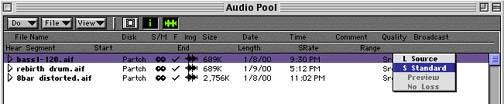
From the Cubase Audio Pool you can individually or collectively manage the renderings that you send to and receive from the server. Your default Post and Receive rendering qualities are set in the preferences. However, after working on a project with Standard or Preview renderings, you may want to upload and download source renderings to complete the project. The items below describe the tools available in the Audio Pool to accomplish this task.
Macintosh: Quality -Broadcast - Popup menu shows renderings available. Select the rendering to be inserted into the Arrange window. Renderings that are not available will be grayed-out. If you select a rendering that is not available locally, it will be downloaded from the server when selected in the popup menu.
Checked items shown in the popup menu are currently posted. Select unchecked items to post those renderings to the server.
Convert SDII to AIFF - Converts SDII files in the audio pool to AIFF.
Delete Low Quality Renderings - Deletes low quality renderings locally. These renderings may be received
Get Best Quality - Post Best Quality - again by selecting them from the Quality popup menu in the Audio Pool. Receives best quality renderings available from the server of all files in the audio pool. Posts source renderings of all owned files in the audio pool.
Windows: Quality -Post as - Popup menu shows renderings available. Select the rendering to be inserted into the Arrange window. Renderings that are not available will be grayed-out. If you select a rendering that is not available locally, the file will be downloaded from the server when selected from the popup menu.
Checked items shown in the popup menu are currently posted. Select unchecked items to post those renderings to the server.
Delete Low Quality Renderings - Deletes low quality renderings locally. These renderings may be received again by selecting them from the Quality popup menu in the Audio Pool.
Get Best Quality - Receives best quality renderings available from the server of all files in the audio pool.
Post Best Quality - Posts source renderings of all owned files in the audio pool.
Rocket Network provides three choices for compression when sending or receiving files. Ideally you will post all three renderings. Users with slower connections can then receive preview versions and users with faster connections can receive Standard compression or source versions. However, you may
choose to send one, two or three different renderings depending on YOUR connection speed.
Macintosh:
1. Select Panels>Rocket Network>Preferences…
2. Check each rendering quality to post to the server in the Upload Quality box
3. Select the quality to receive from the server in the Download Quality box
4. Make a second selection in the ‘If Unavailable take’section of the Download Quality box
5. Click Ok
Windows:
1. Select Modules>Rocket Network>Preferences
2. Check each rendering quality to post to the server in the Upload Quality box
3. Select the quality to receive from the server in the Download Quality box
4. Make a second selection in the ‘If Unavailable take’section of the Download Quality box
5. Click Close
WINDOWS USERS NOTE: If the Rocket Network Module is not available in the Modules menu, select Setup… from the Modules menu. Toggle the ‘Active’status of the Rocket Network Module to ‘Yes’. The RocketControl login screen will launch. Ignore the login screen for the moment and bring Cubase back into focus. Rocket Network should now appear in the Modules menu.
1. Open your internet connection as usual
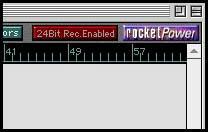
2. Click the RocketPower button in the top right side of the Arrange window. If you do not see the RocketPower button in the Arrange window, expand the window to the right until the button is visible.
3. RocketControl will launch and present you with a login screen.
4. Enter your username and password and click ‘Connect…’.
5. Your web browser will launch and bring up your Home Studio Page.
NOTE: If you do not have a username and password, see Registering a username and Professional Registration in Section 3.2.
You can start an Online Project in three ways:
Start in a clear Internet Recording Studio to create a new Online Project.
Macintosh:
1. Select Panels>Rocket Network>New Project…
2. Name the Project
3. Choose an Audio Files folder and click Choose
4. Click Ok to the dialog prompting you to ‘Make sure to save this song under a new name’
5. In the ‘save this song as’dialog, point to your Audio Files folder and name the song
6. Click Save
7. You now have an empty Online Project.
Windows:
1. Select Modules>Rocket Network>New Project…
2. Name the Project
3. Choose an Audio Files folder and click Choose
4. Click Ok to the dialog prompting you to ‘Make sure to save this song under a new name’
5. In the ‘save this song as’dialog, point to your Audio Files folder and name the song
6. Click Save
7. You now have an empty Online Project.
1. Open an existing Cubase Song
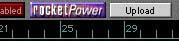
2. Click the Upload button to the right of the RocketPower
button in the Arrange window
3. Name the project and click Ok
4. Choose an audio files folder and click Choose
5. Click Ok to the dialog prompting you to ‘Make sure to save this song under a new name’
6. Your audio, MIDI and arrangement will be transferred to the Studio
7. Your Song is now an Online Project.
1. Navigate to an Internet Recording Studio (See Web Interface section)
2. Receive the active Session (See RocketPower preferences)
3. Choose an Audio Files folder and click Choose
4. Click Ok to the dialog prompting you to ‘Make sure to save this song under a new name’
5. In the ‘save this song as’dialog, point to your Audio Files folder and name the song
6. Click Save
7. The contents of the Studio you entered are now an Online Project
A Post refers to any change sent to the server from your local machine. Changes and additions you make locally will not be sent to the server until you Post them. To Post an update, click the Post button to the right of the RocketPower button in the Arrange window.
Macintosh:
1. Mute any unwanted tracks in
your Arrangement and surround
the desired clip with the left and
right markers
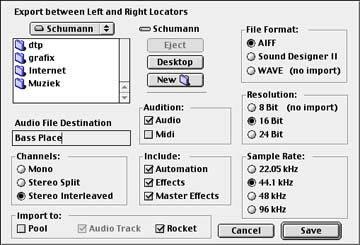
2. Select File>Export>Audio Tracks
3. Check the Rocket checkbox and
all other desired properties
4. Enter a name for the mix in
the Audio File Destination field
and select a local directory to
save the file
5. Click Save
6. The mixed audio file will be
saved locally in the place you
chose and the Mixdown will be
added to your Mixdowns page
automatically.
 Windows:
1. Mute any unwanted tracks in your Arrangement and surround the desired clip with the left and right markers
2. Select File>Export Audio File…
3. Check the Rocket checkbox and all other desired properties
4. Enter a name for the mix in the Filename field and select a local directory to save the file
5. Click Create File
6. The mixed audio file is saved locally in the place you chose and the Mixdown will be added to your Mixdowns page automatically.
Uploading Source Files
Send source renderings of all selected files in the Audio Pool:
1. Select Panels>Audio Pool to open the Audio Pool
2. From the File popup menu, select Post Best Quality
Send individual source renderings:
1. Select Panels>Audio Pool to open the Audio Pool
2. Highlight the file you would like to post
3. In the highlighted portion click and hold under the word Broadcast
4. There are checkmarks next to the renderings already sent.
5. Select the rendering you would like to post
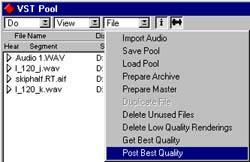 Windows Audio Pool Menu
Downloading Source Files
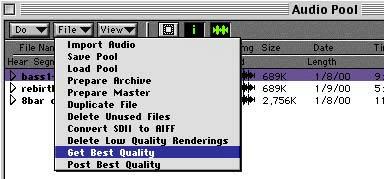 Mac Audio Pool Menu
Windows:
Send source renderings of all selected files in the Audio
Pool:
1. Select Panels>Audio Pool to open the Audio Pool
2. From the File popup menu, select Post Best Quality
Send individual source renderings:
1. Select Audio>Pool to open the Audio Pool
2. Highlight the file you would like to post
3. In the highlighted portion click and hold under the
word Broadcast
4.There are checkmarks next to the renderings that have
been sent.
5. Select the rendering you would like to post
Import/Export Audio setup takes a snapshot of your setup which you can then upload as an arrangement if you are the owner of the project. Everyone else can read it. All of the settings including your bus settings, VST plugin settings, number of tracks, effects settings, etc. are included.