This section covers using the RocketControl interface.
RocketControl can be launched two ways. Click the RocketPower button from within Cubase VST with Rocket Power as described in the previous section or double click the application icon for RocketControl. If you do the latter you will still need to launch Cubase VST with RocketPower separately.
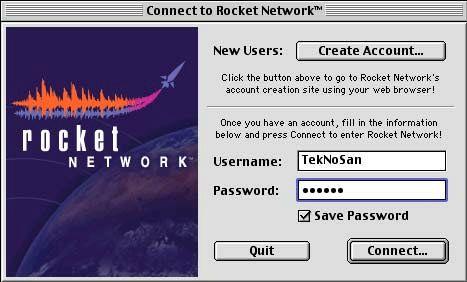
You should see a login splash screen with username and password fields. You will also see ‘Connect…’, ‘Quit’ and ‘Create Account…’buttons. Windows users will also see an ‘Advanced…’button.You need to register a username to login. If you already have a username and password and have upgraded to Professional Registration, skip to Connecting (section 3.3).
Upgrading to Professional Registration gives you the ability to:
Enter Private Studios
Build a list of Studio Favorites for quick studio access.
Build a list of User Favorites allowing you to keep track of fellow collaborators and friends. Customize your User Profile with images and additional information related to your skills and abilities. The Rocket Network search engine targets this profile information, enabling other audio professionals to find you.
3.2.1 Register a username:
You need to register a username before you can download the software. To register a username follow these steps:
1. Go to http://www.cubase.net/studios.html
2. Click the register your cubase.net username link
3. Fill in the Rocket Network Global Registration Form completely
4. Click Submit
5. You're registered!
3.2.2 Upgrade to Professional Registration:
1. If you previously registered a username and wish to upgrade to Professional Registration, launch RocketControl and login to Rocket Network.
2. From your Home Studio Page, click the Upgrade to Pro link next to your username
3. Click the ‘Pro Register’ link
4. Fill out the Rocket Network Pro Registration Form and click Submit Information
5. Follow the instructions to submit the displayed information. This will be the last chance to cancel or modify the transaction.
6. You are now Registered as a Professional!
With RocketControl launched you are at the connect splash screen. Enter your username and password and click the ‘Connect’button. Your web browser will launch and take you to your Home Studio page. From here you can execute any of the functions described in the following section, Using RocketControl.
Note: If you have trouble connecting seeSection 3.5.2.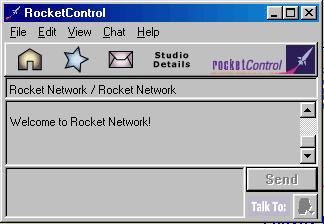
RocketControl has certain basic navigation commands built into the interface. When clicked, the buttons under the menu bar will activate your web browser and open the associated webpage.
Home Studio (House Button) Favorites (Star Button)
Messages (Envelope Button) Studio Details
Rocket Icon
navigates you to your Home Studio and opens your Home Studio page opens your Favorites page
opens your Messages page
shows the current studio’s page and it’s occupants
opens http://www.rocketnetwork.com
3.4.2 RocketControl Menu Items
Make sure you have RocketControl in focus for the menu items to be available.
File>Disconnect
File>Quit
---
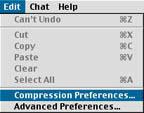
Edit>Undo
Edit>Cut
Edit>Copy
Edit>Paste
Edit>Compression Preferences Edit>Network Preferences
---
(Windows Only)
View>Toolbar
View>Status Bar
View>Always on Top
disconnects from the virtual studios, brings you back to login splashscreen quits RocketControl
Undo last operation
Cut selected and place into the clip board Copy selected into the clip board
Place contents of clip board to insertion point set preferences for post and receive quality set http tunneling
Checkmark makes buttons visible
Checkmark makes Status Bar visible
Checkmark keeps RocketControl on top of all other applications on the desktop
---
Chat>Say
Chat>Action
Chat>Set Font
---
(Macintosh)
Help>Rocket Network Help Site Help>Version...
Speak to the other users in the studio
Perform an action in the chat window
Opens dialog with various font properties for RocketControl
(Windows)
Help>Help Topics
Help>About Rocket Control... Help>Versions
Opens the Rocket Network support site in your web browser Displays develpment and support credits for RocketControl Displays version information for RocketControl
Chat is the primary interactive feature within the RocketControl panel. There are two types of chat, (public) chat and private chat. The chat window allows you to speak with other users in your current studio or simulate an action.
All current occupants of a Studio share the main chat window. Everything typed into the main chat window can be viewed by all studio occupants.To chat, click your pointer in the bottom part of the window, type what you want to say and click send.
Example: (The user in the below examples is Jill)
Input: Hi Everyone! How’s it going?
Result:
You will see this text as: You say, "Hi Everyone! How’s it going?" Everyone else will see: Jill says, "Hi Everyone! How’s it going?" To simulate an action, such as waving, type a colon ( : ) and the action you want to perform.
Input: :waves
Result:
You will see this text as: Jill waves Everyone else will see: Jill waves
The Private Chat feature allows any two users in a given studio to communicate privately. To start a private chat session, click the head icon button in the lower right corner of RocketControl and select a username from the pop-up list. A new Private Chat window will appear. As soon as you make your first entry, the person you selected will be notified that you are attempting to chat with them by flashing the ‘talk to’ button. After initiating the Private Chat session, the Talk To: button acts as a toggle allowing you to hide the Private Chat window or make it visible.
There are two sets of preferences in RocketControl. The Compression Preferences determine the compression ratios and settings for the different upload qualities you set in Cubase. The Advanced preferences are network options designed to aid those who are behind a firewall that doesn’t have the necessary ports open. To open either set of preferences, go to the Edit menu and select the desired set of preferences. Mac users, make sure you have RocketControl at the front.
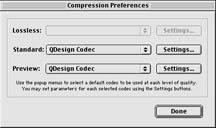 3.5.1 Compression Preferences
The Compression Preferences dialog has buttons for three compression choices: lossless, standard and preview. Lossless compression is slated for a future release. By clicking the settings button next to the standard or preview mode you will be presented with an additional dialog that has five adjustable parameters. These parameters allow you to determine the compression settings for the upload quality available in Cubase VST with RocketPower. There will ultimately be several compression choices to choose between. The five parameters are:
Low Pass: Upper bound on the
bandwidth used for encoding. A
higher value increasessensitivity
to low-band frequencies.
High Pass: Lower bound on the
bandwidth used for encoding. A
higher value increases sesitivity to
high-band frequencies.
Attack Sensitivity: Adjusts the
transient response. A higher value
allows the codec to respond to
transients more quickly.
Spectral Spread: Adjusts the tonal
vs. "noise-like" coding. A higher
value should be used for complex,
percussive signals.
Compression Ratio: Adjusts the
compression ratio from 1:1
through 32:1.
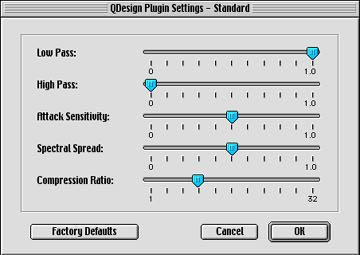 The ‘Factory Defaults’ button will reset these five parameters to their original settings.
3.5.2 Network Preferences
The Network Preferences dialog allows for HTTP Tunneling. If you have trouble connecting through a firewall you should check the Use HTTP Tunneling checkbox and try reconnecting. Changes to this preference only take effect the next time you login. Please note that using HTTP Tunneling significantly diminishes performance. You should contact your systems administrator to open the correct ports.
Ports arelogical connection places, using the Internet’s protocol, that connect your computer to our serverThe ports that need to be open in your firewall are as follows.
With HTTP Tunneling OFF: 1101,1102,1103, 1104, 1105, 2468, 5555
With HTTP Tunneling ON: 80
The text underneath the buttons shows the current state of RocketControl. The Rocket icon in the upper right corner of RocketControl also shows activity by animating when posting or receiving data. The processes shown in the status indicator are:
Posting or Receiving Project
Compressing or Decompressing media Posting or Receiving Media
Communicating with Server
Disconnected
Post/Receive Paused
Studio Center: Studio
shows upload and download of project data
shows compression and decompression of source media shows upload and download of media
indicates general communication with the server indicates you are currently disconnected from the system indicates events to and from the server are paused names the Studio Center and Studio you are currently in