Layout
When you click on ͞Layouts you should see
Right there you can change the layout of your blog to lets say ͞3 columns (one side bar and the other side bar by the left). You can also change the layout on the ͞footer region to 3 columns so you can easily give space for your widgets and even adsense ads.
Adjust Widths
When you click on ͞Adjust widths you shoiuld see
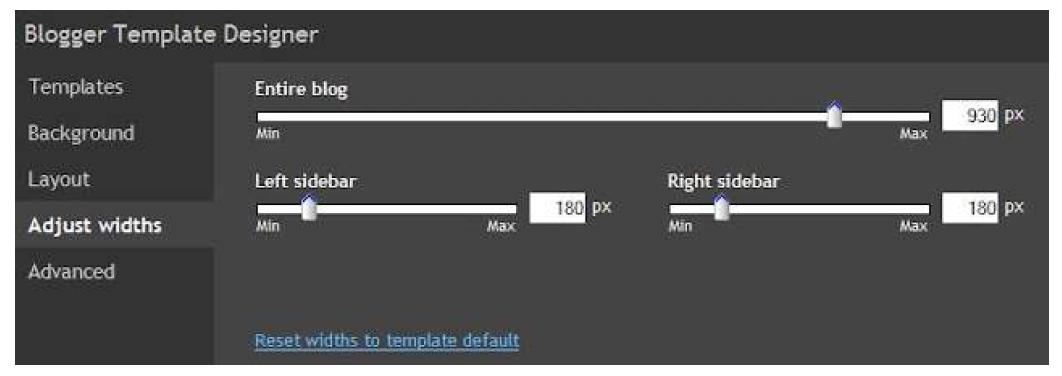
Right there you can adjust the width of your blog and the sidebars. The default size is ok to me. Hence you can just leave it as it is.
Advanced
When you click on ͞Advance you should see
Right there you can make a lot of changes especially with regards to color combination and Font types.
Making Changes In ͞Edit HTML
There will be some point in time when you will need to insert some codes into your template, e.g when you want to insert meta tags for search engine optimization; when you want to insert Adsense ads inside your post etc.
on the left menu click ͞Template then ͞Edit HTML and you should see:

You must be very careful when making changes to the ͞Edit html hence before you edit, it is advisable you back-up your template.
To back up your template click on the ͞close button if you have already opened the ͞edit html . Go to Template.
Look at the top right hand corner and you will see the ͞Backup/Restore button. Click it.
You will see a new window similar to the one below:
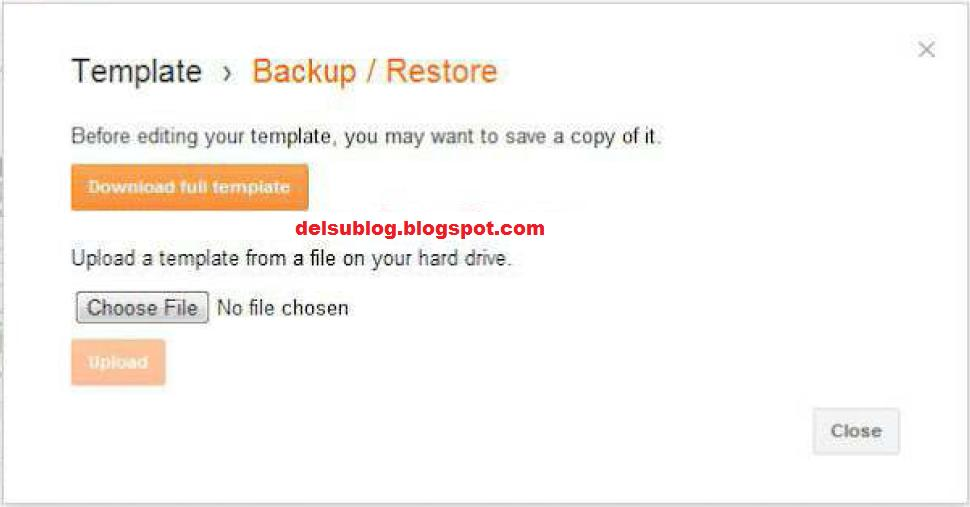
Click on the ͞Download Full Template button.
Save it somewhere on your PC, so that if anything goes wrong in the long run, you can always use the ͞Upload button to load back the backup.
You can also Upload New blogger template via the ͞Upload button whenever you feel like changing your blog template.
How To Easily Locate A Specific Code In "Edit HTML
There will be some instance when you will need to find a specific code in the ͞Edit HTML . All you need do is to click inside the ͞edit html box and hit ͞Control+ F on your keyboard. A Search Box will appear at the top right hand corner of the ͞edit html box where you can enter the code you are looking for. Paste the code in it and hit ͞Enter button on your keyboard. If the code is in the ͞Edit HTML it will be highlighted.
Make sure your internet connection is favourable while doing this; hence it will not work.
Must Do Before Changing Template
1. You must back up your template as explained earlier, so that if something goes wrong or if you are not satisfied with the new template, you can just easily change back to your current template.
2. You must back up your widgets. When you change template, you might lost your widgets. Widgets are your added page elements like html script, Floating Share Bar, Feed burner Email Subscription Box, Facebook Like Box, Search Box etc.
To back up the widgets, you need to save the code of each widget (especially the ones added using html/javascript gadgets properly in a notepad as a text file. To copy code of each widget, you need to log in to your blog and go to Layout. Then click on the ͞edit under each widget you want to backup. Then, copy and save each code in a Notepad.
If you have back up your template and your widgets, you can then go ahead to upload your new template.
NOTE: The name of the template you want to upload must end with .xml i.e it must be an xml file. If you download a zip of a template, you will have to unzip it, to get the xml file which you have to upload to your blog.
How Do I Install New Blogger Template
From your dashboard, go to Template
Look by the top right hand corner and you will see the ͞BackUp/Restore button. Click it.
You will see a new window similar to the one below:
Click on the ͞Choose File button.
Select the xml file of the template you want to install/upload.
Click the ͞upload button.
You will see a message ͞upload was successful .
Save and view your blog.
That’s all Now you have the same blog with no change in content but a complete new look.
If you check your blog and realize that some of your widgets are missing, you can add them back to your blog by going to Layout; Add a Gadget but remember, you should not add too much of them. A clutter and slow blog is a sure way to scare away visitors.
If you really want a unique look on your blog, then customizing the template is the option for you. Small change can make a real big difference and you can easily customize your template via Template Designer provided the Template you downloaded is compatible with Template Designer.
Hence, when you are trying to download a template, make sure the template is compactible with Template Designer You can easily confirm this on a ͞Test Blog If you don’t have a ͞Test Blog create it and be using it to try customizations before applying them to your main blog.
Activating Blogger Mobile Template
To enable your visitors see a mobile version of your blog powered by Blogger when they view your blog on mobile devices, you will have to enable Blogger mobile template for your blog.
To enable your Blogger mobile template, login to www.blogger.com, click on
͞Template on the left menu and click on the ͞settings icon highlighted in the
picture below.
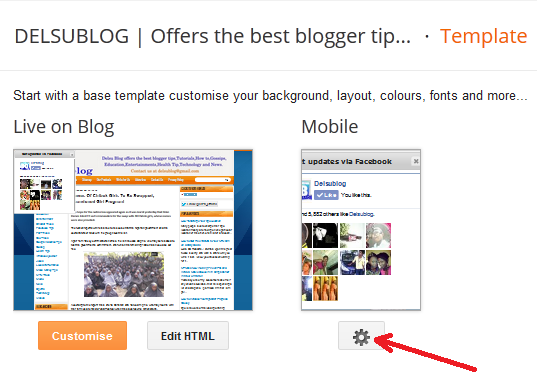
After clicking the icon, you will see:
Select Yes from the options and click SAVE.
You can also change your mobile template from page and also preview before saving.
You can access the mobile version of your blog powered by Blogger by adding ͞?m=l at the end of your blog url Eg http://delsublog.blogspot.com?m=l
Creating Navigational Tabs eg ͞About Me Contact Me
Blogger ͞Pages (different from ͞Blog Post ) lets you easily publish static information on stand-alone pages. For example, you can create an About Us page that discuss the evolution of your blog, or a Contact Me page that provides directions, a phone number or a map to your location.
Once your page is published, you can link it from the Pages gadget. The Pages gadget lets you add links to your pages as tabs at the top of your blog, or as links in your blog sidebar, also known as navigation tabs.
![]()
The pages gadgets is also available in the options you get when you click on ͞ADD NEW GADGETS in the layout control panel.
To get started, look by the left menu. Click on Pages. You should see something similar to the picture below:
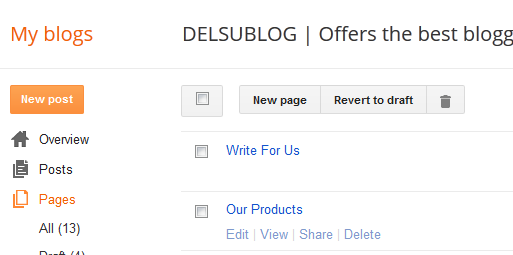
You can use the ͞New Page tab to create a new Blogger Page. You can also create a tab that links to any web address ( This might be a link to a web page, a blog post or a download link).
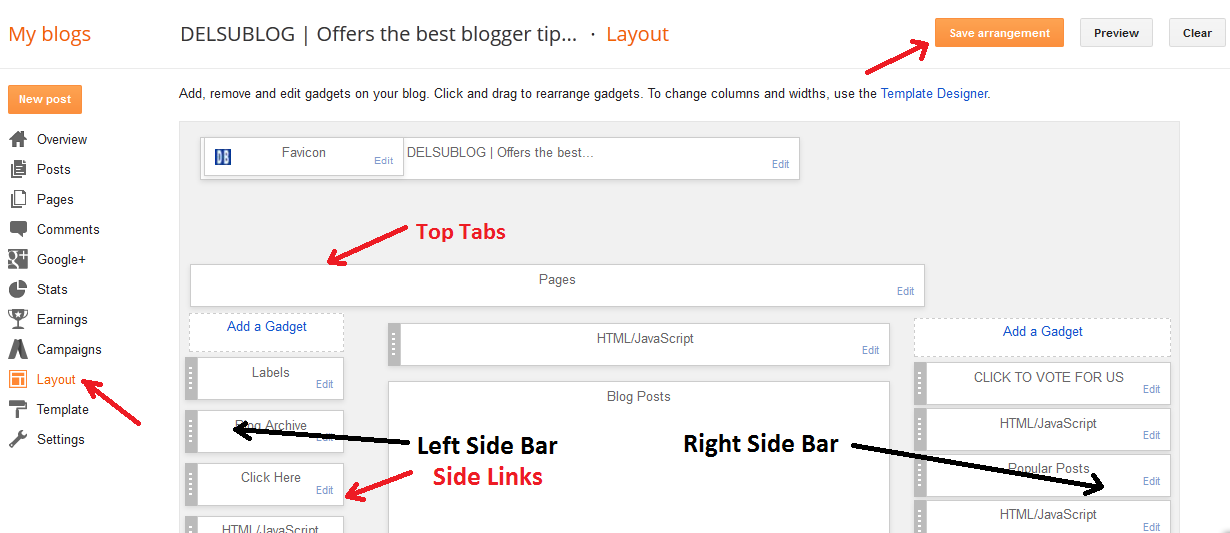
If you want to control where you want your navigation tabs to appear on your blog. You can simply click Layout, ͞drag and re-position the ͞Pages gadget to change its position. Click ͞Save Arrangement button to save the changes you just made.
You can set it to appear under your header (Top tabs) or on either the͞ left or right sidebar (Side links). See image below:
Example
Now let me assume you want to create a tab that links to an external link(e.g www.facebook.com/delsublog).
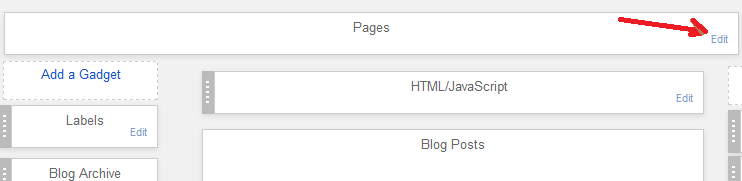
Click on ͞Layout tab as shown above go to the ͞Pages gadget and click on the
͞Edit link on it
A New Window will open as seen in the picture below:
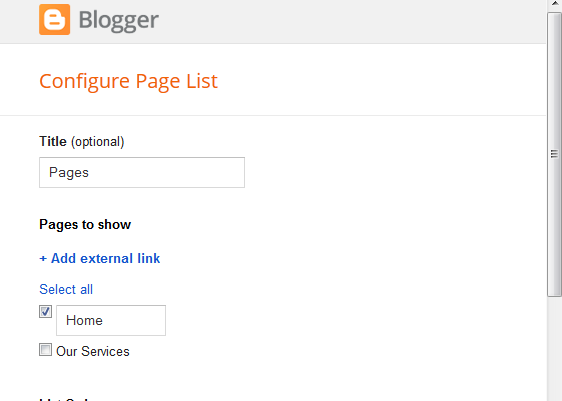
Click on ͞Add external link You will see a new window like the one below
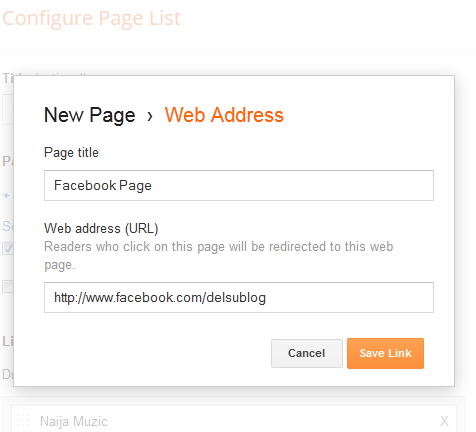
Enter what you want to be displayed on the tab in the first text area. In this example, I entered ͞Facebook Page
Enter the web address you want to link to in the second text area. In this example, I entered www.facebook.comjdelsublog
Click ͞Save
What Next?
The next thing to do is to make the tabs appear on your blog.
So, click on ͞Layout tab as shown above go to the ͞Pages gadget and click on the ͞Edit link on it
A New Window will open as seen in the picture below:
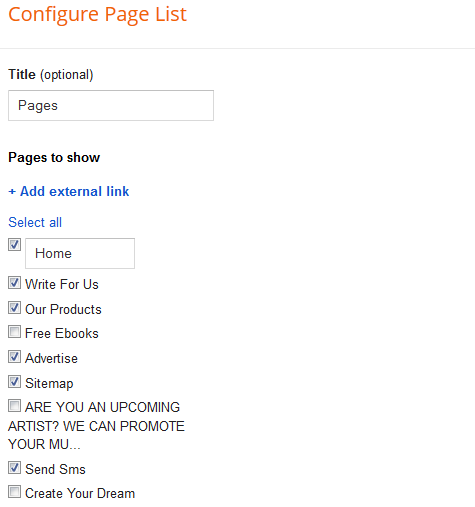
Tick the ͞Box that is in front of the page that you want to appear on your blog and untick the ones that you don’t want to appear I tick write For Us, Our Products, Advertise, Sitemap, Send Sms and untick Free Ebook, Are you an Upcoming Artist, Create Your Dream in the picture above.
Scroll down to the buttom of the page and click the ͞Save button
View your blog and you should see the tabs appear under your blog header.
Want Your Tab to Point to a Label (Category)?
Remember if you visit a Label’s link e g ͞Blogging Tips category on my blog, it will display the POSTS that has been categorized under the LABEL.
If you want to point your tab to a label (category), get the link of the label (category) handy and enter it in the space for ͞web address as explained when creating a web pointing to an external url above.
Below is what the structure of a Label / Category link looks like. http://delsublog.blogspot.com/search/label/Blogging%20Tips
Don’t know how to get your LABEL link? Well, provided you have already added the LABELS gadget to your blog. View your blog, right-click on one of the LABELS (categories) and choose ͞Copy Link Location Paste it in a Notepad and use it accordingly.
NOTE
If you click the ͞New Page tab you will see a page editor which you can use to create a blogger page like Contact Me, About Us pages. Whatever you enter as the title of the page is what will display on the tab on your blog.
You can hide some PAGES you don’ t wa n t t o appea r as ta bs as explained on
͞What Next? above.
You can also re-arrange your tabs. To do this, go to ͞Layout go to the ͞Pages gadget and click on the ͞Edit link next to it
A New Window will open as seen in the picture below:
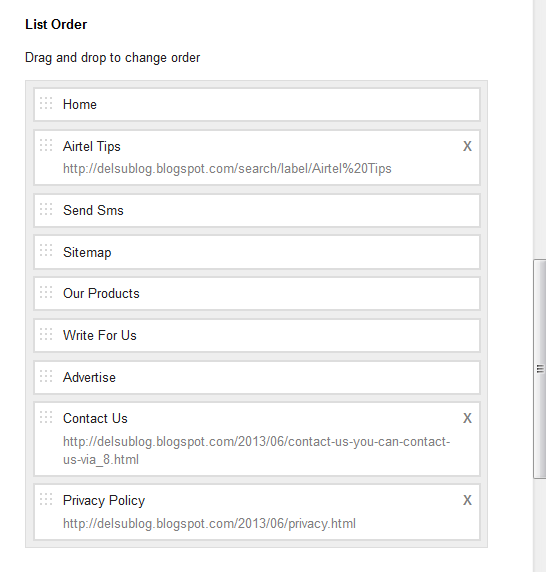
Just drag and drop (under Page order) to change the order of your tabs. i.e Drag ͞Airtel Tips to where ͞Home is possitioned as seen in the picture above.
Scroll to the buttom of the page and click ͞Save when you are satisfied with your settings.
Making Money With Your Blog Via Google Adsense
By displaying Google Ads on your blog, Google will pay you every time a visitor to your blog clicks on the Google Ads.
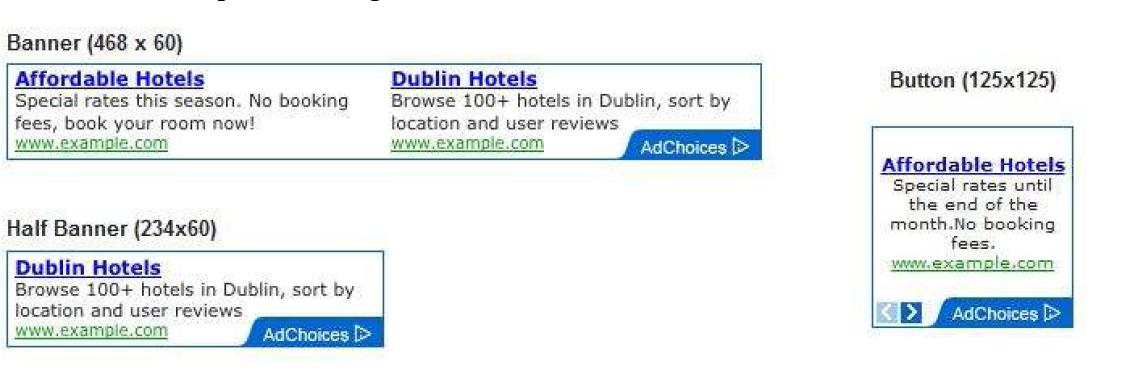
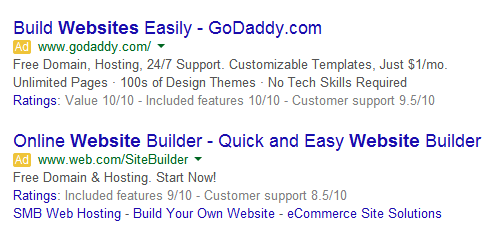
Below are examples of Google Ads.
The amount Google pays per click varies, depending on many factors best known to Google. You can read more about Google Adsense online or get some free ebooks on Google Adsense.
I will teach you the simple way of inserting Google Adsense Ads on Your Blog but I suggest you have posted at least 20 good articles to your blog. This will make your Adsense registration to be approved on time and also enhance the quality of ads that will be served to your blog.
Note: You MUST NOT click on the Google Ads on your blog. If you click on the Ads by yourself, Google will know and you will be banned and once banned, you might not be able to use Google Adsense again. So, DO NOT ENGAGE IN CLICK FRAUD. Wondering how Google will know? Well, technology makes it very easy.
NOTE Before you apply for adsense try and add ͞Privacy Policy and ͞Blog Archive to your blog
You can learn how to generate ͞Privacy Policy for your blog at http://delsublog.blogspot.com/2014/07/how-to-generate-privacy-policy-for- your.html
You will find ͞Blog Archieve from the list of Blogger gadgets
Please Note: Completing this application process does not guarantee that your blog will begin showing ads authomatically. Your blog must comply with Adsense program policies in order for your application to be approved.
To get started, log in to www.blogger.com and click on the ͞Earnings tab as indicated in the picture above.
Then you should see:
Click on the ͞Sign Up For Adsense button. You should see:
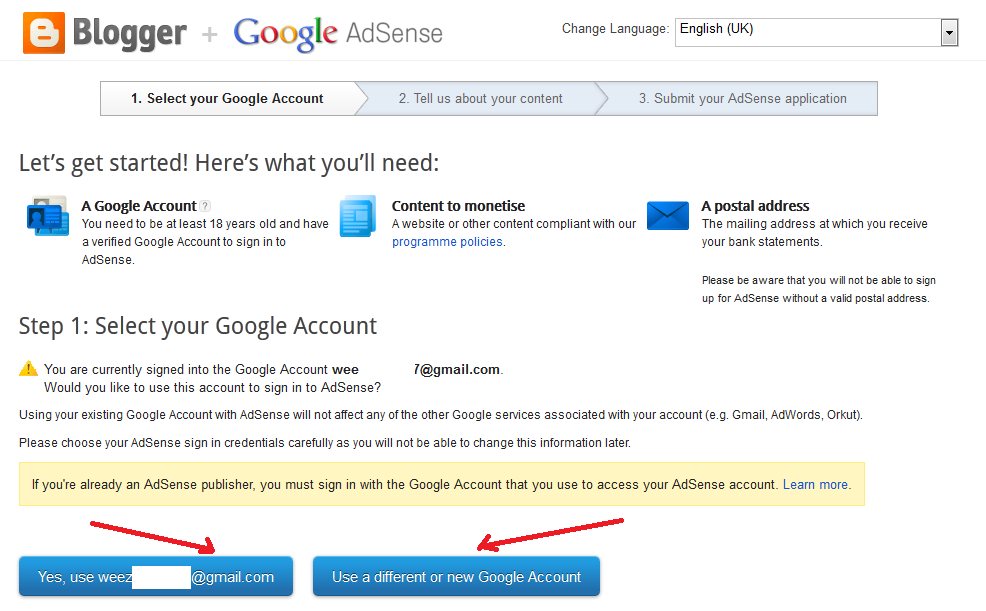
If you click the first button ͞Yes. use yourname@gmail.com you will automatically apply for Google Adsense with your default email that you use in registering for your blog. If you choose the second button ͞Use a Different or New Google Account, you will be given the opportunity to use a different Google Account{Gmail Account) in applying for Google Adsense.
I recommend the ͞first button for newbie bloggers. After ͞clicking the first button, you should see:
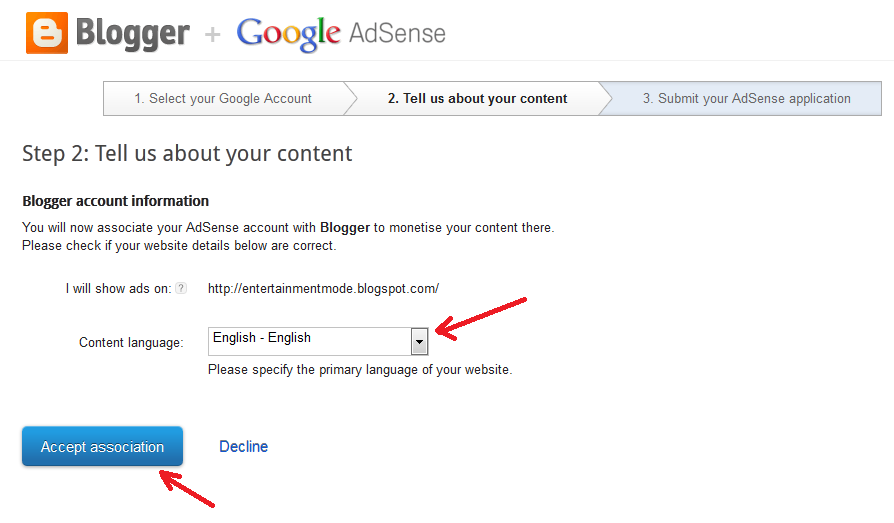
Click ͞Accept Association button You should see:
Click ͞continue button You should see:
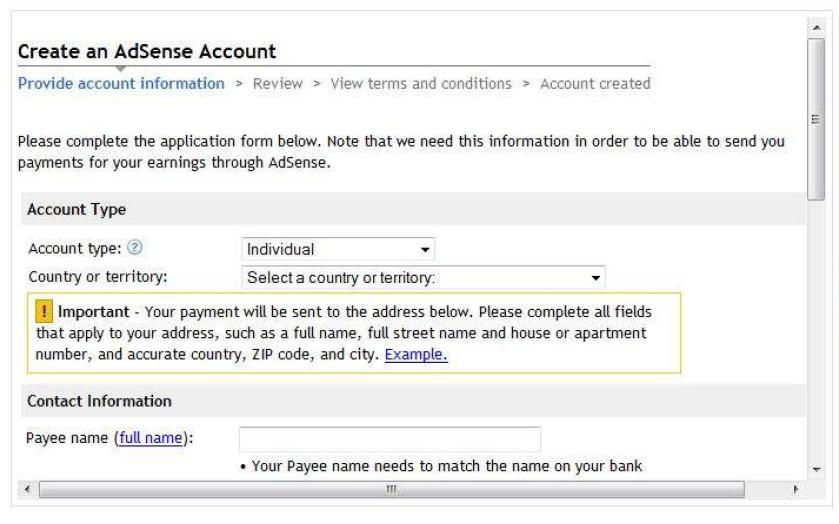
Fill in the form as indicated above.
Choose ͞individual as the acccount type
Ensure you at least 18 years of age and the ͞Payee Name matches the name on your account.
The ͞Payee Name is what will appear on your cheque which you will take to your bank If it doesn’t match the name on your bank account your bank will not process the cheque for you.
Although Google Adsense now have series of payment method which include Paypal, Direct Bank Wire Transfer etc.
There is a space for ͞Street Address which you cant see in the screen shot above. Fill it accordingly.
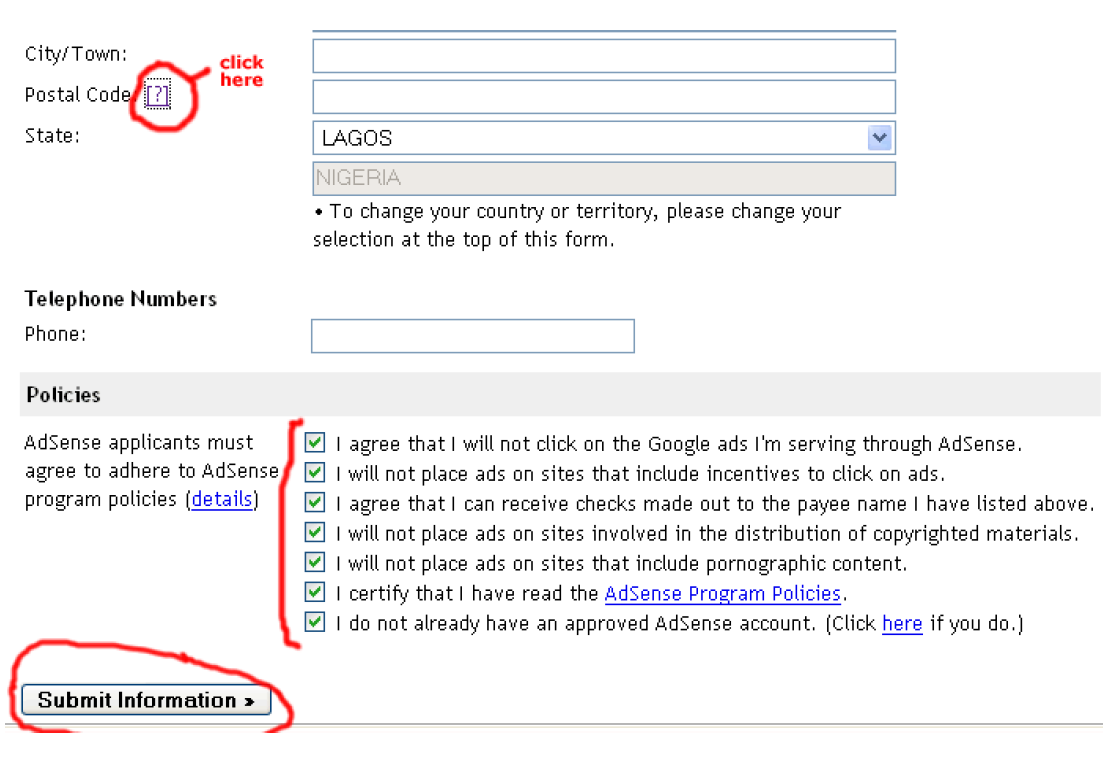
Take Note of the ͞Policies tick all the boxes and note that failure to adhere to the rules will lead to you been banned. Once you are banned, you will never be able to re-register for Adsense again. Be Warned.
Take note of the tutorials on the right hand side. You will learn a lot about Google Adsense if you read them.
When you are done click on ͞Submit Information
What Next?
You will have to wait for feedback from Google Adsense about your application. In the mail that will be sent to you, you will be informed if your application has been approved or not.
If approved, you will see the instruction on how to add the codes to your blog. If not approved, you will see the reasons in the mail and the steps to take in solving the problem(s).
If approved, you can always log in www.google.comjadsense to generate your ad codes, track your earnings, monitor your payments etc.
Once you are up to $10, Google Adsense will mail an envelope containing your Adsense pin to the address in your Adsense account. You will have to enter this pin somewhere in your Adsense account at www.google.comjadsense for your adsesne to be verified. Failure to verify your Adsense account after a specific period of time might stop Google Ads from been displayed on your blog.
WAIT……………….
If you are finding it hard to get your blog approve by Google Adsense, all hope is not lost. I can get you an ͞Approve Google Adsense account within 24 hours for a token Or you can get the ͞Tutorial and do it all by your self for ͞3k . If you are interested in this offer, you can give me a call @ +2347065005521 or Email me: delsublog@gmail.com.
Logging Out of Blogger
Once you have finished working on your blog, always sign out to avoid illegal access to your blog dashboard.
Anytime you log in to www.blogger.com, you will see your name at the top right hand corner of your blog as seen in the picture below.
If you click on the ͞little round picture , a pop-up window will appear as seen in the picture below:

Click on the ͞Sign out button to log out.
Ways To Monetize Your Blog
Apart from Google Adsense, there are other ways you can monetize your blog. You can:
1. Promote other services you render on your blog e.g web design etc.
2. Help others advertise their product via your blog post and charge them for it.
3. Sell adverts spaces on your blog.
4. Promote affiliate products, Joint Partner Products / Seminar etc
You can read more about blog monetization online.
Should incase Google Adsense banned you from their program, you can use an alternative like Addynamo, Media Net, Info Links etc.
NOTE: You will only make money from your blog if people are visiting and reading your blog. The more people that visits your blog, the more money you stand to make from your blog. Hence, TRAFFIC is very important.
How To Get Traffic To Your Blog
If you really want people to be visiting your blog, you must be posting unique content to your blog. You should not be copying and pasting from other people’s blog. If you do this, Google can ban you from Adsense and remove your blog from search engines.
If you want to share an article already published elsewhere, you can re-write it in your own style and even indicate the the source in your post.
You can be getting traffic from search engines e.g Google, Bing etc (organic traffic) or from links you share on websites / forums like Facebook.com, Twitter.com, Stumbleupon.com, Digg.com, Enzinearticles.com, Warriorforum.com, Nairaland.com etc.
Traffic from search engine is considered to be the best for me because when I’m offline and not sharing my links any where, people still visit my blog from the search engine and I keep making money when they click on my Google Ads or if they order for products / services I offer for cash on my blog.
For you to be getting traffic from Search Engines, you must optimize your blog for search engines. This is known as Search Engine Optimization (SEO). You can also search Google for tutorials or ebooks on SEO. Try to download and read the Google SEO Guide at the end of this guide.
You should also try and google for how to get traffic from social networking sites, social bookmarking sites, forums, article directories etc.
RESOURCES AND RECOMMENDATIONS
TwitterFeed.Com: Allows you to automatically share a post to twitter, facebook once you published it
http://apps.facebook.com/blognetworks : Works similarly to Twitterfeed.com but it is a Facebook App.
BloggersCrew: A Facebook group for Bloggers
Google SEO Guide: www.google.com/webmasters/docs/search-engine- optimization-starter-guide.pdf
Creating Custom Domain For Blogger:
http://support.google.com/blogger/bin/static.py?hl=en&ts=1233381&page=ts
There many other things you need to know for you to be a successful Blogger. Make sure you check out the tutorials in the ͞Blogger tips ͞Adsense Tips sections on my blog and also read ebooks, tutorials on other blogs.
Remember, making money from blogging is not a get rich quick scheme. It takes time so don’t get greedy
Enjoy!!
GEORGE EMMANUEL
http://delsublog.blogspot.com
www.facebook.com/weezyfessy
www.twitter.com/weezyfeesygess
SKYPE ID: George.emmanuel27
THE END

Reads:
36
Pages:
46
Published:
May 2024
Are you Looking for the best digital marketing agency in Chandigarh? Social sail is a Chandigarh based leading digital marketing Company in India. We provide ...
Formats: PDF, Epub, Kindle, TXT
Reads:
585
Pages:
51
Published:
Aug 2016
This is the only ebook available on the subject Nodejs with koa2this ebook contains code which worksand how to learn nodejs faster and easy wayafter reading t...
Formats: PDF, Epub, Kindle
Reads:
1052
Pages:
51
Published:
Jun 2016
A Field Guide to Freelancer Finances is a free book of practical finance tips by leading designers, developers and FreeAgent.
Formats: PDF, Epub, Kindle

Reads:
417
Pages:
21
Published:
May 2016
Started in 2013, Ally Digital Media have helped over 1200+ startup business to grow their business online and is one of the top seo company in Mumbai and Indi...
Formats: PDF, Epub, Kindle