CHAPTER
Slow and Bloated – Not a Good Combination
Speed Up Your Browser and Compact Your Mail
Don’t know about you, but there is one particular thing that annoys me big time. That’s a slow and unresponsive browser. I just hate it when the browser takes ages to load a page even on a high-speed fiber optic connection or worse - freezes on me. I’m sure you hate it as much as I do. Thankfully, it is possible to make your Web browser faster and more responsive with a handful of simple tweaks.
Internet Explorer
To tell you the truth, I was so annoyed with Internet Explorer that I had to ditch it long ago and start using Mozilla Firefox as my default browser. However, I still use Internet Explorer for websites that don’t work with Firefox or Chrome very well (yes, there still are lame sites like that).
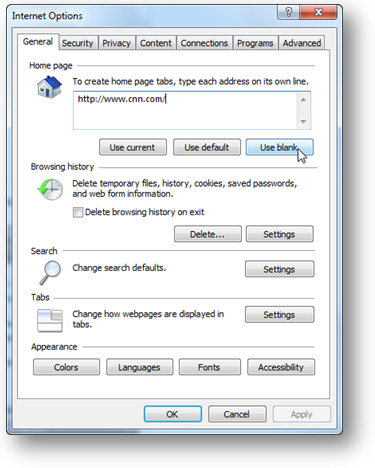
142 | auslogics.com TURBO WINDOWS® — The Ultimate PC Speed Up Guide Thankfully, the newer versions of IE are better than the previous ones, and they can be tweaked and customized for better performance and usability. So, let’s start tweaking!
Set your homepage to blank
If you don’t always use a specific page when you open your browser, it’s best to set it to blank. This will ensure that your browser snaps open. To change your homepage, go to Tools – Internet Options, find the item that refers to Homepage and select Use blank.
143 | auslogics.com TURBO WINDOWS® — The Ultimate PC Speed Up Guide Manage your cache
Just like any other browser, Internet Explorer makes heavy use of the cache. The cache is where your browser stores Temporary Internet Files. These files get downloaded to your computer when you visit Web pages and are supposed to speed up browsing whenever you visit the same website in the future. Anyway, that’s the theory. The reality is a bit harsher. While the cache is designed to speed up browsing, it can actually do quite the opposite and slow down Internet Explorer. On top of that, a bloated cache can take up tons of your disk space, which will decrease overall computer performance.
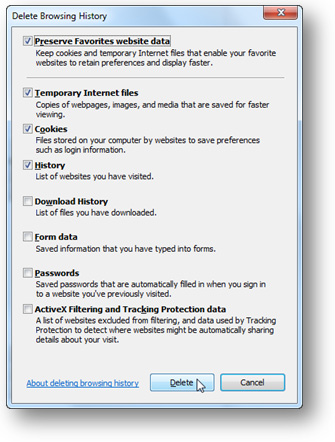
I’ve already described how to clean the cache in the PC cleanup chapter, but here is a quick reminder: 1. Open Internet Explorer and press Ctrl+Shift+Del
2. Check the relevant checkboxes. I recommend selecting Temporary Internet Files, Cookies and History. Deleting cookies and browsing history will help you protect your privacy by removing sensitive information about your computer usage. It will also free up some additional space
3. Click on the Delete button
4. Close the browser.
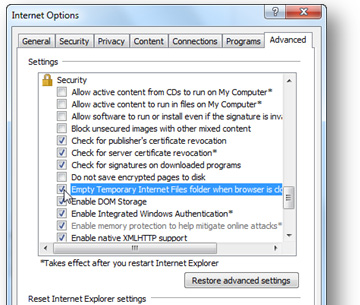
144 | auslogics.com TURBO WINDOWS® — The Ultimate PC Speed Up Guide You can also configure Internet Explorer to delete Temporary Internet Files automatically every time you close the browser. This handy option is very easily enabled:
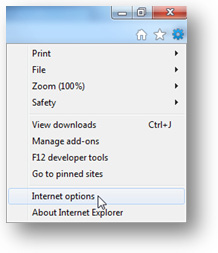
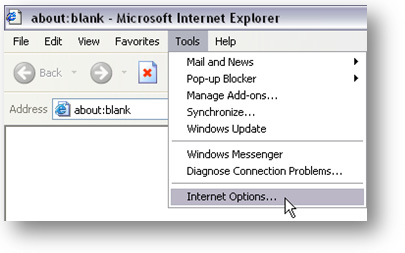
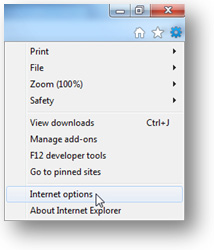
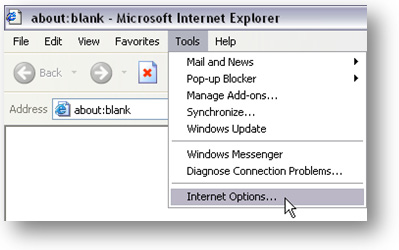
1. Open Internet Explorer and click on the Tools button and select Internet Options
Windows 7 Windows XP
2. Navigate to the Advanced tab
3. Find the Settings list and scroll down to the Security section
4. Check the Empty Temporary Internet Files Folder When Browser is Closed
option
5. Click OK and you’re done.
145 | auslogics.com TURBO WINDOWS® — The Ultimate PC Speed Up Guide Decrease the size of your cache
By default, your Internet Explorer cache is too large. Decreasing its size will help you speed up your browser. Here is how it’s done: 1. Click on the Tools button and go to Internet Options
Windows 7 Windows XP
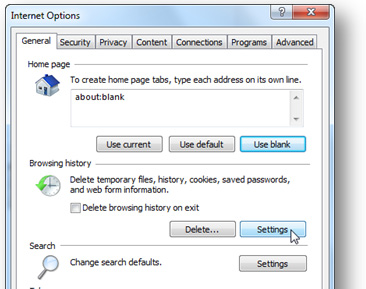
2. Now go to the General tab
3. Under Browsing history, click on the Settings button
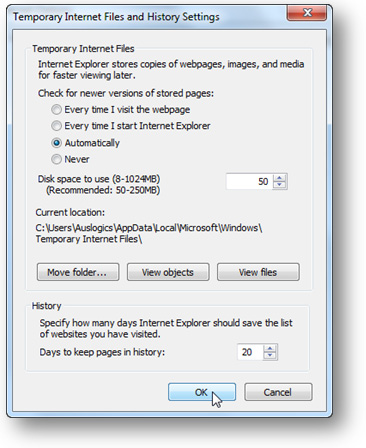
146 | auslogics.com TURBO WINDOWS® — The Ultimate PC Speed Up Guide 4. In the window that appears, set the disk space to something like 50MB. Technically, you can set the cache size to as low as 8MB, but that will make the cache useless.
5. Click OK to apply the changes.
Disable ClearType
By default, Microsoft Internet Explorer 8 uses a font display technology called ClearType. This technology is designed to make fonts on LCD screens smoother and more comfortable to read, making the words look almost as sharp as on a printed source.
Basically, ClearType works on a fraction of a pixel level rather than on a pixel level, which increases the resolution and makes the fonts look, well, clearer.
Even though ClearType is a great feature, it has its disadvantages. The main one is that it can sometimes slow down the performance of Internet Explorer. So, if your IE seems sluggish, try disabling ClearType. Here is how:
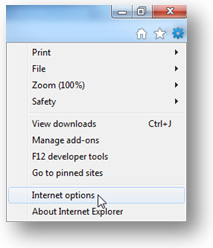
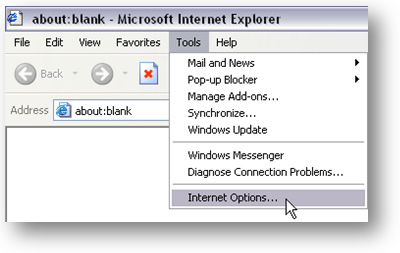
147 | auslogics.com TURBO WINDOWS® — The Ultimate PC Speed Up Guide 1. Click on Tools and select Internet Options
Windows 7 Windows XP
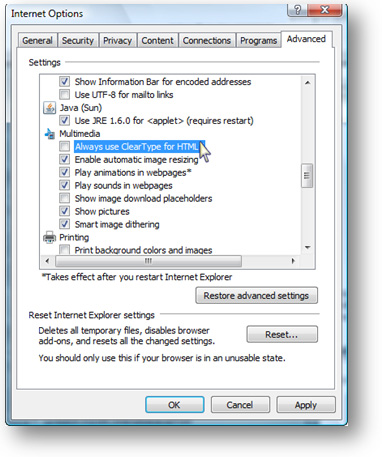
2. Now click on the Advanced tab
3. Navigate to the Multimedia section and uncheck Always Use ClearType for HTML
4. Click OK to apply the changes.
148 | auslogics.com TURBO WINDOWS® — The Ultimate PC Speed Up Guide Switch off RSS feeds
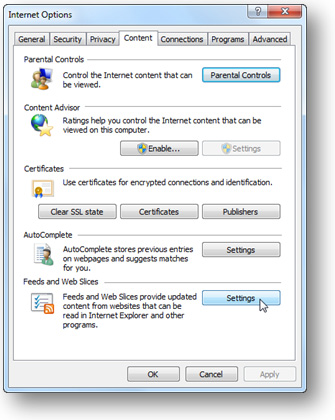
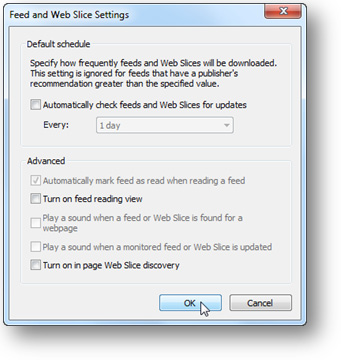
Are you subscribed to any RSS feeds? If no, then you definitely don’t need Internet Explorer’s RSS Feeds feature. And if you are subscribed to some feeds, then most likely you use something like Google Reader and don’t need IE’s RSS Feeds anyway. Moreover, Internet Explorer’s RSS Feeds slow down your browser. Who needs a useless feature that makes your computer slow? Let’s disable it!
1. Once again click on Tools, select Internet Options and select the Content tab 2. In the Feeds and Web Slices section, click on Settings
3. Uncheck everything and click OK
149 | auslogics.com TURBO WINDOWS® — The Ultimate PC Speed Up Guide Disable SmartScreen Filter
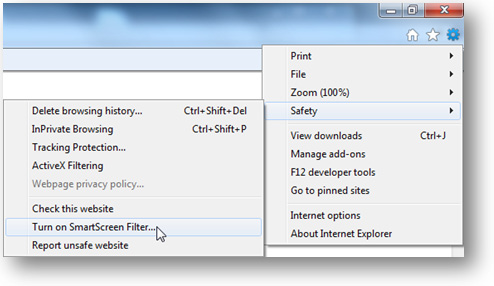
I bet you’ve heard of phishing scams. That’s when a website pretends to be a legitimate online store or even your bank, but all it does is steal your personal information. Nasty stuff and you have to be really careful to avoid becoming a victim. Internet Explorer can help you there. It has a feature called SmartScreen Filter that scans all the websites you browse to identify phishing scams and warns you whenever a suspicious site is detected. Unfortunately, SmartScreen Filter can significantly slow down browsing the Web because it keeps scanning websites. So, if you are a careful person and/or if you have an antivirus like Auslogics Antivirus that includes anti-phishing protection, it makes sense to disable SmartScreen Filter. It’s really easy: 1. Click on Safety and select Turn on SmartScreen Filter…
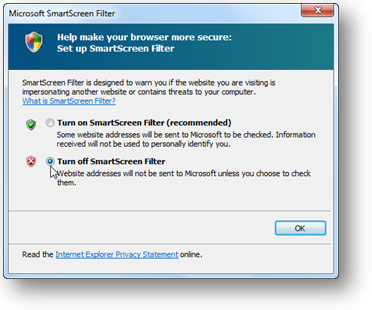
2. A new dialog box will open
3. Check Turn off SmartScreen Filter and click OK.

150 | auslogics.com TURBO WINDOWS® — The Ultimate PC Speed Up Guide Increase the number of simultaneous connections
Just like any other browser, Internet Explorer can use several simultaneous connections per single server. This helps to improve browsing speed, especially for websites with lots of pictures, JavaScripts and other data-hungry content. By default, Windows Internet Explorer 7 and earlier versions limit the number of simultaneous connections per server to 2. Windows Internet Explorer 8
and 9 limits the number of simultaneous connections per server to 6. This is not really enough for Web pages with lots of images and other content. Increasing the number of simultaneous connections can significantly speed up page loading and, therefore, speed up browsing. However, you should remember that some webservers may start dropping/delaying connections if they see over 10 concurrent connections from the same client IP address.
Unfortunately, it’s not all that easy to increase the number of simultaneous connections. You either have to edit the registry or use a third-party tool. Here are the steps you need to take if you decide to edit the registry yourself. The settings are different for different versions of Internet Explorer, so make sure you are using the right ones:
Configure Internet Explorer 6 and 7
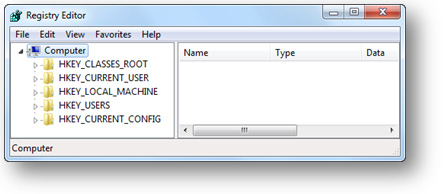
1. Close Internet Explorer, click on Start, type regedit in the search box (XP users will need to click on Start – Run and type regedit there), and hit Enter. This will open Registry Editor
2. Now locate this key:
HKEY_CURRENT_USER\Software\Microsoft\Windows\CurrentVersion\Internet Settings
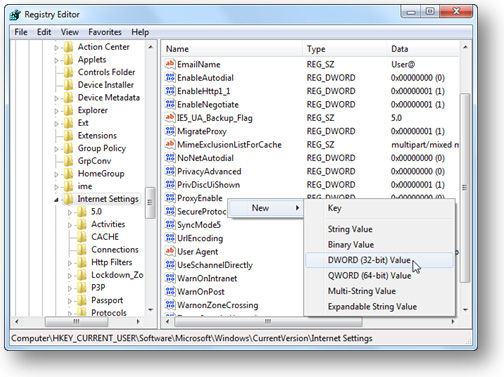

151 | auslogics.com TURBO WINDOWS® — The Ultimate PC Speed Up Guide 3. Right-click on an empty area in the right-hand pane, click New and then select DWORD (32-bit) Value 4. Type MaxConnectionsPer1_0Server and hit Enter
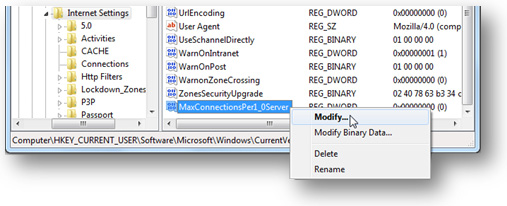
5. In right-hand pane, right-click MaxConnectionsPer1_0Server
and select Modify
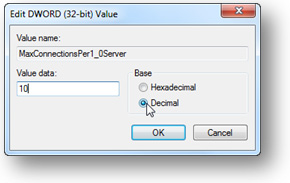
6. Select the Decimal radio button, type 10 in the Value data
box and click OK
7. Now repeat steps 3 to 6, but use MaxConnectionsPerServer instead
8. Exit Registry Editor. You’ll need to either log off and log back on or reboot your PC to apply the changes.

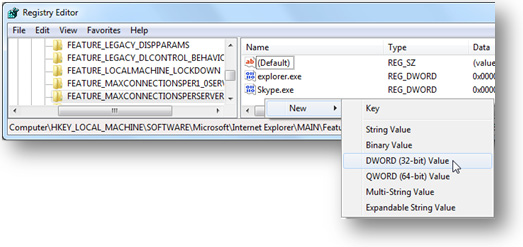
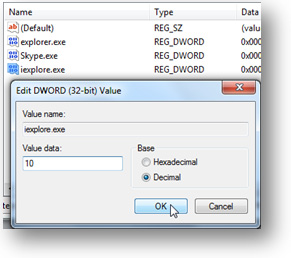
152 | auslogics.com TURBO WINDOWS® — The Ultimate PC Speed Up Guide Configure Internet Explorer 8 and 9
1. Open Registry Editor. To do that, close Internet Explorer, click on Start, type regedit in the search box (Start – Run in XP), and press Enter
2. Now look for this key: HKEY_LOCAL_MACHINE\SOFTWARE\Microsoft\Internet Explorer\
MAIN\FeatureControl\FEATURE_MAXCONNECTIONSPERSERVER
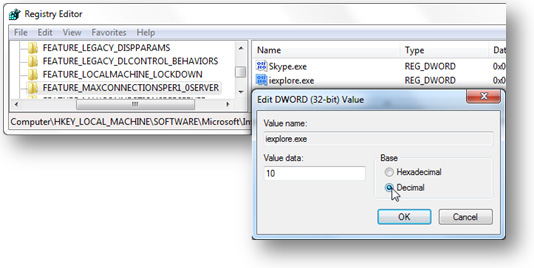
3. Right-click somewhere in the right-hand pane, point to New, click DWORD Value, and add the following registry values:
Value name: iexplore.exe
Value data: 10
Base: Decimal
Click OK
4. Now locate this subkey: HKEY_LOCAL_MACHINE\SOFTWARE\Microsoft\Internet Explorer\MAIN\FeatureControl\
FEATURE_MAXCONNECTIONSPER1_0SERVER
5. Once again point to New, click DWORD Value, and add the following registry values: Value name: iexplore.exe
Value data: 10
Base: Decimal
Click OK
6. Exit Registry Editor and reboot your PC.

153 | auslogics.com TURBO WINDOWS® — The Ultimate PC Speed Up Guide Configure the connection limit via Group Policy
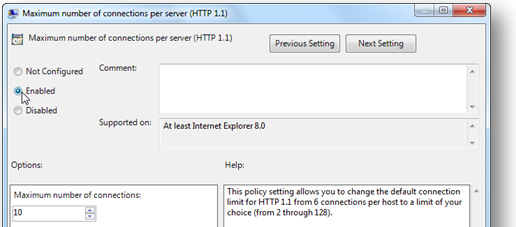
If you don’t feel like tampering with the registry, it’s also possible to increase the number of simultaneous connections per server through Group Policy. Here is how:
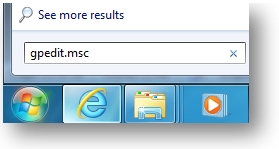
1. Click on Start, then click Run, type gpedit.msc, and then press Enter 2. Now expand User Configuration, then expand Administrative Templates, Windows Components, Internet Explorer, Security Features, and finally expand AJAX
3. Set the Maximum number of connections per server (HTTP 1.0) and the Maximum number of connections per server (HTTP 1.1) options to your preferred values. I recommend 10
4. Click Apply, then click OK
5. You will need to update policies or restart your computer for the changes to take effect.
154 | auslogics.com TURBO WINDOWS® — The Ultimate PC Speed Up Guide Configure connection settings with the help of Auslogics Tweak Manager
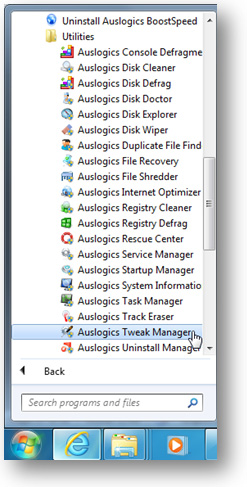
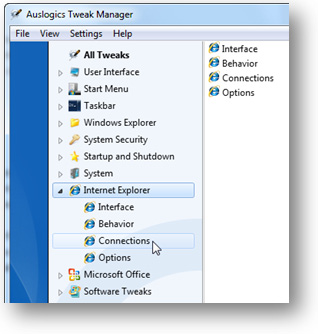
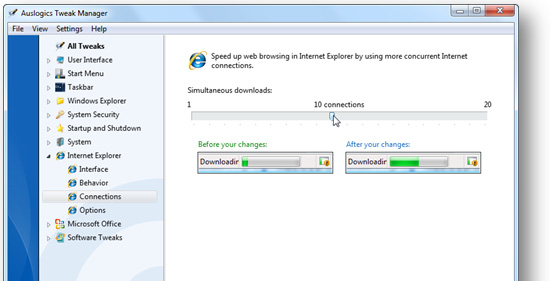
As you have just proven to yourself, editing the registry and using Group Policy is not all that hard once you know what you are doing. But you must remember that editing the registry manually is never 100% safe. So, if you don’t feel comfortable with it, you can use a third-party tweaking program like Tweak Manager in Auslogics BoostSpeed. With its help you can tweak hundreds of settings risk-free. Here is how you can use Auslogics Tweak Manager to increase the number of simultaneous connections: 1. Open Auslogics BoostSpeed and go to the Advanced Tools tab. Click on the System tweaks link under System Tweaks. You can also open the tool by clicking on Start – All Programs – Auslogics – BoostSpeed – Utilities – Auslogics Tweak Manager 2. In the left-hand pane, expand Internet Explorer and click on Connections. The program will display your current settings
3. Adjust the slider to select the desired number of simultaneous
connections. Technically, you can go up to 20, but 8-10 is recom-
mended
4. Click Apply. Alternatively you can click on Optimize and the program will set the optimal value for you 5. Close the program and that’s it! A lot easier than messing with the registry.
155 | auslogics.com TURBO WINDOWS® — The Ultimate PC Speed Up Guide Mozilla Firefox
Firefox is quickly becoming just as popular as Internet Explorer, if not more. Firefox is great for those who want to expand their browser with add-ons and want it to do more than just open pages. True, there are Internet Explorer add-ons too, but they are not nearly as good as Firefox’s.
The great thing about Firefox is that it’s faster than IE as it is and Mozilla tries to make every new version faster than the previous one. However, Firefox can be slow at times and it can also consume quite a bit of RAM. But the great thing about Firefox is that it’s a lot easier to speed up and customize than IE. Here are a few tips that will help you gain speed.
Configure the cache
Just like in Internet Explorer, it pays off to clean and configure Firefox cache:
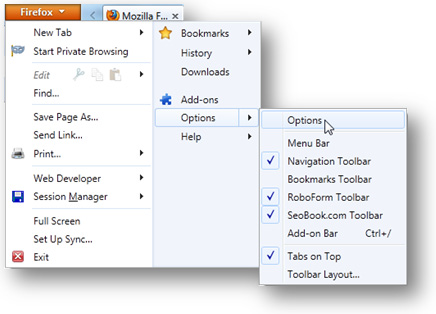
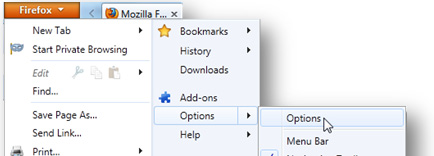
1. To clean the cache in Firefox 5, click on the Firefox button and then click Options. If you are on Windows XP, it’s the Tools menu
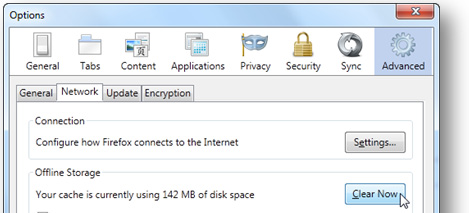
2. Now go to the Advanced panel and navigate to the Network tab
3. Click on the Clear Now button in the Offline Storage section
4. Click OK to close Options.
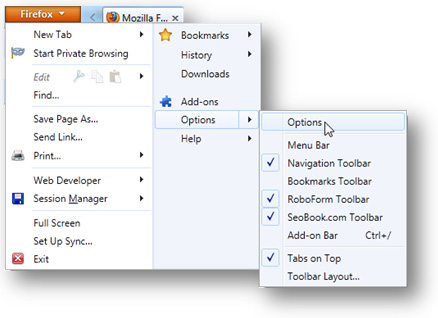
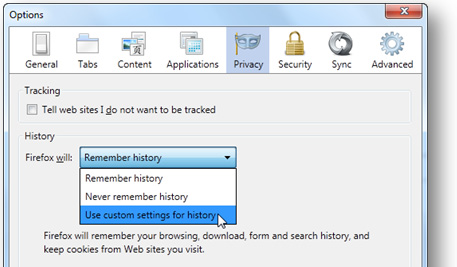
156 | auslogics.com TURBO WINDOWS® — The Ultimate PC Speed Up Guide You can also configure Firefox to clean the cache automatically when you close the browser: 1. Again, click on the Firefox button and go to Options (Tools for XP) 2. Now go to the Privacy panel
3. In the History section, select Use custom settings for history from the drop-down menu
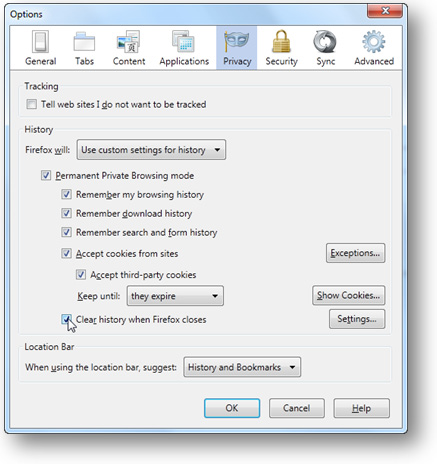
157 | auslogics.com TURBO WINDOWS® — The Ultimate PC Speed Up Guide 4. Check the Clear history when Firefox closes checkbox
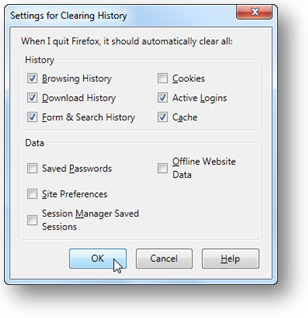
5. Now click on the Settings button to the right of the checkbox you’ve
just checked
6. In the new window, select the Cache. You are also welcome to select
any other checkboxes you find useful
7. Click OK to close the Settings window and OK to close Options.
And, naturally, you can resize the cache in Firefox, even though Firefox is a lot better than IE at setting the best size for the cache automatically. Here is how you can do it:
1. Click on the Firefox button and then click on Options
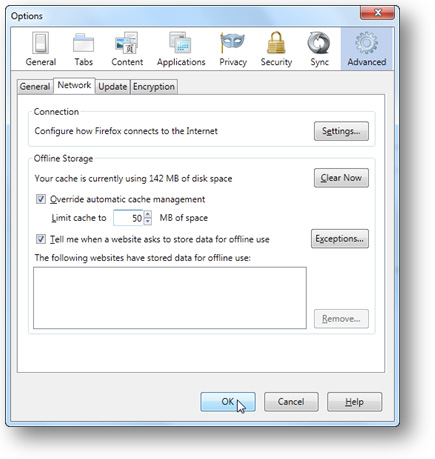
158 | auslogics.com TURBO WINDOWS® — The Ultimate PC Speed Up Guide 2. Go to the Advanced panel, check the Override automatic cache management and set the cache to 50MB
3. Click OK to close the Options window.
And now let’s do some serious tweaking!
Enable pipelining
HTTP pipelining is a technique that allows the browser to send multiple requests to a single socket without waiting for the corresponding responses. Pipelining is only supported in HTTP/1.1, not in 1.0. Using it can significantly speed up page loading time.
To enable pipelining, do the following:
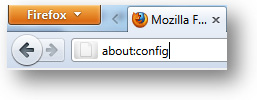
1. Open Firefox, type about:config in the address bar and hit Enter

159 | auslogics.com TURBO WINDOWS® — The Ultimate PC Speed Up Guide Click the button under I’ll be careful, I promise! if it appears
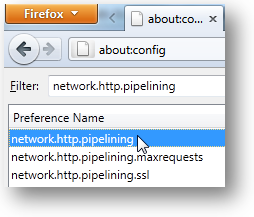
2. Enter network.http.pipelining into the filter box
3. Double-click on network.http.pipelining to set the value to true
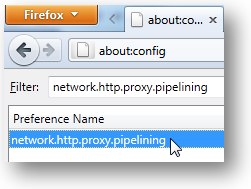
4. Now do the same for your proxy server. Find the value and check that network.http.proxy.
pipelining is set to true as well
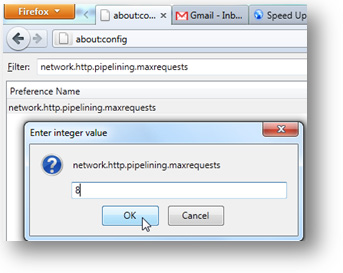
5. Now find and double-click network.http.pipelining.
maxrequests and set the number of pipelining requests to 8
and click OK. Eight is the maximum number of pipelining
requests currently available
6. Return to browsing the Web and enjoy the extra speed!
160 | auslogics.com TURBO WINDOWS® — The Ultimate PC Speed Up Guide Manage you toolbars and add-ons
Add-ons and toolbars are a bit like programs installed on your computer – the more there are, the slower your browser will launch and run. That’s why it’s good to have a look at what you have installed and remove things you never use. This is especially true for toolbars, since they take up quite a bit of system resources and are usually pretty useless. On top of that, toolbars often get installed with you none the wiser when you install some freeware programs.
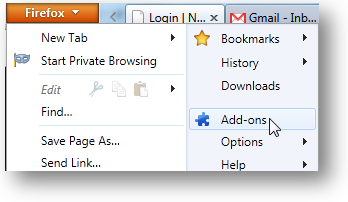
To check and manage your add-ons, click on the Firefox button and the click on Add-ons.
You will be able to uninstall most of them through there, but some of the more persisted toolbars need to be removed via the Control Panel.
Speed up your email client
Do you use an email client, such as Microsoft Outlook or Mozilla Thunderbird? If you do, then you know how slow and unresponsive it can become. This usually happens because the email files (like Outlook PST files) get bloated and start taking up too much space. Fortunately, it’s easy enough to make your email client faster and more responsive.
The easiest way to decrease your PST file is to clear the Deleted Items folder (Trash in Thunderbird). To do that, simply right-click on the Delete


