If you're starting from the Address Book, select the addresses you want to include in the To: box of a new message. You can use the click, Shift+click, and Ctrl+click selection methods discussed earlier. Now click the Action button on the toolbar and choose Send Mail or choose Tools → Action → Send Mail. A New Message window opens and the To: box includes the addresses you selected.
If you're starting from the New Message window, the Reply window, or the Forward window, click the little Rolodex card next to the To:, Cc:, or Bcc: box. You'll see a Select Recipients dialog box, like the one shown in Figure 8-35.

Figure 8·35: The Select Recipients dialog box after selecting two recipients and clicking the To: button
From here you can take any of the following actions as needed:
• To select the name(s) you want from the Name list, use the click, Shift+click, and Ctrl+click methods described earlier in the section "Working with several messages at once." Then, click the To:, Cc:, or Bcc: button depending on whether you want to add the names to the To:, Cc:, or Bcc: address boxes in your message.
• To highlight a name quickly in the Name list, click the "Type name or select from list" box and type the first part of the name (see "Searching the Address Book"). Now select the name you want (if it isn't highlighted already) and then click the To:, Cc:, or Bcc: button as appropriate.
• To do a Find People search, click the Find button and search as explained earlier in "Doing fancy Find People searches." After clicking Find Now, select the names you want and then click the To:, Cc:, or Bcc: button as appropriate.
When you finish using the Select Recipients dialog box, click OK. The e-mail recipient names you selected will appear in the address boxes of your message. (If you added a name by accident, simply click the name in the address box to select it and then press the Delete key.)
Now that you're an ace with your Address Book, why not try this great shortcut for specifying e-mail recipients? It works anytime you're using the New Message window, the Reply window, or the Forward window:
1. Click the To:, Cc:, or Bcc: box of the message as usual.
2. Type any part of a name or e-mail address that you know is in your Address Book. For example, type alan or simpson or coolnerds if you've entered my name and e-mail address in your Address Book. If you want to enter more than one recipient, type a semicolon, and then type the next name or e-mail address.
3. Repeat Steps 1 and 2 as needed.
4. If the correct recipient names aren't filled in automatically when you finish entering names, click the Check Names button on the toolbar or press Ctrl+K, or choose Tools → Check Names from the menu bar. Outlook Express will do its best to match and fill in the names you chose. If it needs your help to decide which address to include, you'll see a Check Names dialog box, as shown in Figure 8-36. Click the address you want to use and then click OK (or click Show More Names, highlight the name you want, and then click OK).
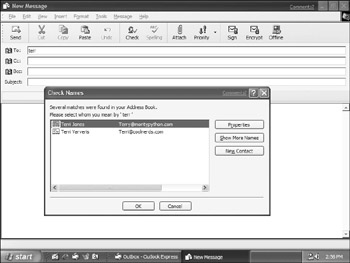
Figure 8·36: If Outlook Express can't match a name you entered, it displays the Check Names dialog box.
Tip If "Automatically complete e-mail addresses when composing" is checked on the Send tab of the Options dialog box - as it is by default - Outlook Express will fill in any match it finds in your Address Book as you type in the To:, Cc:, or Bcc: box of the message and you can skip Step 4. If more than one entry matches your typing, Outlook Express matches only the first entry it finds. For example, if your Address Book includes two Alans - Alan A. Abalone and Alan C. Simpson - Outlook Express matches Alan A. Abalone if you type alan. To match the entry for Alan C. Simpson in this example, enter simp or part of the e-mail address, such as cool. See the section "Personalizing Outlook Express," later in this chapter, for information on customizing the Send options.
Printing your Address Book
Who was it that said you can't take it with you? If they were talking about the Address Book, they were wrong. You can easily print a paper copy of your Address Book to take on a trip or to drop into your little black book by following these steps:
1. Open the Address Book (click the Addresses button on the main Outlook Express toolbar).
2. If you only want to print certain addresses, select them with the usual click, Shift+click, Ctrl+click, or Find methods.
3. Click the Print button on the Address Book toolbar or choose File → Print from the menu bar, or press Ctrl+P.
4. In the Print dialog box (see Figure 8-37), choose a printer, a print range, a print style, and the number of copies to print.
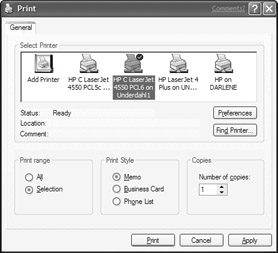
Figure 8·37: Use the Print dialog box to print a copy of your Address Book.
5. Click OK to start printing.
Using online directory services
The Internet is swarming with online directory services that enable you to look up e-mail addresses. Outlook Express can automatically access several of the most popular online directory services - Bigfoot, VeriSign, WhoWhere, and a local Active Directory is your company has such a service. To view or change the directory lists Outlook Express can search, choose Tools → Accounts from the Address Book or main Outlook Express menu bar, and then click the Directory Service tab in the Internet Accounts dialog box (if it isn't selected already).
If you want to add a new directory service to the list, click the Add button (or click Add and then choose
Directory Service). You'll be taken to the Internet Connection Wizard, which will prompt you for information including the Lightweight Directory Access Protocol (LDAP) server, whether the server requires you to log on, whether you want to check e-mail addresses using this directory service, and the name of the Internet directory service. Fill in each box and click Next or Finish to continue (you may need to contact the directory service if you're uncertain how to fill in the dialog boxes). When you finish adding the service, you'll see it in the list, as shown in Figure 8-38.
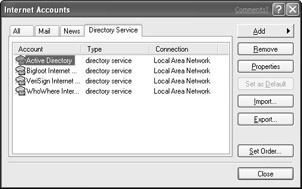
Figure 8·38: This is the Directory Service tab, which lists the online directory services.
Updating the directory service list is easy. First, click the name of the directory service you want to change. Then, click Remove to remove the service from the list, click Properties to view or change the settings you assigned in the Internet Connection Wizard, or click Set as Default to make this your default account. If you want to change the order used to check names when you send e-mail, click Set Order, move the directory services up or down in the list that appears, and click OK. When you finish using the Internet Accounts dialog box, click Close.
Tip Although you can have Outlook Express check names against the online directory service when you're sending e-mail, everything will go faster if you search the online directory occasionally and add selected addresses to your local Address Book (as explained in the section "Doing fancy Find People searches").
Backing up your Address Book
Just as you'll want to back up your message folders, you'll also want to back up your Address Book.
The Address Book is stored in a file named username.wab in the folder c.Documents and SettingsusernameApplication Data MicrosoftAddress Book, where username is your e-mail name or network user name.
Even a large address book like mine will fit conveniently on a floppy disk, so compressing the Address Book files before backing them up isn't important. Simply use My Computer, Windows Explorer, or Find to open the c. Documents and SettingsusernameApplication DataMicrosoftAddress Book folder. Then select the Address Book file and copy it to your backup disk.
Importing and exporting address books
If you used another e-mail program before switching to Outlook Express, you probably already have a bunch of add<