In this chapter, you learned about Usenet newsgroups, yet another popular feature of the Internet. Here's a quick recap of the important points covered in this chapter:
• A newsgroup is a collection of messages sent to and from people who share an interest.
• You can use Outlook Express News to participate in Usenet newsgroups.
• To use Outlook Express as your newsreader, you must set up your account using the name of the news server as provided by your ISP.
• With Outlook Express as your newsreader, you can post messages and reply to messages using the same tools you use to create e-mail messages.
• Many communities and message boards on the Web provide newsgroup-like services, without the need for a news server or newsreader. Just use your Web browser instead.
Chapter 10: Windows Messenger, Games, and Such
You don't always have to be alone at a computer. Windows Messenger enables you to communicate with others who might be logged on as well. You also can use MSN Chat to meet up with others who share your interests in various chat rooms built around specific interests. And don't forget about the most important use of computers: games! You can join others online and compete in a wide range Internet games. This chapter introduces you to these features of Windows XP and steps you through the processes required to get started.
Setting Up a .NET Passport
To use some of the features described in this chapter and the next, you need to set up Microsoft .NET Passport. If you're thinking that sounds a little "fishy," it's really no big deal. All you're really doing is giving yourself a unique user name that identifies you on the MSN network, as well as other networks that support Microsoft Passports and Microsoft .NET Web services. It won't cost you anything and won't interfere with your existing ISP account or e-mail address. To set up a .NET passport, follow these steps:
1.Click the Start button and open Control Panel.
2.Open the User Accounts icon.
3.If your computer is set up for multiple user accounts, click your account name or picture.
4.Click Set up my account to use a .NET Passport.
5.Follow the instructions presented by the wizard.
The procedure is simple and self-explanatory. When you've finished, you'll be able to use the Windows
Messenger program described in this chapter.
Starting Windows Messenger
An icon for Windows Messenger is usually visible in the Notifications area of the taskbar. If you see an x circled in red, that just means you're not signed in at the moment (or, you haven't set up your .NET Passport yet). To open Windows Messenger, you can do any of the following:
• Double-click the Windows Messenger icon in the Notifications area.
• Or, click that same icon and choose Open.
• Or, click the Start button and choose Windows Messenger.
Windows Messenger opens in a small window. If you're not signed in, you'll just see a prompt that says Click here to sign in. Just click that text to sign in. Once you're signed in, the window will look more like Figure 10-1. In that example, I've already set up some contacts, so your window won't look exactly like the example. But you can easily set up your own list of contacts, as described next.
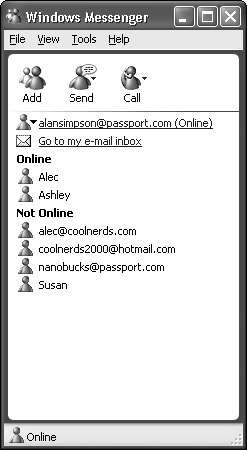
Figure 10-1: The Windows Messenger window
Creating your contacts list
The next step is to create a contacts list - or "buddy list" as some services call it - of people with whom you want to interact online via the Messenger service. With the Windows Messenger window open on your screen, follow these steps to get started:
1. If the Windows Messenger indicates that you're not signed in, go ahead and click that blue underlined text to sign in.
2. Click the Add button in the Windows Messenger window. The Add a Contact Wizard starts.
3. Choose how you want to identify the contact. If you know the person's e-mail address or sign-in name, for example, choose the first option. If you don't know that, choose the second option. Then click the Next button.
4. Follow the instructions presented by the wizard to add a contact.
After you've set up at least one contact, you will see which of your contacts are currently online (and which are not) when you start Windows Messenger. For example, back in Figure 10-1 my contacts named Alec and Ashley are both online. The rest, listed below those names, are currently offline.
Starting a conversation
To communicate with one of your contacts, double-click the contact's name in the list. Alternatively, click the Send button and choose the contact's name from the menu that appears. In the Conversation window that appears, type a message in the lower text box. You can insert an emoticon (tiny picture) into your message by typing a series of characters. For example, typing :) displays a happy face. Table 10-1 lists the characters you type to insert emoticons. After typing your message, click the Send button to send it. The message moves the Conversation pane as in the example shown in Figure 10-2.
Table 10-1: Emoticons, and the Characters You'll Type to Display Them

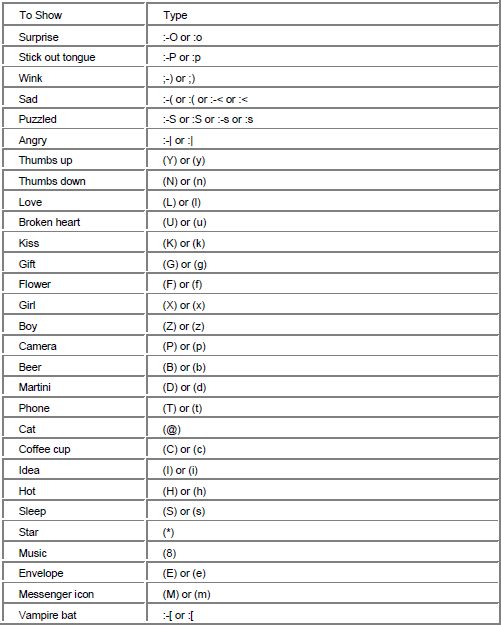
Table 10·1: Emoticons, and the Characters You'll Type to Display Them
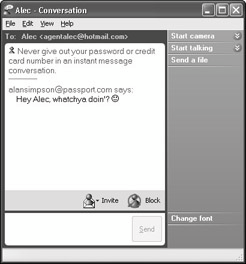
Figure 10-2: Preparing to send a message to Alec using the Conversation window
Tip To see the actual emoticon pictures, choose Help → Help Topics from the Windows Messenger menu bar, and then choose Use Emoticons in Messages from the Web page that opens. Note that emoticons won't be visible until you press the Send button. If they still don't appear, choose Edit → Show Emoticons from the
Conversation window's menu bar.
Click the Send button after you've finished typing your message. The recipient will see the message right away if he is in the Windows Messenger window. If that window isn't open, a notification will
appear on his screen as in the example shown in Figure 10-3. Clicking the larger taskbar button to the
left of the Notifications area will open the Conversation window. Now you can communicate with one another by typing in the lower window and clicking the Send button.
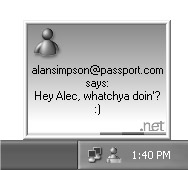
Figure 10-3: What the recipient, Alec, might see when my message arrives
Tip To choose a different font for your messages, click the Change Font option in the right pane, or choose Edit → Change from the Conversation window's menu bar.
To get other contacts to join in the conversation, just click the Invite button and fill in the blanks as instructed. To end the session, just close the Windows Messenger dialog box. Alternatively, should you get a weirdo on the line whom you want to get rid of, just click the Block button to make her go away. Careful though - that person won't be able to reach you in the future, so don't block people you intend to communicate with later.
Tip If the text in the conversation is too small to read, choose View → Text Size from the Conversation window's menu bar, and try a larger text size.
Your "Do Not Disturb" option
If you don't want to receive messages, log off of the service. Then right-click the Windows Messenger icon in the Notifications area of the taskbar and choose Sign Out. Other people who have you listed as an online contact will then see you as being offline. The Windows Messenger icon in the Notifications area will display an x to indicate you're offline. When you want to sign back in, just right-click that icon and choose Sign In.
As an alternative to signing out, you can display a message that indicates you're away from the computer or busy. Right-click your Windows Messenger icon, choose My Status, and select an option from the submenu that appears (see Figure