NetMeeting has so many capabilities that it would take a small book to cover all the possibilities. Because I have only one chapter to work with, I have limited my coverage to just the most important and widely used features of the product. For the rest of this chapter, I want to point out some of those capabilities and point you in the right direction for getting more out of NetMeeting.
Using Directory Services
You are not limited to using the Microsoft Internet Directory as your directory server. NetMeeting is compatible with a wide range of directory servers. The best source for finding compatible servers is probably the NetMeeting Zone at www.netmeet.net. You might want to read up on the latest information available from its home page. If you're just looking for other servers that work with NetMeeting, however, you can go straight to the page at www.netmeet.net/bestservers.asp.
Tip Directory server URLs typically follow the format ils.domainname.com, where ils is an acronym for Internet Locator Service (a service that finds people currently online). For example, the URL of the Microsoft Internet Directory is actually ils.microsoft.com. Of course, the URL of a directory server can be anything - the initial ils acronym is common, but by no means universal.
There are a couple of ways to log on to a server other than a Microsoft server. If you want to control whether your name will appear in that server, and whether you're logged on to a specific server when NetMeeting starts, your best bet is to add the directory server's URL to NetMeeting via the Options dialog box. Here are the exact steps:
1. From NetMeeting's menu bar choose Tools → Options.
2. Under Directory Settings, replace the contents of the Directory drop-down list with the URL of the directory server that you're interested in. For example, you could drag the mouse pointer through the Microsoft Internet Directory option to select it. Then type in some new directory URL, such as ils. visitalk.com.
3. If you don't want to be listed in that directory server's list of people online, select the Do Not List My Name option.
4. If you want to log on to a directory server automatically whenever NetMeeting starts, select the second option. Then choose the name of the directory that you want to log on to automatically from the Directory drop-down list.
5. Click OK.
Tip You also can enter a new directory URL in the Select a directory drop-down list of the Find Someone dialog box, which opens after you choose Call → Directory from NetMeeting's menu bar.
Now whenever you're in NetMeeting and want to visit some server other than the one you're currently logged on to, just choose Call → Directory from NetMeeting's menu bar. Open the Select a Directory drop-down list and choose the directory that you want to log on to. To place a call to anyone in the list, just click her name and then click the Call button.
Gateways and gatekeepers
If you work for a large organization that uses gateways and/or gatekeepers to provide access to telephone and videoconferencing, you can log on to that server via NetMeeting. First you need to get the address, password, and any other relevant information about the server from your company's network administrator or system administrator. That person can best tell you how to use the server. Some of those servers will even let you dial directly to normal telephones via NetMeeting. Should you ever need to dial directly, you can use choose View → DialPad from NetMeeting's menu bar to get to the dialing pad.
Still more
As I said earlier, a single chapter in a book cannot really do justice to all that NetMeeting and all the various ILS servers on the Internet have to offer. Given that this is a book about Windows, however, rather than NetMeeting per se, a chapter is all I have to work with. You can find a lot more information online that will help you expand the basic skills and concepts that you learned here. Of course, NetMeeting's own Help menu offers plenty of information - just choose Help → Help Topics from NetMeeting's menu bar. On the Web you can learn about the many different directory servers that support NetMeeting, keep up with new events as the technology evolves, and learn about some of the more esoteric features of NetMeeting from any of these Web sites:
• Microsoft's NetMeeting Page at www.microsoft.com/windows/netmeeting
• MSN Messenger page at http://messenger.msn.com
• MSN Hailstorm at http://communities.msn.com/microsofthailstorm
• CU-SeeMe World at www.cuseemeworld.com
• Conflab.com at www.conflab.com
• Helpmeeting at www.helpmeeting.com
• ILS Center at www.ilscenter.com
A search for the keywords "free long distance," "videoconference," "security certificate," or "NetMeeting" using any Web search engine is bound to turn up a lot more resources.
Summary
NetMeeting is one of the most powerful Internet tools in the Windows XP arsenal. As discussed in this chapter, it enables you to communicate online using voice, video, chat, and a whiteboard. You also can use NetMeeting to collaborate on projects, transfer files, and manage computers remotely. Here's a quick recap of the main techniques covered in this chapter:
• The easiest way to place a call in NetMeeting is to choose Call → Directory from its menu bar to see who is online. Then click the name of the person you want to call.
• To "chat" (by typing messages) during a call, click the Chat button.
• NetMeeting's Whiteboard acts as a board on which you can place text and pictures. Click the Whiteboard button or choose Tools → Whiteboard to open the board.
• To collaborate on a project in NetMeeting, open the document you want to share, and then click the Share Program button or choose Tools → Sharing from NetMeeting's menu bar.
• To transfer files in NetMeeting, click the Transfer Files button.
• To finish a call, click the Hang Up button.
• To turn over control of your computer to a trusted expert, use Remote Desktop Sharing, available on NetMeeting's Tools menu.
• To control an unattended computer from afar, set the computer up to "listen" for RDS requests before leaving the computer. You can do so by right-clicking the NetMeeting Remote Desktop Sharing icon in the Notification area of the Windows taskbar.
Chapter 12: General Housekeeping (Copying, Deleting, and
So On)
As you gain experience in using your computer, creating documents, and so forth, you may find you occasionally need to manage your files. The term "manage" includes copying, moving, deleting, and renaming folders and files. It can also include compressing and uncompressing files that are stored in the popular Zip format. This chapter explains all the basic techniques you use to manage files and folders on your PC. As you'll see, you'll use the Windows Explorer (i.e., "Explorer") window discussed in Chapter 2 to perform all these tasks. So if you find yourself having trouble in this chapter, be sure to review Chapter 2 so you remember how to "get around" using that Explorer window.
Select, Then Do
Often, when moving, copying, or deleting files, you'll want to do so with more than one file at a time. It would be darn tedious if you had to, say, move or copy 100 files one at a time. So before we get into the specifics of these file management techniques, you'll want to learn how to select the files you intend to work with. Like just about everything else in Windows (and most Windows programs you'll use), the "Select, Then Do" rule applies. First you select the files you want to move, copy, or delete, and then you do the task, be it copying, moving, or deleting. There are many ways to select files. The general rule is to just use whichever technique is most convenient at the moment.
First, get to the files
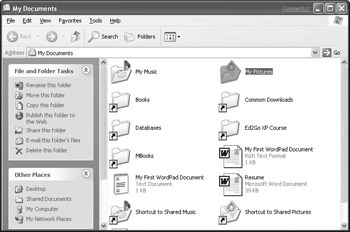
To do anything with a file, or files, you first need to get to them via Explorer. As you may recall from Chapter 2, the Explorer window opens any time you click My Computer, My Documents, My Pictures, or any other location from the Start menu - as well as when you choose Search from the Start menu. For example, Figure 12-1 shows Explorer displaying the contents of my My Documents folder after choosing My Documents from the Start menu. In this example, I'm viewing the Folders pane, Explorer bar, and my files and folders in Icons view, with the Explorer window maximized to full-screen size.