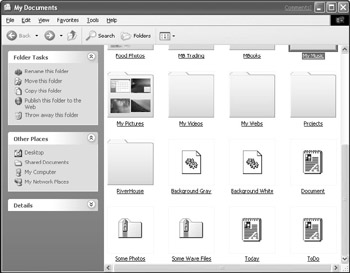
In Figure 12-15, I have created a couple of compressed folders within My Documents. Their zippered icons are visible in the lower part of the Explorer window. Remember that compressed folders aren't really folders at all - they're actually Zip files. Notice that in Thumbnails view, which is what Figure 12-15 is using, the compressed folder icons aren't as big as the icons for the regular folders. In fact, the compressed folder icons are the same size as the regular file icons. Furthermore, when you arrange the icons by name, the compressed "folders" are alphabetized with the rest of the files in the folder, not with the regular folders. But of course, that's not important to using the compressed folders.

Figure 12·15: Compressed folders have a zipper on their icon, like the two near the bottom of this Explorer window.
Moving/copying files to a compressed folder
After you've created a compressed folder, you can easily move or copy any files or folders into it. For tarters, you can open the compressed folder by clicking (or double-clicking) its icon. Size its window to make room for other Explorer windows. Then open My Computer, My Documents, or any other Explorer window, and navigate to the folder that contains the files/folders you want to compress. Select the files/folders you want to compress, using any of the techniques described earlier in this chapter. Then copy or move those files to the compressed folder by right- dragging and then dropping them into the compressed folder.
Tip It's not really necessary to open the compressed folder to move/copy items into it. You can drop selected items onto the folder's icon instead.
Remember that if you move the files into the compressed folder, they will no longer be available from their original location. You'll have to open the compressed folder to get at those files and folders. Do this only if your hard disk is getting full and you want to use compression as a way to gain back some disk
(or if you intend to move the compressed folder to some external medium such as a floppy disk).
E·mailing your compressed files
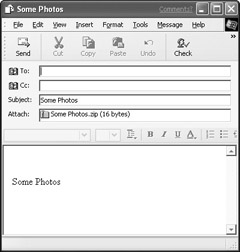
If you compressed your files to make it quicker and easier to e-mail them to someone, there are a couple of ways you can attach the compressed files to someone. The quickest way is to right-click the compressed folder and choose Send To → Mail Recipient. Your e-mail client program (for instance, Outlook Express) will open a window that enables you to compose your e-mail message, as in Figure 12-16. The compressed file (that is, the Zip file) is already attached, and the Subject is filled in with the name of the file you're sending. You just need to fill in the recipient's e-mail address in the To portion and add any text to the body and then click the Send button.

Figure 12·16: A window for composing an e-mail message, with the Some Photos compressed folder already attached Optionally, you can compose your e-mail in the traditional manner and attach the compressed folder just as you would attach any normal file to an e-mail message, as discussed in Chapter 8.
When the recipient gets your message, the file will be like any other attachment. The recipient can use her e-mail program to save the attachment to her own hard disk. If she doesn't have Windows XP (or some other version of Windows that supports compressed folders), the file will be saved as a regular Zip file, with the normal icon for their system, in whatever folder she places the icon. If she has a version of Windows that supports compressed folders and no third-party compression program installed, the saved attachment will appear as a compressed folder in her system.
Uncompressing files
There are several ways to deal with files that are within a compressed folder. Probably the simplest way to do so is to extract normal, uncompressed copies of the files out of the folder and into some normal folder on your computer, such as My Documents. To do so, follow these steps:
1. Right-click the compressed folder's icon and choose Extract All. An Extraction Wizard will open.
2. Click Next on the first page of the wizard. On the second wizard page, use the Browse button to navigate to the folder in which you want to place the normal, uncompressed copies of the files. Then click OK.
3. Click the Next button to extract. If you want to open the folder in which you placed the extracted files, choose the Show Extracted Files option on the last wizard page.
4. Click the Finish button.
After the files have been extracted, it's not necessary to keep the original compressed folder. You can right-click its icon and choose Delete if you want to get rid of it.
As an alternative to extracting all the files from a compressed folder in one fell swoop, you can extract them individually. This comes in handy if you want to put different files in the compressed folder into several different folders on your hard disk. For example, if the compressed folder contains pictures and text documents, you might want to put the pictures in your My Pictures folder and the text documents in your My Documents folder. To extract files individually, follow these steps:
1. Open the compressed folder by clicking (or double-clicking) its icon. Its contents appear in a "normal looking" Explorer window.
2. Shrink that open Explorer window down a bit to make room for another Explorer window.
3. Open My Documents, My Computer, or any other Explorer window, and navigate to the folder into which you want to place normal, uncompressed files. Shrink that window down a bit too so that you can see both open Explorer windows.
4. In the compressed folder's Explorer window, select the files/folders you want to uncompress to the other Explorer window.
5. Right-drag the selected items from the compressed folder to the normal folder and choose Copy Here or Move here, depending on which you want to do.
You can repeat Steps 3-5 to move or copy different files from the compressed folder to different folders on your hard drive.
Caution Some programs cannot be run while they are contained in a compressed folder. If you find that a particular program won't run in a compressed folder, just move the program and its associated files to a regular un-compressed folder. Then open the program file from within that normal, uncompressed folder.
Note If you have formatted your hard drive using NTFS - the NT File System - you also have the option of using NTFS file compression on your entire hard drive. NTFS file compression is not related to compressed folders or Zip files and so does not have any effect on files you send or receive. See "NTFS File Compression" in Chapter 31 for more information.
Other compression types
Windows XP compressed folders use Zip compression mainly because that's the most popular method for transferring compressed files from one Windows computer to the next. However, Zip isn't the only compression method out there. Macintosh users often use a program named StuffIt to compress files. These compressed files often have the .sit file name extension. UNIX and Linux users sometimes compress files to Tape Archive (.tar) or gzip (.g or .gz) format. Still others will create self-extracting files (.exe) that automatically decompress as soon as you open their icons.
If you attempt to open a compressed file that Windows cannot decompress, you'll either be taken to an Open With window or a dialog box that enables you to search the Web for programs that might be able to open the file. If the Open With list opens, there's no harm in trying one of the listed programs. You might have to try several to find one that works. It's also quite possible that none of the listed programs will work!
If instead of the Open With list, you're taken to the option that enables you to browse the Web for appropriate programs, you can choose that option to see what suggestions are listed. Before you download any programs to open the file, remember that if the program you download also handles Zip files, you may lose the ability to use the built-in Windows XP compressed folders capability. Your best bet might be to reply to the person who sent you the compressed file and ask whether he can send a Zip file instead. If you really need the flexibility to work with a wide variety of compression formats, your best bet might be to do some research on Windows XP-compatible programs. First, go to a download site such as http://download.cnet.com. The


