1.Click the Start button and choose All Programs → Accessories → System Tools → Character Map.
2.Use the Font drop-down list to choose a font. (Different fonts offer different characters to choose from.) In Figure 22-5, for example, I chose the Wingdings fonts, which offers all kinds of symbols.
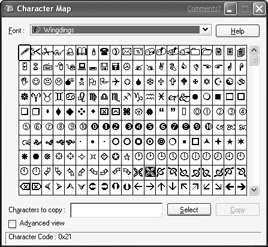
Figure 22·5: The Character Map applet with the Wingdings font selected
3.To get a close-up look at a character, point to the character you want to inspect and then hold down the primary mouse button.
4.To select a character, click it and then click the Select button. The Characters to copy text box will show the character to be copied. You can repeat this step to select as many characters as you want.
5.To paste the character(s) into your document, first click any visible portion of the document's program window or the program's taskbar button to make it the active widow. Then, in the document, right-click where you want to place the character(s) and choose Paste.
Using Image Preview
Image Preview is an applet that pops up on its own when you open a graphics image (or fax) that isn't associated with any other graphics program. You also can open any picture in Image Preview by right- clicking the picture's icon and choosing Preview. To open several images at once, select the image's icons in any Explorer window. Then right-click any selected icon and choose Preview. One picture will appear within Image Preview, as in the example shown in Figure 22-6.
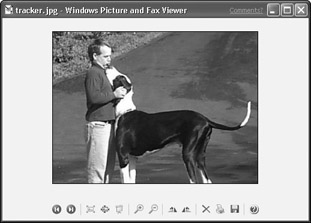
Figure 22·6: The Image Preview applet displaying a photograph
Buttons in the toolbar across the top of the window provide some rudimentary options for working with the image. To get an idea of what a specific button does, just point to the button for a moment. Here's what the buttons offer:
• Previous Imagel Next Image: If several pictures are open, enables you to view the next or previous image.
• Best Fit: Displays the picture at the largest size possible within the window.
• Actual Size: Shows the picture at its actual size.
• Start Slide Show: Starts a full-screen slide show of all the pictures in the current folder. Clicking the Close (X) button near the upper-right corner of the screen returns you to the
viewer.
• Zoom In: Clicking this button turns the mouse pointer into a little magnifying glass. Click any part of the picture to zoom in on that spot.
• Zoom Out: Does the opposite of Zoom In.
• Rotate Clockwise: Rotates the picture clockwise 90 degrees.
• Rotate Counterclockwise: Rotates the picture counterclockwise 90 degrees.
• Delete: Deletes the image file from your disk.
Caution The Delete button does not just remove the picture from the Image Preview window - it actually deletes the file from your hard disk!
• Print: Prints the picture.
• Copy to: Enables you to save a copy of the image to your hard disk with any file name you want.
• Edit: Closes the viewer and opens the picture in an editing program, such as Paint.
• Help: Brings up the Help for Image Preview, where you can learn more about the program.
As with any window, you can close Image Preview by clicking the Close (X) button in its upper-right corner.
Editing Pictures with Paint
Whereas Image Preview just lets you look at images, Paint enables you to change them. As WordPad is to full-blown word processing programs, Paint is to full-blown graphics programs - it's a scaled-down version with just a handful of features. To start Paint, click the Start button and choose All Programs → Accessories → Paint. Initially, you are taken to a blank canvas within the program.
You can actually draw in Paint. First choose a line color by clicking the color you want down in the little color palette near the bottom of the window. You also can choose a fill color, which comes into play when drawing filled shapes, by right-clicking any of the colors in the palette. Then pick a drawing tool from the left side of the window. If you're interested in learning how to draw with Paint, choose Help → Help Topics from its menu bar and then click any book that appears in the contents pane at the left of the Help window.
Getting Pictures into Paint
For those of us who can't draw worth beans, Paint can serve as a tool for working with existing pictures and photographs. Suppose, for example, that you're browsing through some pictures in your My Pictures folder and you see a picture you want to edit or crop or whatever. To open the picture in Paint, you can right-click its icon (or thumbnail) and then choose Open With → Paint from the shortcut menu that pops up. Or, you can start Paint from the Start menu (Start → All Programs → Accessories → Paint.) Then choose File → Open from its menu bar to open any picture file.
You can often use Paint to edit pictures that aren't even on your hard disk. Suppose, for example, that you're browsing the Web with Internet Explorer and come across a picture or photo that you want to have a copy of. All you need to do is start up Paint from the Start button. Then, in Internet Explorer right- click the picture you're interested in and choose Copy. Then go back to Paint and choose Edit → Paste from its menu bar.
Note Of course, I'm not condoning swiping copyrighted pictures off of Web sites. I assume you'll use the utmost caution to make sure you don't break any copyright laws when you cut-and-paste into Paint.
If all else fails, you can take a snapshot of the screen and then paste that into Paint, as discussed under "Printing the Screen," later in this chapter. Then crop out anything you don't want in your final picture.
Nothing much seems to happen, but the snapshot of the screen is in the Windows Clipboard at this point. To paste it into Paint, choose Edit → Paste from Paint's menu bar.
Rotating pictures in Paint
If you hold the camera sideways when taking a picture with a digital camera, the image you see on your screen will also be sideways, such as the example shown in Figure 22-7.

Figure 22·7: A photo in Paint, before flipping it
To rotate the image upright, follow these steps:
1. Choose Image → Flip/Rotate from Paint's menu bar.
2. In the Flip and Rotate dialog box that appears, choose Rotate by Angle.
3. Choose 90° and then click the OK button.
The image rotates accordingly, as in Figure 22-8. If your image turns upside down, choose Image → Flip/Rotate → Flip Vertical.
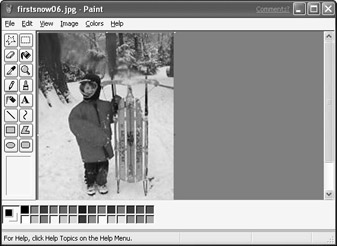
Figure 22·8: A photo in Paint after rotating it 90 degrees
Cropping pictures in Paint
Another common problem with photographs is when the picture is taken from too far away, leaving a whole lot of extra background that's perhaps not all that relevant to the real subject of the photo. In this case, the solution is to crop the picture by just cutting out any unwanted background. To crop a picture in Paint, follow these steps:
1. Click the Rectangular Selection tool on the toolbar at the left side of Paint's window. (It is the upper-right button.)
2. Point to any corner where you want to begin the cropping and then drag a frame around that portion of the image you want to keep, as in the example shown in Figure 22-9.
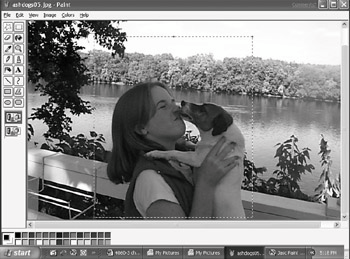
Figure 22·9: Here I've dragged a selection rectangle around a portion of a photo.
3. Choose Edit → Copy from Paint's menu bar. A copy of the selected portion of the picture is placed in the Windows Clipboard.
4. Open another instance of Paint by clicking the Windows Start button and choosing All Programs → Accessories → Paint. The new instance of Paint opens with a blank canvas. The rest of the steps must take place in this n