• To select text, drag the mouse pointer through the text you want to select.
• To select a single picture, click it once.
• To select the number currently showing in Calculator, choose Edit → Copy from Calculator's menu bar.
• To select an entire document or picture, choose Edit → Select All from the program's menu bar.
2.When the item is selected, choose Edit → Copy from the program's menu bar or press Ctrl+C. A copy of the selection goes into the Windows Clipboard.
Note
You cannot copy a picture from Image Preview into the Windows Clipboard. You have to open the image in Paint or some other graphics program instead. You cannot really paste text into a picture either. However, you can paste a picture or a number into text.
3.In the document in which you want to place the picture or number, click at about where you want to insert the copy. Then press Ctrl+V or choose Edit → Copy from that program's menu bar, or right-click the spot where you want to paste and choose Paste from the pop-up menu.
Let me show you an example. Figure 22-11 shows two separate documents in two separate programs - a graphic image in Paint and some text typed in WordPad.
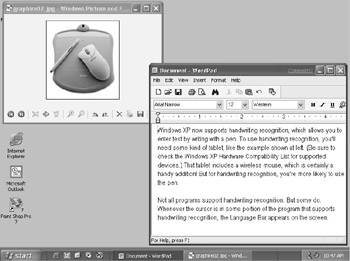
Figure 22·11: A picture in Paint and some text in WordPad
Suppose you want to put a copy of the picture inside the written document in WordPad. It's not too difficult. Just follow these steps:
1.In Paint, choose Edit → Select All to select the picture. Then choose Edit → Copy to copy it to the Windows Clipboard.
2.In WordPad, click at about where you want to place the picture. In my example, I clicked near the upper-left corner of the document.
3.Press Ctrl+V or choose Edit → Paste from WordPad's menu bar.
4.The picture is pasted and also has sizing handles. You can drag any corner or edge to size the picture. Figure 22-12 shows the results. It's not ideal. Figure 22-13 shows a Microsoft Word document with lots of pictures thrown in. As you can probably guess, Word gives you much better control over the exact size and placement of the pictures within a document. The important point is, however, the basic cut- and-paste techniques described here will work in virtually every Windows program you ever use. So do keep them in mind!
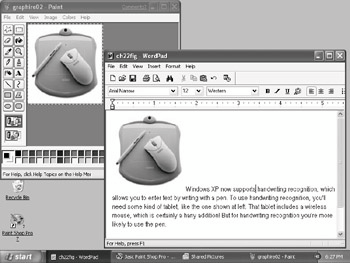
Figure 22·12: The picture has been pasted in the WordPad document.
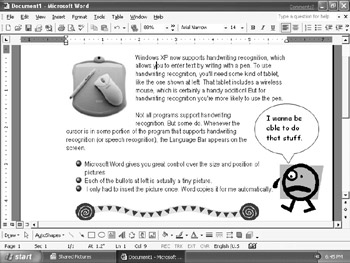
Figure 22·13: Microsoft Word offers very precise control of pictures within a document.
I should also point out that as an alternative to the Clipboard, you can use scraps, discussed in Chapter 28, to move and copy material from one document to another.
Printing the Screen
In the olden days of DOS, you would print whatever was on your screen by pressing the Print Screen (Prnt Scrn) key on your keyboard. In Windows, this works a little differently. First you capture the screen to the Windows Clipboard. Then you can paste it into Paint or any other graphics program and print it from there.
You can capture the screen in two ways:
• Press the Print Screen key if you want to capture the entire screen.
• Hold down the Alt key and press Print Screen if you want to capture only the current window (whichever window on the screen has the colored title bar).
Nothing appears to happen, but the Windows Clipboard receives a copy of the screen or window. You can verify this by opening the Clipboard Viewer, if you like. To print or save this image, you need to open Paint or some other graphics program and then choose Edit → Paste from that program's menu bar. A copy of the image will be loaded into the graphics program.
At this point, the screen capture is like any other graphics image. You can edit it by using the graphics program. You can save it by choosing File → Save or print it by choosing File → Print from the graphics program's menu bar.
Summary
In this chapter, you learned about some of the applets that come with Windows XP, as well as some general ways to move and copy stuff from one document to another. Here's a quick recap of the important points covered in this chapter:
• The Windows applets provide some simple tools for working with numbers, text, and pictures.
• The Calculator applet works like a standard pocket calculator.
• The Notepad applet is good for working with plain, unformatted text.
• The WordPad applet is a miniature word processing program capable of displaying fancy text, fonts, pictures, and special characters.
• The Character Map applet enables you to insert special characters - characters not normally found on the keyboard - into a document.
• The Paint applet enables you to draw pictures and to perform some rudimentary editing on photographs and other graphics images.
• To put something into the Windows Clipboard, select the thing to move/copy and then choose Edit → Copy or Edit → Cut from this program's menu bar.
• To copy something from the Clipboard into another document, click at about where you want to place the object. Then choose Edit → Paste from that program's menu bar, or right-click and choose Paste.
• Keyboard alternatives for cut-and-paste are as follows: Ctrl+C copies the selection to the Clipboard, Ctrl+X moves the selection to the Clipboard, and Ctrl+V pastes the Clipboard contents at the current cursor position.
• Use the Print Screen and Alt+Print Screen keys to puts screenshots in the Windows Clipboard.
Then paste the snapshot into any graphics program by choosing Edit → Paste.
Chapter 23: Cameras, Scanners, and Faxes
Windows XP has made working with pictures easier (and more fun) than ever. You can get pictures onto your computer from a wide variety of sources, including cameras, scanners, faxes, screen shots, and clip art. All pictures, regardless of their source, are referred to as digital images in tech talk. Regardless of where a digital image originated, the tools and techniques for working with them are pretty much the same. Chapter 22 has already discussed some of the basics of working with pictures. This chapter goes much deeper into the subject to give you total mastery of working with the many different types of digital images you're likely to come across.
Pictures Are Documents
Every picture (digital image) on your computer is a document stored in a file. There are lots of different programs available for working with digital images. You met two of them that come with Windows XP in Chapter 22: Image Preview and Paint. If you happen to own Microsoft Office XP, you might also have Microsoft Photo Editor installed on your computer, which provides some basic editing capabilities for working with pictures. Many third-party graphics programs provide even greater picture-editing capabilities. For example, Jasc's Paint Shop Pro (www.jasc.com) is a very high-powered yet easy to use program that gives you total control over virtually all types of images (as well as animations). Adobe's PhotoShop (www.adobe.com) is another high-powered program for working with pictures.
Like any document file, digital images can be stored in any folder on any disk. To give you a little help in keeping your pictures organized and some extra tools for working with images,
Windows comes with the following two folders already created on your hard disk for storing your pictures.
• My Pictures: Stores pictures yo