1. Click the Start button and choose Control Panel. If Control Panel opens in Category view, choose Sounds, Speech, and Audio Devices option.
2. Open the Sounds and Audio Devices icon. Initially, you'll be taken to the Volume tab shown in Figure 24-1.
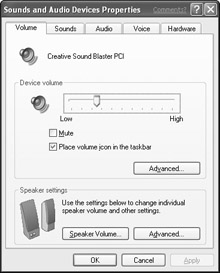
Figure 24·1: The Volume tab of the Sounds and Audio Devices dialog box
Caution
With headphones, too much volume can actually damage your ears. Be sure to hold the headphones away from your ears while you adjust volume so that you don't hurt yourself!
3. If you want a volume control on your taskbar, choose the Place volume icon in the taskbar check box, as in the figure.
4. Click the Apply button.
5. A tiny speaker icon appears in the taskbar. From now on, you can adjust your sound volume by clicking that icon and dragging the slider, as shown in Figure 24-2.
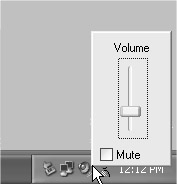
Figure 24·2: The volume control slider on the Windows taskbar
The Volume tab, under Device Volume, also offers you these other options:
• Volume slider: General sound card volume, linked to the slider that's accessible from the taskbar (moving one moves the other).
• Mute: If selected, no sound will come from the sound card.
• Advanced: Takes you to the "mixer" for setting the volume of individual types of sound, as discussed later in this chapter.
Under Speaker Settings, you have the following options:
• Speaker volume: Enables you to set the right and left speaker volume for all speakers attached to this computer.
• Advanced: Enables you to maximize speaker performance by choosing a speaker setup that best resembles your own and to adjust other settings relevant to your particular sound card and speakers.
Choosing preferred playback devices
You might have multiple devices capable of playing and recording sound. For example, the computer I'm sitting at right now has a sound card and speakers. It also has an audio headset with a speaker and a microphone. Most of the time, I prefer to use my large external speakers for playing sound. For recording voice (or talking on the Internet), however, I prefer the microphone on the headset. Choosing your preferred devices in Windows XP is pretty easy. In the Sounds and Audio Devices Properties dialog box shown back in Figure 24-1, just follow these steps:
1. Click the Audio tab to reveal the options shown in Figure 24-3.
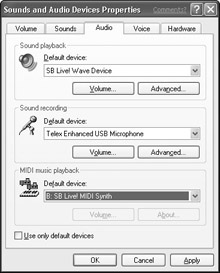
Figure 24·3: The Audio tab of the Sounds and Audio Devices Properties dialog box
2. Using the available drop-down lists, choose your preferred device for sound playback, recording, and MIDI music.
3. Optionally, you can adjust the volume of each device individually using the Volume button. You'll be taken to the mixer described later in this chapter.
4. Optionally, you can use the Advanced button (if enabled) to adjust other settings that are relevant to your audio devices.
The Use only default devices option will limit your sound recording and playback to the devices you have selected. You probably don't want to select that option until you have all your devices working properly. If it turns out that two or more devices are playing or recording sound, you can choose that option to limit sounds to your chosen default devices.
If you use voice communications, such as speech recognition, narration, and so forth, you can select devices for voice sound. Click the Voice tab to reveal the options shown in Figure 24-4 and choose your devices. Choosing the Test Hardware button will fire up a wizard that will let you test and adjust your voice hardware. If you have a headset or any other microphone, choose this option to get all that squared away now.
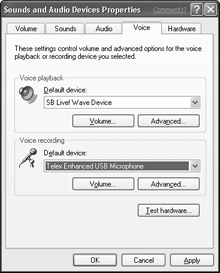
Figure 24·4: The Voice tab of the Sounds and Audio Devices Properties dialog box
At this point, you click the OK button in the Sounds and Audio Devices Properties dialog box and save your settings. You can, of course, change your preferred devices at any time. If you have a headset for voice as well as a microphone and you prefer to use the microphone, for example, you can just go into the Sounds and Multimedia Properties dialog box and choose the microphone as your preferred device for voice capture. If you're not sure which device to use for each of the different types of sound, just use the default settings that were in the dialog box when you first opened it.
Using the mixer
Yet another program, called the mixer, enables you to adjust the relative volume and sensitivity of different types of sounds your sound hardware can play and record. There are a couple of ways to open the mixer:
• Double-click the little speaker icon in the indicators section of the taskbar.
• Or, click the Start button and choose All Programs → Accessories → Entertainment → Volume Control.
• Or, click the Volume button on any device in the Sounds and Audio Devices Properties dialog box. The mixer will open displaying a separate volume control slider for each type of playable sound, as in the example shown in Figure 24-5. Initially, the mixer shows volume controls for various playback devices, as well as types of sounds.
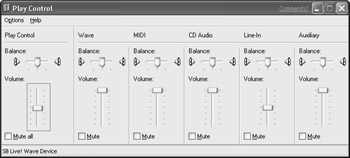
Figure 24·5: The Play Control side of the volume control (the mixer)
Note The controls available through the mixer come from the capabilities of your sound card. Your mixer might look different and not offer the same options as the examples presented here.
The first column in the sample mixer shown, labeled Play Control, is (yet again) another general volume control for the sound card. If you open the little speaker icon in the taskbar and move its volume control slider up and down, you'll see that the Play Control slider in the mixer moves right along with it. The remaining sliders affect the volume of specific types of sound (for instance, Wave and MIDI files), as well as other devices on your system, as follows:
• CD Audio: Controls the volume of music being played in your computer's CD-ROM drive.
• Line-ln: Adjusts the volume of any device attached to your sound card's Line-In device.
• Auxiliary: Adjusts the volume of devices attached to the Aux In port on the sound card inside the computer.
The Line-In device adjusts the playback volume of any device that's connected to the Line-In port of your sound card. This would typically be some kind of music player or video camera that you connect directly to that port. If you use any such devices and do want to hear the sound coming from that device through your computer speakers, make sure the Line-In device is not muted, and its volume control slider is cranked up a bit.
Your sound card may also have an Aux In port on it, inside the computer. If you didn't install the sound card yourself, you might not know whether anything is connected to that port. If you have, say, both a DVD and CD-ROM drive, an IEEE 1394 port, or some kind of port for connecting a video camera to your computer, however, there's a good chance that the device is connected to the Aux In port of your sound card. If you want to hear that device played through your computer speakers, make sure that the Auxiliary volume control is not muted and that its volume control is cranked up a bit.
Adjusting recording volume
The mixer also has a separate set of controls for setting the volume of any devices you use to record sound. To get to those controls, follow these steps:
1. Choose Options → Properties from the mixer's menu bar.
2. Choose the Recording option.
3. Click the OK button.
Now the mixer shows volume sliders for various types of devices from which you can record sound. Note that the Mute check boxes have been replaced with Select check boxes, as shown in Figure 24-6. If you want to record from a specific device, you must choose its Select check box and crank its volume slider up a bit. You can record from only one device at a time. So if you're able to record from many devices, you need to return to these options and choose the device you want to record from at the moment.
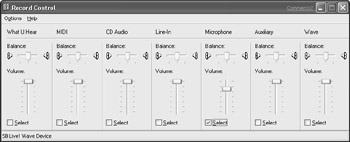
Figure 24-6: The Record Control side of the volume control (the mixer)
Once again, be aware that the Line-In and Auxiliary items can be important here. If you have trouble recording from some devices, it's quite possible that the device is connected to the Aux In port inside the computer