Many radio stations now broadcast over the Internet, which means that you can listen to the station no matter where you are in relation to its broadcast origin. Just open Windows Media Player in the normal manner and click Radio Tuner in the left column. Media Player splits into two panes. On the left, the PRESETS pane lists featured radio stations, which serve only as examples. Hundreds of radio stations are actually available on the Internet. The right pane, titled STATION FINDER, enables you to explore available radio stations. Using the Find By drop-down list, you can choose how you want to search for available radio stations, by Format, Language, Location, and so forth. Once you make a selection, a second drop-down list appears. Making a selection from that drop-down list displays stations that match your criteria. For example, Figure 24-23 shows the results of searching for radio stations with a 60s format. (The Search button in the upper-right corner enables you to search by several criteria.)
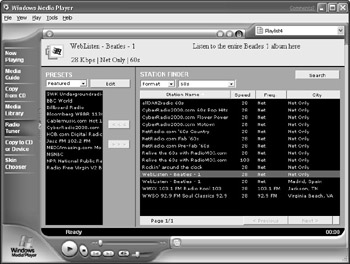
Figure 24·23: The Radio Tuner tab in Media Player
To listen to a radio station, double-click it. You might have to wait a couple of seconds before you hear the station. (The station's Web page will open in Internet Explorer as well.)
To create your own custom collection of favorite radio stations, choose My Presets from the drop-down list under PRESETS. To add a station to your Preset list, click the station in the right pane, and then click the ccc button. To remove a station from your Presets list, click the >>> button. The stations you select as presets will also be added to the Media Library, under Radio Tuner Presets. To stop listening to a station, click the Stop button. Simple!
DVD and Video
Media Player also acts as a video and DVD player. If you have already updated Your Media Library, any existing videos on your hard disk will be listed under Video, categorized under All Clips, and by Author, as in the left pane of Figure 24-24. If you have a DVD drive, you can watch the DVD currently in the drive by choosing your DVD drive and the DVD title from the "playlists" drop-down list near the upper- right corner of the window, as is also shown in that figure.
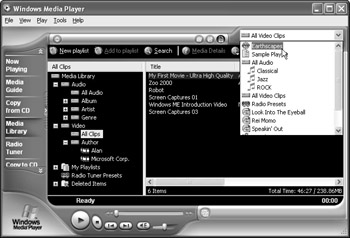
Figure 24·24: Available video files in the left pane, DVD drive available in the drop-down list
While a video is playing, you can use the Play, Pause, Volume, Rewind, Fast Forward, and other controls near the bottom of Media Player's window just as you would on a VCR or DVD player. You'll also notice a tiny Full Screen button, which you can click to show the video full screen, as it would appear on a TV. (Or choose View → Full Screen from Media Player's menu bar.) In the full-screen view, you can right-click to reveal some basic controls, as well as an Exit Full Screen option to return to Media Player. Any features unique to the DVD you're watching at the moment will also be available on that
right-click menu.
On some videos, switching to full-screen view will display a menu strip along the top of the screen and some semi-transparent Media Player controls along the bottom of the screen. Both will gradually fade away. But just moving the mouse pointer will bring them back into view. Of course, you can always right-click in full-screen view to see other options.
If you have a DVD drive installed, the Options dialog box for Media Player (which you get to by choosing Tools → Options) will include a DVD tab, as shown in Figure 24-25. From there you can set Parental Controls. For example, setting the rating to PG-13 prevents the kids from watching DVDs with any more mature rating. Many DVDs are multilingual. The DVD tab also enables you to select a language for subtitles, audio, and menu displays presented by the current DVD.
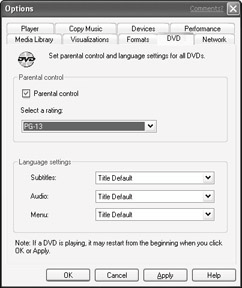
Figure 24·25: The DVD tab of Media Player's Options dialog box
Recording Sound with Sound Player
If you want to record voice or other sound that doesn't come prepackaged from an audio CD or from the Internet, you can use Sound Player. It's really only useful for recording small sound clips, perhaps up to a minute or so in length. If you ever need to create such sounds, however, the Sound Recorder applet will help you do the job.
Tip For lengthier recordings, such as when copying LPs or longer voice narrations, the audio capabilities of Windows Movie Maker, described in Chapter 25, is the preferred tool.
To record your own voice with Sound Recorder, you first need to have a microphone or headset plugged into your sound card or computer. To test that device, open the Sounds and Audio Devices Properties dialog box, described earlier in this chapter. On the Voice tab, select your microphone under Voice Recording and click the Test Hardware button to try it out.
Tip Files created with Sound Recorder are stored in Wave (.wav) format, which is the most common format used for voice and small sound effects.
To start Sound Recorder, click the Start button and choose All Programs → Accessories → Entertainment → Sound Recorder. Before you start recording, you can set a sound quality by choosing Edit → Audio Properties from Sound Recorder's menu bar. Under Sound Recording, choose your recording device and then click the Advanced button to choose a Sample Rate Conversion Quality setting. As usual, the higher the quality you select, the larger the file used to store the recording. You also can click the Volume button to display a little volume slider for making further adjustments (see Figure 24-26).
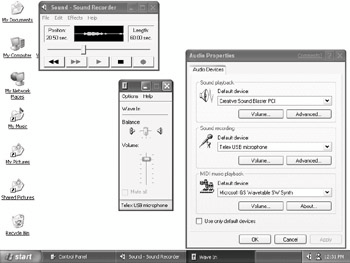
Figure 24·26: Sound Recorder, Audio Properties, and the Wave In volume control all on the screen
When you're ready to record, choose File → New from Sound Recorder's menu bar, just to make sure you're starting with an empty Wave file. Then click the Record button (red dot) and start talking (or making whatever sound you want to record). When you've finished recording, click the square Stop button.
To hear the recording, click the Rewind button and then click the Play button. To save the recording, choose File → Save. You can add echo to the file, play it in reverse, and increase or decrease its speed or volume by making selections from the Effects menu. The effects are additive. For example, choosing Add Echo once adds some echo, choosing that again adds more echo. Don't forget to save the file again after making your selections.
In the future, opening the Wave file from an Explorer window is likely to open Media Player to play the file. To get the file back into Sound Recorder in the future, run Sound Recorder and choose File → Open from its menu bar.
Assigning Sound Effects to Events
You can assign sounds, stored in Wave files, to various events that occur in Windows. You can play one sound when Windows starts, for example, another when an error message appears on-screen, and so on. To assign system sounds, follow these steps:
1.Click the Start button and choose Control Panel.
2.If Control Panel opens in Category view, choose Sounds, Speech, and Audio Devices. Open the Sounds and Audio Devices icon.
3.Click the Sounds tab.
4.If you want to check out and possibly modify an existing sound scheme, select one from the Sound Scheme drop-down list.
Under Program Events, you'll see a list of "events" to which you can assign sound effects. For example, the Asterisk event occurs whenever a message containing an asterisk icon pops up on the screen. The Close Program event occurs whenever you close an open program's window.
To assign a sound effect to an event, click the event and choose a sound from the drop-down list. Or, if you've created your own Wave files and want to assign one of those to the event, click the Browse button, navigate to the folder that contains your Wave file and then click the file's icon. To hear the sound you've selected, click the Play Sound button just to left of the Browse button.
Tip The Internet is home to thousands of tiny sound effects files stored in Wave format, most of which you can download for free. To explore, go to any search engine and search for some phrase, such as "free wave files."
To save your sound scheme, click the Save As button and give it a file name. Click the OK button. In the future, you can use this new sound scheme, or any other, by returning to the Sounds tab and selecting it from the Sound Scheme drop-down list.
Summary
Whew - Windows XP and Media Player 8 have made some great strides in turning the PC into a device for playing audio, video, and DVD. The main points covered in this chapter include the following:
• If you have any problems with sound, the Sounds and Audio Device