If you're an administrator and you forget your password, you will permanently lock yourself out of your account. To play it safe, create a password reset disk right after you password-protect your account, as described a little later in this chapter.
Caution
Never take passwords lightly! Remember that passwords are always case- sensitive. The password PASSWORD is highly overused, and the first one every hacker tries when attempting to break into an account.
7. Type your password (twice) and type a hint to remind yourself of the password in case you forget; then click the Create Password button.
8. When asked whether you would like to make your personal documents private, as in Figure 29-2, choose Yes, Make Private. (This option won't appear if the hard disk is using the FAT32 file system, or if you're password-protecting a Limited account in the Professional edition.)
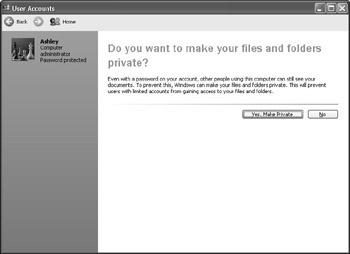
Figure 29·2: Choosing Yes, Make Private hides your My Documents folder from other users.
Note In Windows XP Professional edition, password-protected user account documents are private by default, so the option to make the account private doesn't appear. In the Professional edition, user accounts can be managed through Local Users and Groups, as discussed in Chapter 32.
After password-protecting your account, you are prompted to enter your password each time you log on. If you have a Limited account yourself, other users with Limited accounts will no longer be able to view and open your My Documents folder through My Computer. (However, anyone with an administrator account can still get to your stuff.) If you just password-protected your own Administrator account, you've just blocked out everyone, even other people with Administrator accounts. Remember these key points:
• There essentially is no privacy on a hard disk that's using the FAT32 file system.
• On an NTFS hard disk, user accounts need to be password-protected to gain any privacy.
• Limited accounts have limited privacy in that they can't "hide" from administrative accounts.
Changing your privacy settings
Should you ever need to enable or disable privacy after password-protecting your user account, you can do so by following these steps:
1. Open My Computer and then open the icon for your local hard disk (drive C:).
2. Click Folders in the toolbar and expand the My Computer category.
3. Expand the icon for your hard drive (for instance, Local Disk C:).
4. Click Documents and Settings to reveal user folders.
5. Right-click the folder icon for your own account and choose Properties.
6. Click the Sharing tab (see Figure 29-3).
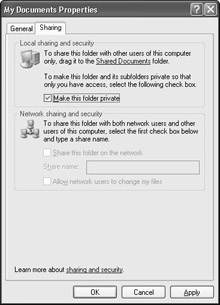
Figure 29·3: An account's privacy is set on the Sharing tab of its Properties dialog box within the Documents and Settings folder.
7. Clear or select the Make this folder private option and then click the OK button.
Note Limited accounts are always private to other limited accounts, so there is no option to turn privacy on and off.
Cross· Reference
Chapter 32 describes the more advanced techniques that computer administrators can use to manage user accounts and groups in the Professional edition.
Recovering lost passwords
If you're an administrator and a user forgets his password, you can easily get that user back online by creating a new password for him. Go into User Accounts, click the user's account name or picture, and choose Change the Password. Create the new password and hint; then click Change Password. Optionally, you can delete the user's password so that the account is no longer password protected.
If you're the only person on this computer who has an Administrator account and you forget your own password, the only way to get back into your account is through the password reset disk (assuming you already created one!), as described in the next section.
Creating a password reset disk
As an administrator, you should create a password reset disk for yourself, just in case you forget your password at some time in the future. You'll need a blank floppy disk. To create the disk, follow these steps:
1. In your own account, open Control Panel and open User Accounts.
2. Click your account name/picture.
3. Choose Prevent a Forgotten Password under Related Tasks in the Explorer bar.
The Forgotten Password Wizard will take you step-by-step through the procedure. When you're done, you need to store the disk in a safe place where you can find it in an emergency. Furthermore, be aware that anybody can use this disk to log on to your account without a password. So this is one disk you definitely don't want to leave laying around.
To use the password reset disk in the future, go ahead and log on normally. When prompted for your password, click the -> button to try to log on without a password. In the message box that pops up, click the link that enables you to log on with your password reset disk. Another wizard will appear, helping you to create a new password and log on.
Protecting yourself from yourself
Just because you have granted yourself an administrator account doesn't mean you have to use it all the time. You can create a second, more limited account for yourself and use it in your day-to-day work that doesn't require administrative privileges. Doing so prevents you from inadvertently making sweeping changes to your system. Furthermore, being logged in as an administrator risks allowing Trojan horses (seemingly innocent programs designed to wreak havoc) to damage your system, perhaps before you realize what's happening.
If a Web site downloads a Trojan horse to your computer that then starts executing itself, for example, it can gain the privileges of the account you are logged into, which, if you currently have administrative privileges, can give it free reign over the system. If you were logged on with a Limited account at the time, the Trojan horse might not be able to do its dirty work in your Limited account.
If you're working in your Limited account and need administrative privileges, you don't need to close everything to switch to your administrative account. Just click the Start button and choose Log Off → Switch User.
Tip In the Professional edition of Windows XP, you can create an account for yourself within the Power Users group, to minimize your restrictions and still keep your
computer relatively safe.
As an alternative to switching user accounts, you can use Run As to start a program as an administrator. In the Start menu or in Control Panel, hold down the Shift-key and click the icon for the program you want to run. Choose Run As from the menu bar. Select The Following User, and enter your administrative account user name and password.
Beefing Up Internet Security
It's no secret that the Internet isn't exactly the safest place for your computer to hang out. People (who apparently have nothing better to do with their time) use the Internet to spread viruses, break into private computers and networks, and generally make nuisances of themselves. This section introduces techniques to protect your computer, or even your entire network, from invasion from the ever-public Internet.
Using Internet Connection Firewall (ICF)
Windows XP comes with an Internet Connection Firewall (ICF) that you can use to protect a single computer that's connected to the Internet, or a whole network of computers that share an Internet connection. The firewall detects attempted hacks (attempts to access your system from the Internet) and blocks them. You also can enable firewall /ogging, which enables you to review any attempted hacks into your system.
If you use the Home Networking Wizard to set up a local area network and share a single Internet connection, the firewall is automatically set up on the ICS (Internet Connection Sharing) host. The host is the computer to which the modem is physically connected. On a single computer that doesn't share its Internet connection, the firewall is disabled by default. You can enable it by following these steps:
1. At the computer to which the