Working with groups is similar to working with users. To create a new group, for example, click Groups in the left column of Computer Management and then choose Action → New Group. In the New Group dialog box that appears, enter the group name, description, and optionally, click the Add button to add users to the group.
To rename, change, or delete an existing group, right-click the group name and choose the appropriate option. You cannot delete the Administrators or Guests groups.
Tip Even though you cannot delete the Guests group, you can disable the Guest user account. Click Users in the left column in Computer Management, double-click the Guest account, and choose Account Is Disabled.
The predefined groups are all oriented toward different types of computer users. In a corporate environment, you might want to create groups based on departments and job types. For example, you might create a group named Accounting Admins. Later, you could give users in that group the permission to create, read, modify, and delete files relevant to the accounting department. Then create another group, perhaps named Accounting Staff. Later, you could give members of that group permission to open and read certain files, but not to modify them.
Still later, if a member of the Accounting Staff group gets promoted, extending her privileges would be a simple matter of making her a member of the Accounting Admins group. At this stage of the game, you're just creating group names and descriptions - you'll grant permissions later. So feel free to think up and create as many groups as you think might be useful in your organization. Of course, you needn't get it perfect the first time. You can add, change, and delete groups at any time.
You can close the Computer Management window when you are finished working with users and groups. The next phase is to start granting permissions to your users and groups, to determine which objects (devices, files, and folders) they can, and cannot, access.
Granting Permissions
You control access to various objects (the generic term for files, folders, and devices such as printers) by granting permissions to users and groups. As a rule, you're better off granting permissions to groups rather than individual users. Because that way, if a person gets promoted, you can just make that person a member of a different exiting group, instead of assigning new permissions to the individual on an object-by-object basis.
Tip In Windows XP Home edition, you can assign permissions to shared resources only.
You can control permissions to individual objects through the standard Windows Explorer windows. Optionally, as discussed later, you can control permissions to shared objects through Computer Management. You'll find that approach easier because all the shared items are accessible from a single window - you don't need to navigate around through Explorer to find each shared object. For items that aren't shared, or haven't been shared yet, however, you need to grant permissions via Explorer. Here's how:
1.In Explorer, navigate to the icon for the object to which you want to control permissions.
2.Select the icon by pointing to it for a moment. Or, if you're using the classic double-click method to open icons, select the item by clicking it once.
3.Right-click the icon, or if you are choosing more than one icon, hold down the Ctrl key first, and then choose Properties.
You must right-click the actual icon for the object - a shortcut icon that points to the object won't do. You might need to navigate to the item through My Computer and Folder List in the Explorer window. In the case of a shared device, you might find it easier to get to security options through Computer Management, as discussed under "Managing Shares."
Once you've done this, the object's Properties dialog box will include a Security tab, which you can use to control permissions. The exact security options available vary from one object to another, but the techniques for granting and denying access is the same.
The top half of the dialog box lists users and groups who currently have some kind of access to the object. The bottom half of the dialog box shows permissions for whichever user or group is currently selected in the top half of the dialog box. In Figure 32-6, for example, the Administrators group is currently selected. The bottom half of the dialog box shows that this group has unlimited access to the file (by virtue of the fact that every Allow check box is selected).
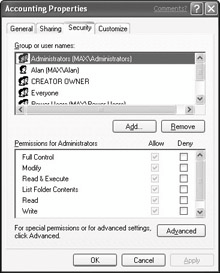
Figure 32·6: The Security tab from a sample Shared folder
You can control access to the object by using the Add and Remove buttons to add and delete existing users and groups. For example, you could add the Accounting Admins group to the list to control access by members of that group. To allow and deny permissions, click that group name, and then make selections from the lower half of the dialog box.
Note You can choose only combinations of permissions that make sense. For example, you can't allow Write access, but deny Read access, because one must be able to read a file in order to write to it!
Some Allow check boxes will have a dimmed appearance. These dimmed check boxes represent inherited permissions. An object inherits permissions from its parent object. Suppose, for example, that you're working with permissions for a folder that's contained within the Shared Documents folder. By virtue of the fact that the current folder is a child of Shared Documents, it inherits the Shared Documents folder's permissions for every use and group, and those permissions have the dimmed appearance.
As previously mentioned, different objects list different types of permissions. For example, a folder will include a List Folder Contents permission, which determines whether the selected user or group is allowed to view the contents of the folder. An individual file, on the other hand, does not offer that permission. In most cases, the permissions are self-explanatory. However, you can get more detailed by right-clicking the permissions list, choosing What's This?, and then choosing Permissions on Objects in the dialog box that pops up.
Tip Here's another buzzword for you. The security settings you apply to an object are stored in its access control list, often abbreviated ACL. The list is actually part of every file and folder stored on an NTFS partition. Files stored on FAT32 partitions have no ACL, and hence advanced security options aren't available.
Clicking the Advanced button takes you to Advanced Security Settings dialog box for the object, as shown in Figure 32-7. This dialog box gives you much more information about current permissions, as well as an alternative way to control permissions. The Add button enables you to add a new user or group. The Edit and Remove buttons enable you to change or remove the currently selected user or group. (You cannot remove built-in users and groups, such as SYSTEM and Administrators, however, because they always have permission to access every object, by default.)
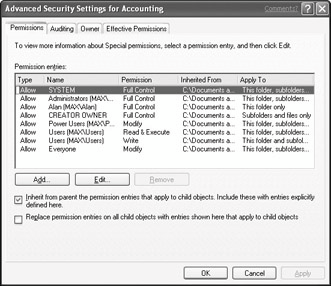
Figure 32·7: The Advanced Security Settings dialog box
When working at this level of detail, you'll notice a couple of users (their names in all uppercase letters) and a group named Everyone that weren't in your original list of users and groups. They are:
• SYSTEM: Refers to Windows itself. All objects need to grant Full Control to Windows.
• CREATOR OWNER: Refers to the person who created the object, unless the administrator has transferred ownership to herself or some other user.
• Everyone: As the name implies, basically everyone who can log on to the computer.
Note Unlike earlier versions of Windows, XP doesn't include members of the Anonymous Logon group to be members of the Everyone group.
You also can control inheritance from the Permissions tab of the Advanced Security Settings dialog box. By default, all objects inherit permissions from their parent object. But you can disable that by clearing the Inherit from parent the permissions check box. If you're changing the permissions of a folder and you want all child objects within that folder to inherit the new permissions, choose the Replac