compatibility mode settings is changing settings in the Registry. These are benign changes done on a per-executable file basis, so you need not fear destroying your system while trying to get an older program to run.
Summary
This information has become a bit technical. But, remember, most of you will probably never have to edit the Registry directly. Should the occasion arise, however, here are some important points to remember:
• The Registry is a collection of information about your Windows XP preferences and all the application programs on your PC.
• The Registry is automatically updated when you change preferences or install new programs, so a need to change the Registry yourself rarely occurs.
• The Registry replaces the initialization (INI) files used in Windows 3.1 and earlier.
• Information within the Registry is organized in a tree-like hierarchy, much like the way folders and files on a disk are organized.
• Always back up your Registry before making any changes to it manually.
• To edit the Registry, use the Regedit program that comes with Windows XP. To start Regedit, click the Start button, choose Run, type regedit, and then click OK.
Chapter 34: Special Features of Windows XP Professional
This chapter discusses features of Windows XP Professional that aren't found in the Home/Personal edition. Some of these features, such as Dualview, Remote Desktop Connection, Synchronization, and File Encryption, are accessible to all users. Others are for professional system and network administrators in corporate settings. An in-depth treatment of the administrative topics is beyond the scope of this book. This chapter does, however, point them out along with resources for getting additional information.
Using Multiple Monitors
Windows XP Professional supports Dualview (a.k.a. multiple monitors), a feature that enables you to connect multiple monitors to a single computer. Each monitor becomes an extension of your desktop. If you place the monitors side-by-side and set each monitor to 800 x 600 resolution, for example, your actual desktop becomes 1600 x 600, as in Figure 34-1. There, I have stretched an Excel worksheet across the two monitors. There's still plenty of room for desktop icons off to the left and an open Help window to the right.
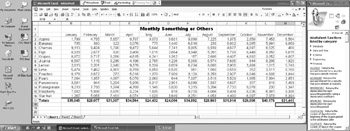
Figure 34·1: An Excel workbook stretched part way across a 1600 x 600 desktop
From your perspective, the desktop is split across the two monitors, as in Figure 34-2. The mouse and keyboard act as though they're one monitor. As you move or drag the mouse pointer off the edge of the monitor on the left, it instantly appears on the monitor on the right, as though it were a single monitor. You can drag items across monitors just as you drag them across one monitor.
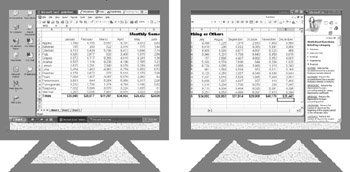
Figure 34·2: What you actually see on the two monitors
There are a few ways to initiate multiple monitors. One way is to add a PCI or AGP graphics card for each monitor. You need to use graphics cards that are supported by Windows XP, as listed under the "Video" category in the hardware compatibility list (HCL) at www.microsoft.com/hcl.
A New Name
Dualview is the new name for the "multiple-monitor" capability found in previous versions of Windows. If you upgrade a computer that's already using multiple monitors, Windows XP Professional should be able to detect the graphics cards and install with multiple-monitor support intact. As to why they didn't add this capability to the Home/Personal edition of Windows XP, I can't say. There were a lot of complaints about this omission in the beta tester newsgroups. But so far, they've gone unheard.
Caution If the computer already has onboard video, it needs to be set to VGA mode for Dualview to work. The mode is set through the computer's BIOS Setup program, which you can usually get to by pressing Del or F2 as the computer is first starting up.
Another approach is to use a dual-head or multi-head graphics card. Currently, Windows XP Professional supports the following multi-head cards. However, you might want to check the current hardware compatibility list for updates.
• Appian Graphics Jeronimo Pro (PCI)
• Matrox Millennium G400 DualHead (AGP)
• Matrox Millennium G400 DualHead Max (AGP)
• Matrox Millennium G450 DualHead (AGP)
• Matrox Millennium G450 DualHead LE (AGP)
• Matrox Millennium G450 DualHead PCI (PCI)
Whichever approach you use, make sure you to shut down the computer and unplug it before changing or installing any cards. After the cards are installed, plug in and turn on the monitors and restart the computer. Windows should detect the new card(s) and install the drivers automatically. Don't be alarmed if the additional monitors don't work right away.
To activate additional monitors, as well as to control color depth, desktop area, and so forth on each monitor, use the Settings tab on the Display Properties dialog box. You can get there in one of two ways:
• Right-click the Windows desktop and choose Properties.
• Or, open the Display icon in Control Panel (Classic view).
The settings tab will show a "box" representing each monitor, as in Figure 34-3. To activate a monitor, click its box and choose the Extend my Windows desktop to this monitor check box. To see which monitor is which, click the Identify button, or point to either monitor box and hold down the primary (left) mouse button. A large number will appear on the monitor. You can arrange the monitors in the box to match the arrangement of your physical monitors. You can set the screen resolution and color depth of each monitor by first clicking the monitor's box or choosing a monitor from the Display drop-down list. The resolution and color-depth you choose affects only the current monitor.
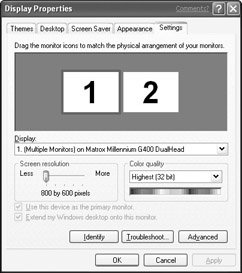
Figure 34·3: The Settings tab of Display Properties with two monitors attached to a dual-head graphics card
One monitor will act as the primary monitor that displays the logon screen and taskbar. You can make either monitor the primary monitor by selecting it and then choosing the "Use this device as the primary monitor" check box. If you have any problems getting multiple monitors to work, try the Troubleshooter. Just click the Troubleshoot button on the Settings tab in the Display Properties dialog box to get started.
Remote Desktop Connection
Windows XP Professional Edition offers Remote Desktop Connection, which allows you access to a Windows session that is running on some computer other than your own. For example, you could connect to your office computer from home and use all the resources of your company's network. In fact, you could just leave your office computer running, with any programs and documents you were working with open and on the desktop. When you get home and connect to the office computer, your home computer's screen will directly reflect the office computer's screen, exactly as you left it.
Remote Desktop in Home Edition
In Windows XP Home Edition, you can use the Remote Desktop Sharing capability of NetMeeting to perform most of the functions available in the Professional Edition. See Chapter 11, "Online Conferencing with NetMeeting," for more information.
The Home Edition also offers Remote Assistant, which allows another user to access your desktop to help you solve some problem. Or vice versa - someone can ask you for assistance and grant you control over her desktop. See "Using Remote Assistance" in Chapter 19 for more information.
You can use Remote Desktop in a variety of scenarios, such as accessing your office computer from a notebook. For the sake of example however, I'll refer to the computer that's being accessed remotely (from afar) as the office computer and the computer that's gaining acce

Reads:
109
Pages:
90
Published:
Sep 2023
I hope you enjoy this FREE ebook. Thanks for downloading it.
Formats: PDF, Epub, Kindle, TXT

Reads:
89
Pages:
74
Published:
Sep 2023
Databases are crucial for managing and utilising data effectively in various industries and applications. The aim of this book is to enable the reader to revi...
Formats: PDF, Epub, Kindle, TXT

Reads:
28
Pages:
293
Published:
Jul 2023
How-to's are step-by-step tutorials that are designed to help you learn more about Maya.
Formats: PDF, Epub, Kindle, TXT

Reads:
108
Pages:
176
Published:
Apr 2023
"No Filter, No Problem" by Famium is your ultimate guide to creating a visually stunning, engaging Instagram presence. Packed with insider secrets and practic...
Formats: PDF, Epub, Kindle, TXT