for installing the modem, as discussed in Chapter 17.
Setting Up an Internet Account
Once your modem is hooked up and installed, you're ready to set an your account with an ISP. There are thousands of ISPs to choose from. If you plan on setting up a dial-up account with a traditional modem and phone line, it's important to find an ISP that can provide a local access number that you can dial for free. The local access number is the phone number your modem will dial to connect to the Internet. You want to make sure that number is within the area code and range of dialing prefixes for which there are no tolls whatsoever. Check your local telephone directory for a list of dialing prefixes you can dial free. Then check out your potential ISP's list of local access numbers to ensure they have one that will be toll free for you.
Caution Don't take lightly the issue of a local access number within your "free" dialing area. If the number you dial has any toll charges, you may get slapped with some pretty horrific phone bills!
If you haven't given any thought to choosing an ISP, here are some resources you can use to search for a service that meets your needs:
• Go to the section titled "Using the New Connection Wizard" later in this chapter. When using the wizard, select Choose from a list of Internet service providers (ISPs) when prompted.
• Check your local Yellow Pages (under Internet) or newspaper for local Internet services.
• Call your local cable TV or phone company and ask whether they offer a service.
• If you have access to the Internet through work or a friend, visit ISP FIND at
Many ISPs will provide a disk or CD for setting up your account. If you have such a disk, you can use it to set up your account as per your ISP's instructions. Chances are, that's all you'll need to do. If, instead, your ISP just gives you a bunch of account information, you can use the New Connection Wizard described later in this chapter to set up your account. Make sure you keep that information in a
safe place where you can always find it. You'll need it to set up your account. And, in case some mishap messes up your account at some time in the future, you'll need that information again to repair or re- create your account.
As a convenience, Table 5-1 lists the types of information your ISP might provide. I've left the second
column in this table blank so that you can jot down whatever information you get from your ISP. Don't be alarmed if your ISP doesn't provide all the items listed in the table. Just jot down whatever information you have.
Table 5·1: Information Provided by My ISP
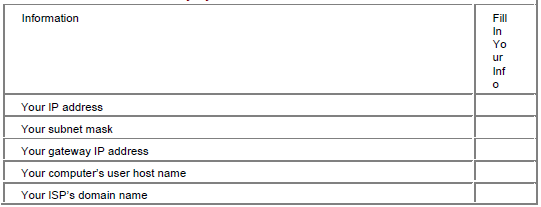
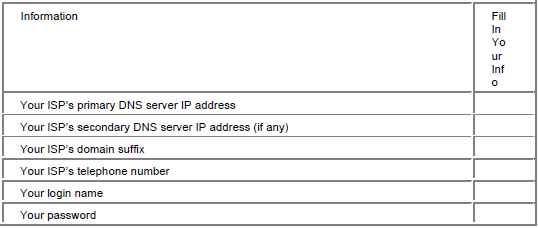
Caution For obvious security reasons, you may not want to write your password in Table 5-1, especially if other people might be peeking at your answers. But you could put in a hint - a word or phrase that will remind you of the password.
Using the New Connection Wizard
The New Connection Wizard, which comes with Windows XP, is a handy program for setting up your Internet account. The wizard poses questions for you to answer and gives you blanks to fill in. To start the New Connection Wizard, follow these steps:
1.Click the Start button and choose All Programs → Accessories → Communications → New Connection Wizard.
2.From the first wizard screen, click the Next button.
3.Choose Connect To the Internet from the second wizard screen and then click the Next button.
4.The third wizard screen, shown in Figure 5-1, asks how you want to set up your account.
Choose whichever option best describes what you want to do. For clarification, here's what they mean:
• Choose from a list of Internet service providers (ISPs): Select this option only if you've never contacted an ISP or set up an account and you want to purchase an account right now.
• Set up my connection manually: If you've set up an account with an ISP and have a user name and password (and perhaps some other information from Table 5-1), choose this option.
• Use the CD I got from an ISP: If you purchased an account already and your ISP has provided you with a CD, choose this option.
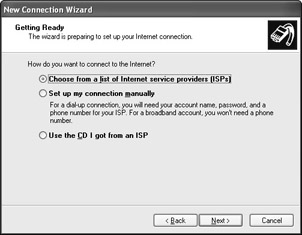
Figure 5·1: Three ways to set up an Internet account in the New Connection Wizard 5.After making your choice, click the Next button and follow the instructions on the screen.
If you chose the first or third option, it's all just a matter of doing what the wizard tells you to do. I cannot take you step-by-step through those options because how you progress through the wizard depends on how you answer the questions. It's important, however, to pay attention to the following warning.
Caution User names and passwords are usually case-sensitive. Any time the New Connection Wizard asks you to type a user name or password, make sure you type it using the exact upper/lowercase letters provided by your ISP.
If you chose the second option, Set up my connection manually, you'll be presented with questions about your account. Remember, you must enter the requested information exactly as provided by your ISP. The slightest typographical error will prevent your account from working properly. Because many of you will be setting up a dial-up account, I'll use that type of an account as an example of the types of questions you're likely to see and appropriate answers to those questions. The first screen for setting up a connection manually, shown in Figure 5-2, asks how you want to connect.
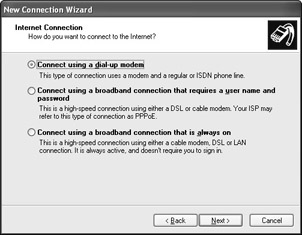
Figure 5·2: Choose how you want to connect to the Internet.
Assuming you're setting up a traditional dial-up account (or ISDN account), choose the first option and click the Next button. The next page asks for the ISP's name. This is just a name used to describe the ISP, so you can type it in however you want. Click the Next button. You'll then be prompted for a phone number as in Figure 5-3. This will be the local access number provided by your ISP. Be sure to type it in exactly as specified by your ISP, and follow any dialing rules of your area. If you live in an area that requires 1O-digit dialing, for instance, include the area code. As the wizard suggests, you might want to dial the number with your telephone and listen for a modem sound, to verify that you've dialed the number correctly. Click Next after typing in the local access number.
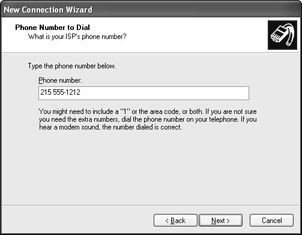
Figure 5·3: Enter your local access number in this wizard screen.
The next wizard screen, shown in Figure 5-4, asks for your user name and password. These must be typed exactly as provided by your ISP. Note that if you've gotten separate user names and passwords for logging on and e-mail, you want to enter your logon account name and password here. You won't be using your e-mail user name or password until you set up your e-mail account (as discussed in Chapter 8).
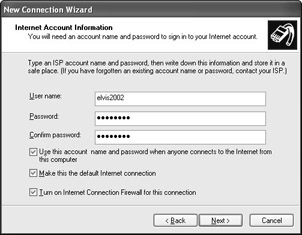
Figure 5·4: The Internet Account Information Wizard screen
Options at the bottom of the screen are summarized here:
• Use this account name and password when anyone connects: Choose this option if you've set up multiple user accounts on this computer and want all users to use this account to access the Internet.
• Make this the default Internet connection: If this is your only account or is your "main" account for accessing the Internet, choose this option.
• Turn on the Internet Connection Firewall: A firewall protects your computer from unauthorized users (hackers) trying to access your computer through the Internet. Go ahead and select this option, if it's available.
The last wizard screen tells you that you've completed all the necessary steps. To make it easy to get to the connection's icon, you may want to select the Add a shortcut check box as in Figure 5-5. Then click the Finish button. If any more instructions appear on-screen, be sure to follow them carefully. At this poin