Creating Blog Posts or Articles that Attract Organic Traffic
Creating information type articles or blog posts for your website is important because it will increase the number of visitors you get and make you more important to the search engines.
Articles and blog posts are among the most important elements of complete internet marketing because they help you achieve several goals including:
Here, I’m going to show you how to create blog posts or articles that’ll boost visitors to your site, for free!
Content management systems like Wordpress, Drupal, Joomla, etc. were created to make blogging easy. Many of you already use one of these. I do not because the platforms are too slow for business use on mobile. They also are not easy for the novice to achieve the page load speed of 3-seconds or less needed for mobile users viewing your web pages.
Don’t worry. If you’re on one of these platforms, I’m not trying to scare you. in fact, for blogging, they work very well.
But, as my web efforts grew, I moved all my sites off Wordpress and onto my company’s platforms because they were designed for speed. Particularly on mobile devices.
Step 1 - Writing the Headline or Title
14 Writing Your Title
I’m a professional copywriter as well as a consultant. Thus, I like to start with a title.
In most web page/website builders, the title is also the first text field to appear.
The function of a post’s headline is to grab the attention of users. It should give the reader a quick reason why they should stay and read your article.
The title is also used to help rank your site for the keywords that you target with it. I’ve learned from my copywriting training and from years of experience that three elements help make a killer headline.
Number one is a numbered title. Internet readers love list articles, and they’re easy to create. You simply must divide the content in your post into numbered entries.
For example, if you write a post about complete internet marketing tips, you can divide it into 10 different entries. Each entry corresponds to a tip. The number of entries you got is the number you’ll add to the beginning of your headline.
In this example, I have divided our posts into 5 entries, so our headline will start at 5.
Number two, you must add a long-tail keyword that includes a high-volume search term you wish to rank well for. With this trick you can rank your post on top of searches that target the keywords you include. It also helps users to identify your post in the results.
Number three, you must add an actionable tease to your headline, such as a promise, or a command, or something to create curiosity. The purpose of this text Call-to-Action (CTA) is to make your readers curious. This works because it makes you stand out even if there are 10 other different results targeting the same keywords as you. Users will be more inclined to click on your post.
There’re more techniques for making great titles or headlines, but these 3 tips will work well to get you started.
Step 2 – Building the Content
15 Creating the Content
Now, let’s see how to structure on online article or blog post. We want it to be very readable and highly valuable to the reader.
First, create an article that is between 1,200 to 3,000 words long. Search engine algorithms are programmed to give more relevance to long-form content. The explanation for this is that long-form content is elaborate and original.
It’s also the type content most likely to provide searchers important and valuable information.
As you can see, the word count in our article is a bit over 2,000 words long. Once you hit the recommended word count, you must divide the content with numbered subheadings to make it into a list article, with separate entries.
The reason why readers love list articles is that long articles are easier to read when divided in entries. Readers get the sensation that they’re just reading short pieces, so they stay for longer on your content pages. At the same time, you increase your site’s relevance and authority.
Expert Copywriting Tip: Use short sentences and short paragraphs. Even in seemingly “elitist” niches, targeting a 6th to 8th grade level of reading will get the best results.
Write your sentences and paragraphs first.
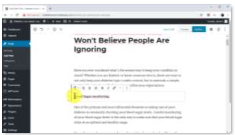
Then, come back and find the long paragraphs and break them into paragraphs of 2, 3 or 4 sentences. Even use a single line sentence when you want the sentence to stand out and ensure it gets read.
Then, find long sentences and break them into shorter sentences. Typically, sentences with lots of commas or clauses are easily broken into shorter sentences.
Now, review your article or post again, and break any of the newly structured paragraphs into smaller paragraphs again.
Finally, close your article with a call-to-action.
Since your articles or posts should be related to your products or services, adding a CTA should be easy.
Step 3 - Optimizing Your Images
16 Using and Optimizing Images
You can and should add images to your blog posts or web articles to achieve two goals:
Adding images in the middle of your content decreases the load of reading, which improves the user experience on your site.
The key to images aiding the user experience is to ensure the image adds to the message you’re writing. Random images with little or no connection to what’s written won’t help your reader. They’ll also slow down the load speed of your web page.
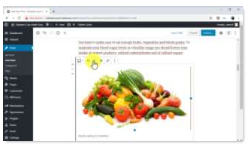
The optimal way in WordPress to add images to your content is to add a single image in the middle of each numbered entry. Here’s a quick example.
First, separate text in an entry after the third or fifth paragraph by placing the cursor at the end of the paragraph and pressing the “enter” key on your keyboard.
Now click on the “add image” button. Now upload or select an image from the “media library.”
Enter a high-volume search term or keyword on the “title” and “alt text” fields. The image alt text is for search engines. While a keyword of some type is great, the alt text should describe the image in human terms. The field isn’t there for you to stuff random keywords in. Doing so will not help your rankings.
Note: Did I tell you I started in digital marketing with SEO? I speak from expertise when it comes to search engine optimization. Don’t stuff unrelated keywords in image alt text.
You can also add a comment about the image or about the entry into the “caption” field. Now click on “select.” Once an image is inserted into your content, center it by clicking on the “align center” button.
However, you don’t have to center it. Your image may be more effective when aligned left or right with text around it. You’ll have to make the decision.
Step 4 - Adding Tags

17 How to Use Tags
Blog or content management systems typically allow the addition of tags.
Tags help readers search internally for appropriate information on your site. They can also aide search engines in recognizing what topics are relevant to your site, ranking your content pages for searches for those topics.
Because of this, I recommend you use specific keyword phrases for your articles. Not too specific. They should be able to be used on other related articles or posts in your website.
Nevertheless, keep the tags related to the content in the article or post. Otherwise, they will be recognized by search engines as keyword stuffing or spam.
To add tags to your posts in WordPress, you’ll simply have to click on the “document” tab, to click on the “tags” tab, and then to enter your target keywords in the “add new tag” field.
Remember to press the “enter” key each time that you enter a new tag.
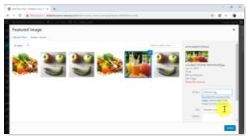
18 Use of Featured Images
You can set a feature image to your posts to increase visibility to image search results and to improve the visual presentation of your posts.
This is possible with most website builders with a blogging capability built in.
My company’s mobile first website builder includes a blogging platform for our clients, so you get speed and all these capabilities as well.
To add a feature image in WordPress posts, click on the “featured image” tab under “document,” and then click on “set featured image.” Now upload an image or select one from the media library. Add a high-volume search term or keyword on the “title” and “alt text” fields. Now click on the “select” button.
Step 6 - Publishing Your Blog Post or Article

19 Publishing Your Post or Article
Finally, make sure to proof-read the article or post. Ensure that all your images are optimized, and that your title and subheadings are engaging and coherent.
Now, in WordPress, click on the “publish” button. And this is it! I recommend you keep coming back to your blog posts so you can update them as needed!