How to Create A Powerful Email Marketing Campaign in 2020 and Beyond
Many advertise try to sell you on the idea email marketing is dead. That’s a bold- face lie. They seriously just want you to buy their shiny object. Ignore them.
No complete internet marketing plan is complete without an email marketing campaign. Email marketing is still one of the most high-converting and cost- effective online marketing strategies you can implement.
With email marketing you can reach your leads and potential customers right where they’re most likely to convert — in their email inboxes on their desk at home or in their office, or on their mobile devices.
Today I’m going to show you how to create a powerful email marketing campaign, the easy way, in 2020 and beyond.
Step 1 - Prepare Your Email Incentive
If you want to convert website visitors into email subscribers, then you must set up an attractive email incentive. The most powerful type of email incentive is a lead magnet. I showed a little about lead magnets in Chapter 3 where you saw how to create marketing funnels and flows.
62 Creating Your Email Incentive
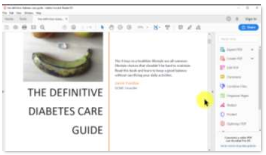
A lead magnet is an exclusive piece of content that you offer to visitors in exchange for their names and email addresses. A lead magnet can be an eBook, video training, report, or infographic that you only send to people that sign up to your mailing list through your opt-In page. This eBook is a lead magnet.
Don’t limit your thinking. Anything you can give a visitor access to through the web that has a perceived value can be given away as a lead magnet. Even physical things can be given away through a lead magnet.
Think about it. Restaurants give away food using a coupon code or similar device to get you to come to them.
As you can see here, I have prepared an eBook with content that is not on our website. If a visitor wants to get the eBook, they will need to sign up to our mailing list.
Depending on your type of business, you can also offer incentives such as discount codes and coupons. Whatever you can give away to bring you customers and drive bigger sales.
The next step after preparing your email incentive is building your email campaign, so let’s move on!
Step 2 - Building Your Email Campaign and Creating an Email List
63 Create and Email Audience
You need to create an email list of email addresses of qualified people likely to buy your products or services. An email list is simply a database that connects to your sign-up forms. When a lead enters their email address and/or other details into the sign-up form, it’s saved to your email list.
The easiest way to create an email list is with an email marketing service.
In this example we’ll use MailChimp to show you how to create an email list the easy way, in very few steps. I chose MailChimp because it offers you basic email marketing features, and you can use it to capture up to 2,000 subscribers and to send up to 12,000 emails a month, all for free so you can get started right away.
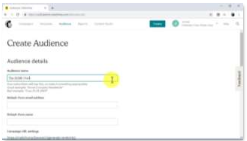
Let’s start on the MailChimp dashboard. Click on the “audience” option on the top bar. From the drop-down menu, select “audience dashboard.” Now, click on the “create audience” button.

64 Create an Audience in MailChimp

65 Begin with Create Audience
Now it’s time to set up the email list. First, enter a name for your new list in the “audience name” field. Next, enter the sender email address that you want your subscriber list to see into the “default from address” field. Now enter the sender’s name in the “default from name” field.
In the “remind people how they signed up to your list” field, enter a brief statement to remind subscribers what they agreed to when they signed up. in this example, we’ll remind subscribers that they opted in to receive the free eBook.
You can additionally enable “form settings” such as “double opt-ins” and “notifications.” You can click on “save” when you finish setting up your new email list.
Double opt-ins mean when a person fills out your form on your web page, they will be first asked to confirm their email before sending them any other emails. This helps keep a more responsive list because:
Setting Up A Sign-Up Form
Now it’s time to create a sign-up form to capture email contacts on your site. in this example I will use MailChimp’s built in sign-up form builder.
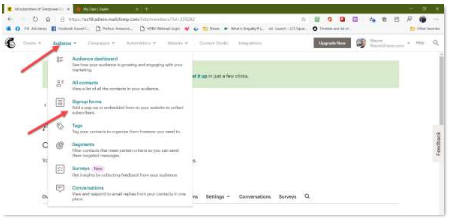
If you’re using MailChimp, click on “audience” and then “sign-up forms” option. Next, you’ll be on a new page. Click down arrow next to “stats” and on the dropdown menu, click “Signup Forms.”
66 Start Your Sign-up Form
67 Create your form in your list
Now you must design your pop-up opt-in. First, select your pop-up format.

68 Use the Pop-up Form for this example
In this example we’ll select “slide” because it doesn’t interrupt the user experience. Click on “Settings” on the left. Then click on “Slide.”
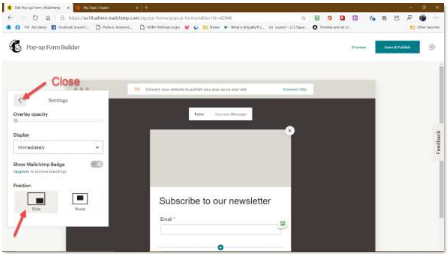
69 Select your initial settings
Now under the “display” menu to select from the drop down when to show your pop-up. Here you can select to show your pop up to visitors immediately, after 5 seconds, after 20 seconds, after scrolling to the middle of the page, after scrolling to the bottom of the page, or on exit.
In this example I will select “scroll to middle of page.” Finally, close the settings block by clicking the left arrowhead next to “Settings.”
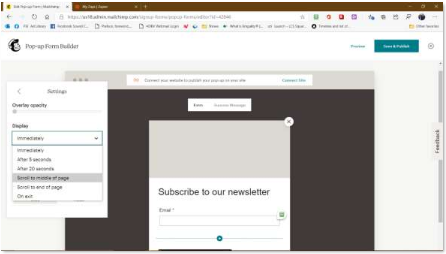
70 Select when your Pop-up appears
Now select your “layout” and “style.” Use the selections on the left side of the page.
Then you want to add an image to represent your free offer. Below that, some text with some compelling text.
Then style your subscribe button. Select your colors and add some text.
A neat internet marketing trick is to use calls to action in the first person. So instead of typing “sign up now,” you type “Yes! Sign me the report!”
Now select “text color,” “background color,” and “hover color.” For the best effect, select white as “text color,” green as “background color,” and red as “hover color.” Now check the “full width” option to make the CTA button the same size as the sign-up fields. Now click on “add photo” to add the image of your email incentive to the pop-up.
Now click on the “fields” tab, check the “first name” option, and then click on “required” to make it a required field. By asking for the first name on sign-up forms, you can personalize the emails that you send to your subscribers.
Now click on the “content” tab. Click on the “body” field to add a call to action on the pop-up. Now click on the “sign up success message” field to add a thank you message and the URL to claim your email incentive.
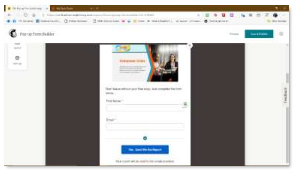
71 Complete Your Sign-up Form
Now that your email capture form is complete, click on the “save and publish” button. Enter the website address where you want to publish it and click get started at the bottom of the box.
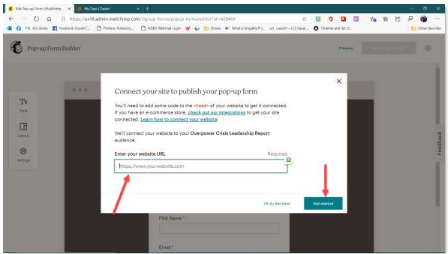
72 Enter Your Website URL
Then copy the code provided in the <head> section of your webpage. Additional instructions are provided by MailChimp. Once you’ve inserted the code on your webpage, click the “check connection” button to validate the installation.
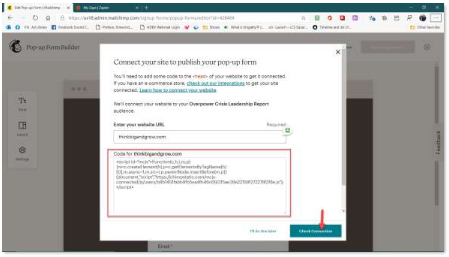
73 The code to add to your website
After confirmation, the success window will appear. Be sure to turn on the pop up by clicking the slider button on the right.

74 The Success Window