LESSON 07 – USING TOKENS
When you enter your name and email address into a form on a capture page they are being stored for later use by the autoresponder. When required they can be accessed by using Tokens. You can think of tokens as little containers that hold a piece of paper containing information such as a name. Programmers of the Basic programming language can think of tokens as Variables. Tokens are often used to add a subscriber’s name to a letter to give it a personal touch. A Name Token looks something like this.
**NAME**
When added to a letter it looks like this.
Hi **NAME**,
Thank you for subscribing to my newsletter.
When the subscriber received their welcome letter it will appear to them like this.
Hi John Smith,
Thank you for subscribing to my newsletter.
So in general, what has happened here is that the autoresponder has written down the subscriber’s name (when they entered it on the capture page) and wrote it down on a piece of paper and placed it in a container it calls **NAME**. Once it sees the name token in a letter it looks in that container and replaces the token with the information on the paper. In this example: John Smith. The ability of adding the subscriber’s own name to a letter adds that personal touch and is more likely to get your letter read. Most marketer’s like to add the name token in a subject line like this.
Thank you **NAME**, here is the information you requested.
Adding the subscriber’s name in the subject line improves the click-thru rate of an email because it catches their attention. But you can actually go one better by using only their first name which brings us to another token called **FIRSTNAME**. Autoresponders give the option of displaying separate fields for the first and last name. So the welcome letter will look like this.
Hi **FIRSTNAME**,
Thank you for subscribing to my newsletter.
And the subscriber will see the letter like this.
Hi John,
Thank you for subscribing to my newsletter.
Some autoresponders (such as Trafficwave) will simply take the first word in finds in the **NAME** token and use it as the first name whenever it sees the **FIRSTNAME** token.
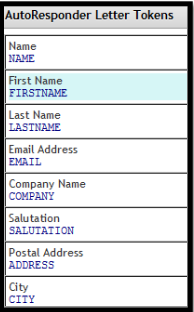
There are other tokens that allow you to store information such as date of births, addresses, and cities. You can even create custom tokens to store any other information you require, such as a username or a membership number chosen by the subscriber. In this lesson I will show you how to use tokens in your letters and how they can benefit you. Log into your Trafficwave account and enter the Campaign Manager. Now enter the “mylist” campaign by clicking on the “mylist” link. Now click on the Signature Tokens tab.
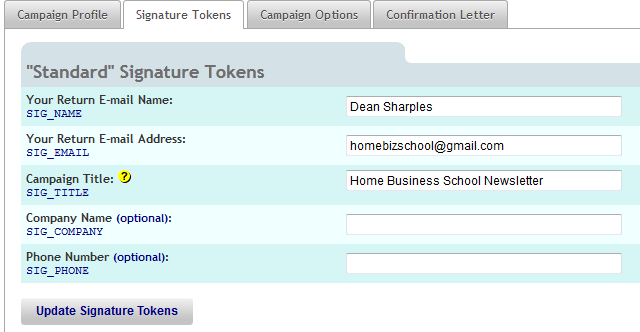
At the end of every letter you send it is good practice to include a signature which usually consists of your name, email address and phone number. You could add this information manually into each letter in your campaign but what would happen if you changed your email address or phone number? By using signature tokens you can easily update your information on this page knowing that your letters will always get the information it requires from here.
In an earlier lesson I showed you how to add your website URL to a letter. By using a URL Token it is much easier as you don’t have to keep adding the URL and making it a clickable link. When Trafficwave sees a URL Token it will automatically display the URL as a clickable link for you.
Click on “Add New URL Token” and enter the URL of your website like the example below.
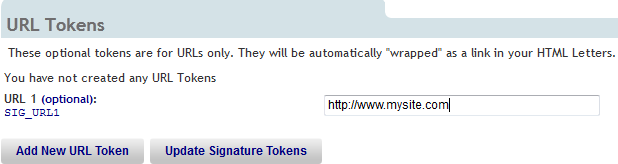
You don’t have to click anything to save this. If you go to another page your token will still be there. If you want to delete this token then just delete it from the box and click “Update Signature Tokens”. You can add more if you want.
Trafficwave allows you to collect any information from your subscriber by using Custom Tokens. These tokens allow you to collect information that is not covered by the default tokens. For example you may ask if the prospect is interested in becoming an affiliate, what their interests are, what music do they like and so on. Once they enter the information into the form you will receive all this information in an email so you can add this information into a database. One example of this could be to allow subscribers to choose their own username for an affiliate program you run. If you were running a newsletter for affiliates of a particular program then you could ask for their username for that program.
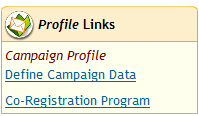
You can actually add custom tokens on the page you are currently on but we will define them on another page. Click “Define Campaign Data” from the Profile Links on the left hand side of the page.
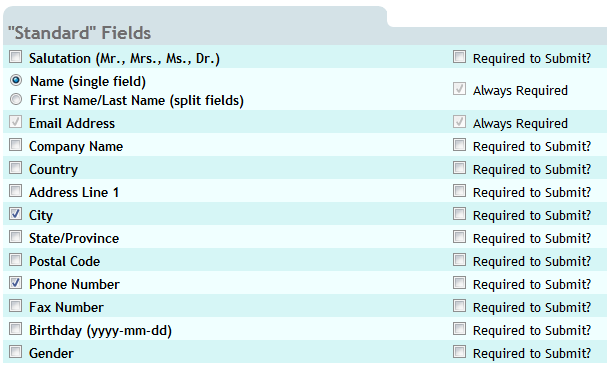
By default the name and email address fields will be available on your capture form. These are part of the standard (default) fields that Trafficwave offers you. You can choose to ask for this information on your form by clicking the boxes to the left of each field. If you click the “Required to Submit” box then this means that the subscriber has to enter something in that field otherwise they will not be able to submit their information. If you leave the box blank then the subscriber can leave that box empty and still submit their information. This is useful for optional questions that you don’t really need an answer to.
To add a custom token click the “Add Custom Data Field” button.
In my example I am going to ask two custom questions. First I am going to ask the subscriber to choose a username as I am going to enroll them into a learning program. Next I am going to ask them what they want to learn about.
CUSTOM FIELD 01 – USERNAME
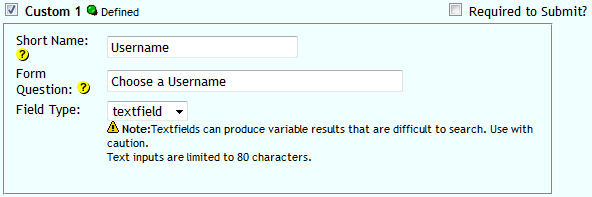
First I have chosen a Short Name which is for my reference only. Now I need to ask the subscriber a question which is to “choose a username”. The field type is a “text field” which allows them to type their answer to the question. Now I click the “Custom 1” box to create it. I have decided to make this an optional question so I can assign a username for them if they don’t want to do it themselves.
CUSTOM FIELD 01 – LEARNING CHOICES
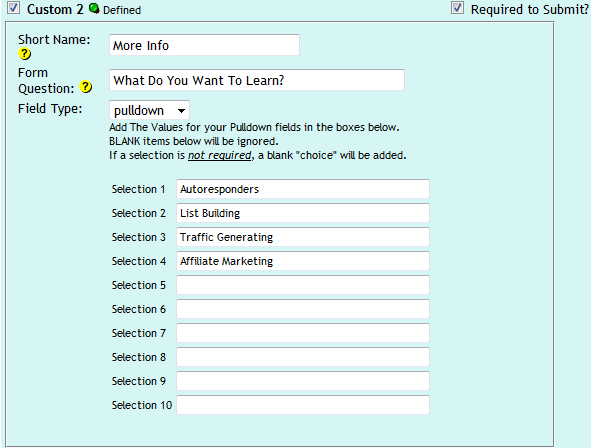
Now I want to ask the subscriber to choose what they want to learn about from my list of courses. I use “More Info” as my short name, I ask the question “What Do You Want To Learn” and I select a “Pull Down” menu because I want to give the subscriber a list of courses to choose from. I have clicked the “Required to Submit” box because I really DO need this information. Again I click the “Custom 2” box to add.
If you are asking for a phone number then you may want to ask the subscriber when is the best time to call them and what country they live in so you don’t end up calling them in the middle of the night.
When you have finished adding your custom questions click the “Submit Changes to Data Collection” button. You will be given a warning about altering changes but don’t worry about this.
When you created a capture page before, you may have seen a message telling you that not all capture pages can accept extra fields. Therefore we need to create a new one. Click on the Capture Pages/Forms tab and select Hosted Capture Pages from the menu. The Default Black Menu is already selected and is the one we will use. Now add this information to the rest of the page.
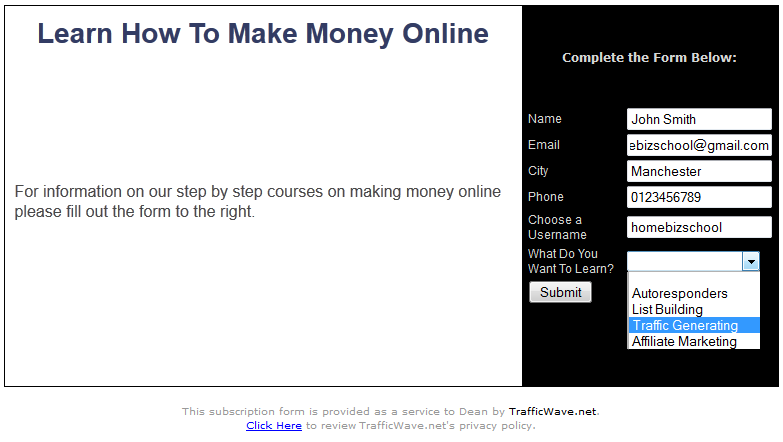
PAGE TITLE: Courses
TITLE: Learn How To Make Money Online
PARAGRAPH 1: For information on our step by step courses on making money online please fill out the form to the right.
Enter your name in the Signature Box and click the button to create the page. It will look like this.
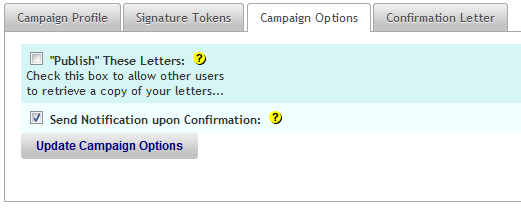
In order to receive this information you need to make sure you have told Trafficwave to send you notification of confirmation. If you didn’t do this then you need to go to the Campaign Options tab in your Campaign Profile and click the box that says “Send Notification upon Confirmation”.
Did you notice that I filled in the form of the new capture page? Once I submitted the information and confirmed my email address I received the following information in my email.
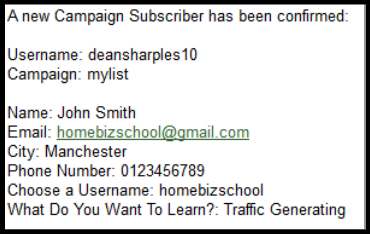
I see from this email that John Smith wants to learn about Traffic Generating, he lives in Manchester and I have his phone number. I can now call him and try to sell him a Traffic Generating course. Or I can send him more information on this subject.
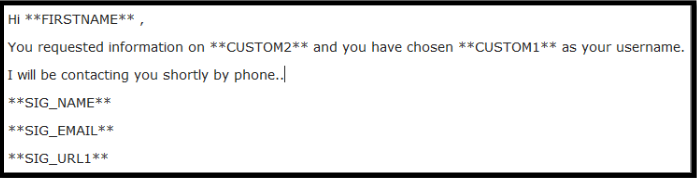
Finally I will show you how to add tokens to your letters. Click on “Create New Letter” from the Letters tab and enter the following information.
SUBJECT: Thank you – Here is your information
BODY:
Hi,
You requested information on and you have chosen as your username.
I will be contacting you shortly by phone.
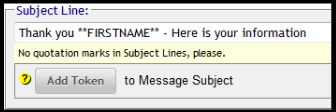
This is the basic welcome letter. Now let’s add a First Name Token to the subject line. Position your text cursor just after “Thank You”, making sure you leave a space after it. Click on the “Add Token” button and the following list of tokens will appear.
Notice how the background goes a cyan color when selected? Click the First Name token from the list. You will see the token appear in the subject line.
Now we will add tokens in the body section of the letter. Locate the following section just above the body section (where you write the letter).

When you click on the “Tokens” button you will get a list like this.
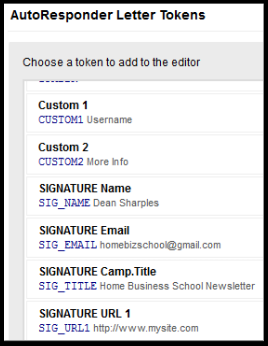
If you scroll now the list then you will see the Custom Tokens created before. By clicking on these tokens they will appear in the letter where I have positioned my text cursor. The screenshot below shows my letter with the tokens added.
PROOF READING
Whenever you create a letter you should always proofread it. This will show you how your letter will appear to your subscriber. Click on the “Proofread Letter” box and you will see the following.
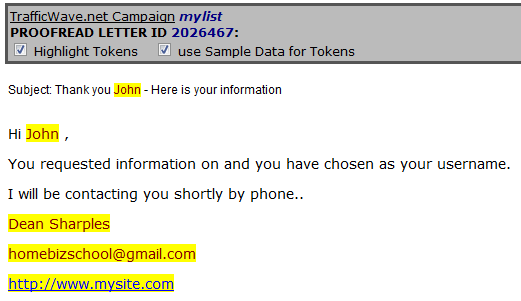
By clicking on the “Use Sample Data for Tokens” box I can see my tokens displayed as they should be. At present the custom ones don’t show as the values have not yet been entered. These will appear when the subscriber entered them on your capture page.
Click on the “Save This Letter” button. Now you need to make it your welcome letter. Move the original welcome letter back to the “Stored” status by deleting the zero (0) from the day delay box then add a 0 to the day delay box of the new letter you just created.
Remember when I entered my information in the capture page before? Well I have received the welcome letter with the information I entered which looks like this.
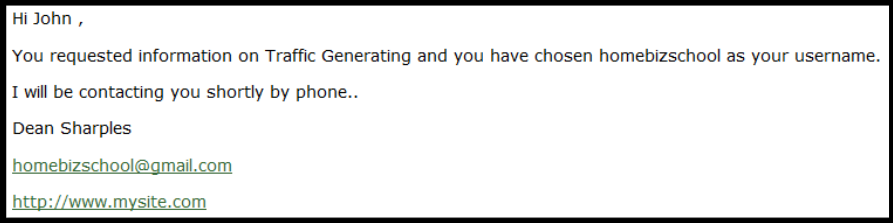
As you can see the custom answers “Traffic Generating” and “homebizschool” have been inserted into the letters and this is what I actually see in my email.