LESSON 05 - CREATING FOLLOW UP LETTERS
The second part of creating a campaign is to write some letters. Depending on your campaign you may only need to create the first letter (known as the welcome letter), if you are only interested in providing a link to your blog or a download link for an E-Book. If you want to create more letters (which are referred to as Follow up Letters) then you will need to plan out your letter campaign which I will cover in a later lesson.
If you are following on from the last lesson then you will find yourself on the Letter Creation page. If not then go to your Campaign Manager and click on the firstcampaign link from your list of campaigns. Now click on the Letters tab at the top of the page.
From the menu on the left hand side with the heading Letter Links click on Create New Letter. You will be given an option to use a template or start with a blank letter. Trafficwave comes with many templates that you can use to create professional looking letters with nice layouts. Right now we are only interested in starting with a blank letter so click that button.
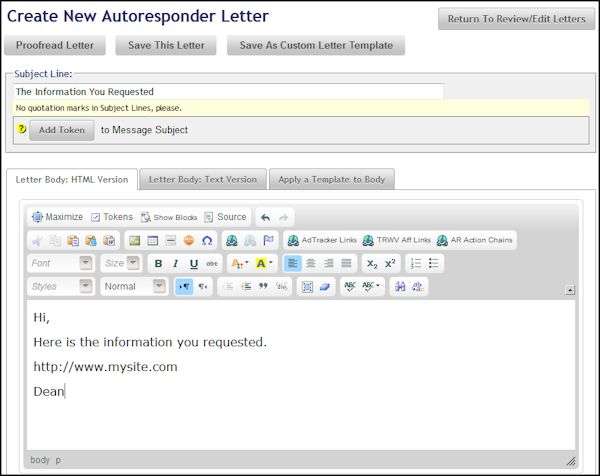
As the first letter is usually the welcome letter you would usually write a welcome type message. Your subject line would be a short indication of what the letter is about. In my example I have simply put “The Information You Requested” and in the body “Here is the information you requested” along with the URL of the website I want them to visit. Notice that you have various options to change the font and size of your text as well as adding effects such as bold and underlined text. Notice I have added an URL to the message. Let’s make it active (clickable).
Highlight the URL “http://www.mysite.com” then click the icon from the options above that look like this.

The following box appears. Enter “http://www.mysite.com” in the URL box and click OK.
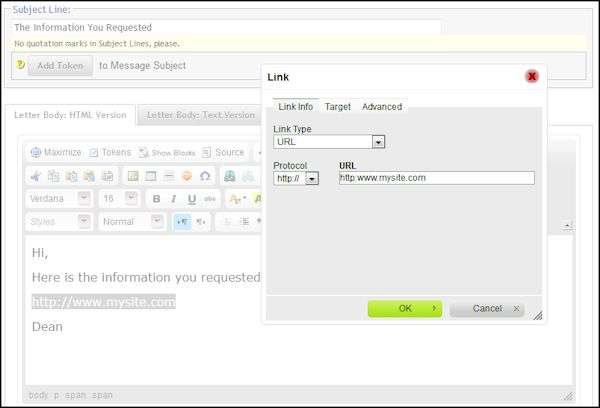
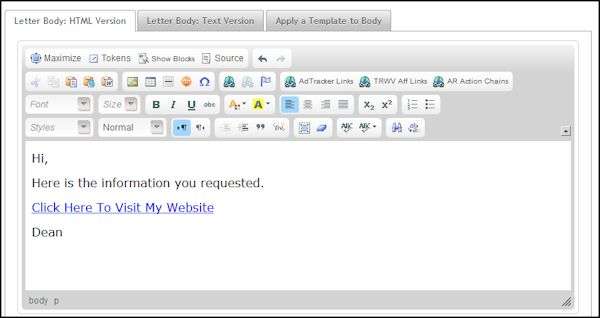
The URL is now active and can be clicked in the letter by the subscriber. Note you can write any text and make that active. Just highlight the text, enter the URL and click OK like in the example below.
If you click on the Proofread Letter button then a window will open showing you what the letter will look like to the subscriber. Click on the Save Letter button as we have finished with this one.
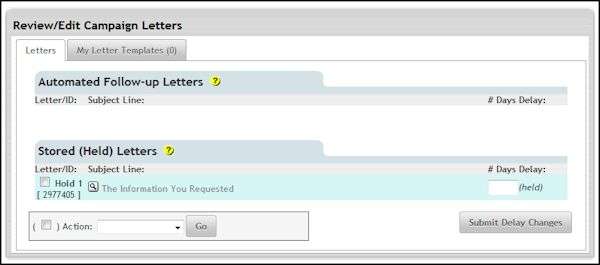
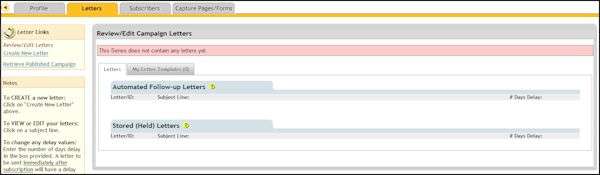
As you can see the letter has gone into the stored letters section. Each new letter will be placed here until you add a time delay to it. Now let’s create a second letter. Click on the Create New Letter link on the left hand side of the screen. In this letter we want to address the subscriber by name. We can do this by adding a token to the message. The default tokens are the name and email address tokens which are used to store the subscriber’s name and email address when they entered it on the form on your capture page.
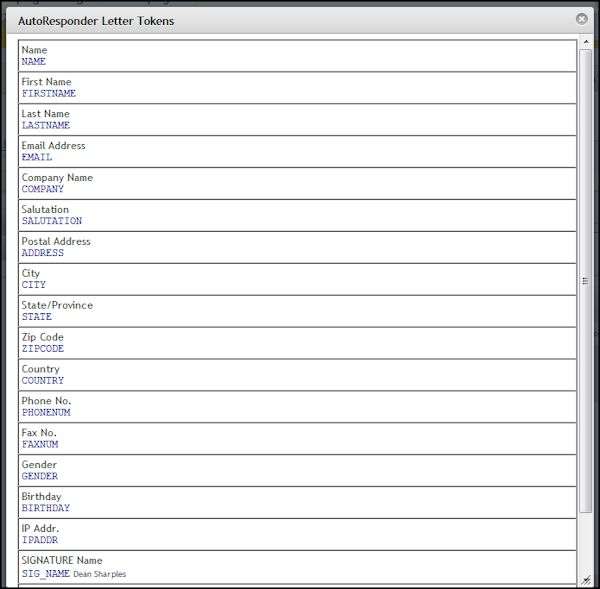
Enter the line “Hello Again” in the subject line. Making sure you haven’t clicked anywhere else and moved the cursor out of the subject line. Now click the Add Tokens button just below the line. The following list of tokens will appear.
Remember when you set up your campaign you had the option to define campaign data? If you had added any of these tokens to your form then you could have referred to them by adding them to your letter. At the moment you only stored the subscriber’s name and address. So let’s add the subscriber’s first name. Click on the box that says First Name. You will see the token “**FIRSTNAME**” added to the message in the subject line.
![]()
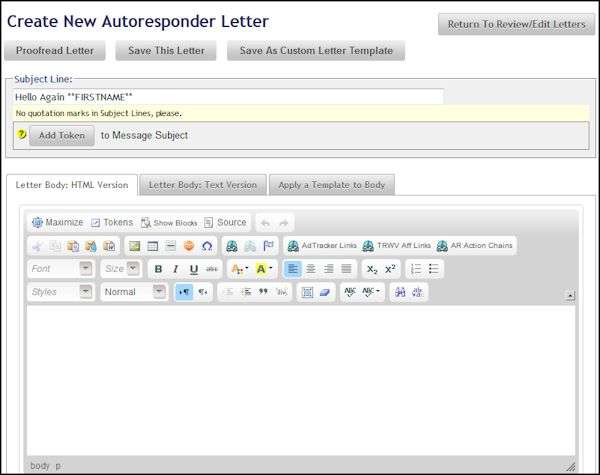
When the subscriber receives this email the token “**FIRSTNAME**” will be replaced with the subscriber’s first name. For example: “Hello Again John”. You can also add tokens to the body of the email. Just above the body window you see another tokens button. Click that and choose another token for the body of the email. The token button can be found here.
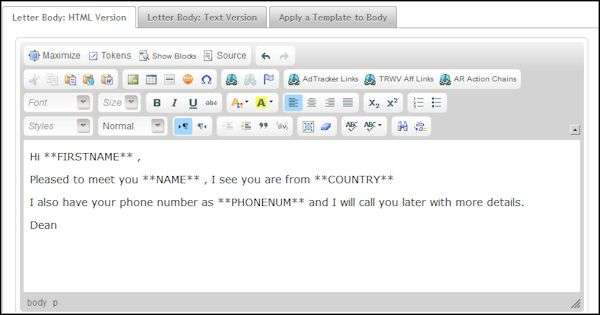
In the following screenshot you can see I have written a letter with a few tokens such as country and phone number. The **NAME** token is the subscriber’s full name. Note that if the subscriber did not enter this information on the capture page the tokens will be empty.
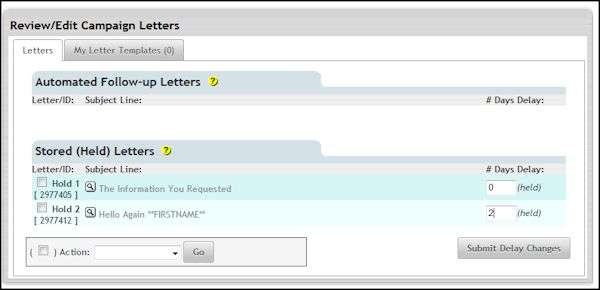
Save this letter. We now have two stored and it is time to add the delays.
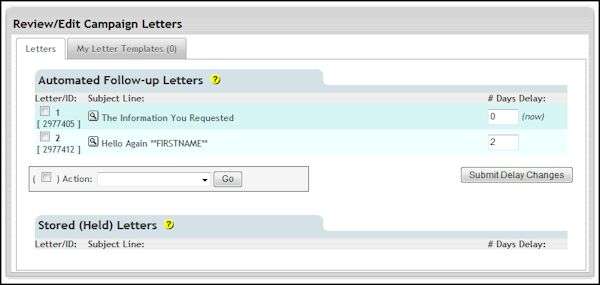
In the screenshot above you can see that both letters are in the stored section. In order to schedule them to be sent to the subscriber we need to add “delay values”. These values tells Trafficwave how many days after the confirmation message we want each letter sent out. In the screenshot above I have entered “0” for the welcome letter and “2” for the second letter because I want it to go out two days after the welcome letter. If I wanted a third letter to go out four days after the second letter then I would enter “4”. After entering the values click the Submit Delays button.
As you can see the letters have moved to the follow up section. Your campaign is now complete. All you need now is a way of getting people to subscribe which is covered in the next lesson.