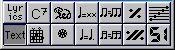
 The Regular Text option selected.
This type of text is inserted by selecting “Text” in the “Other” Symbols Palette. The text is tied to the bar and staff position. If you move the bar or the entire staff, it moves with it.
Inserting the same Text to all Staves
If you hold down [Alt] when clicking with the Pencil, the text you type in will be added to all staves you are currently editing.

The Lyrics option selected.
This type of text is inserted by selecting “Lyrics” in the “Other” Symbols Palette.
When you insert Lyrics, you should click below or above the note the syllable belongs to. The text will then appear horizontally centred around the note and vertically positioned to where you clicked. You can later move it up or down, as with any symbol.
This text is tied to note position. If you move the note, the text moves with it. The spacing between notes is also adjusted to make the lyrics fit.Inserting Lyrics for a number of Notes
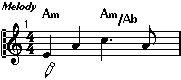
Click below the first note.
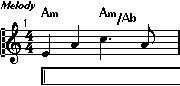
2. In the text dialog that appears, type in the syllable for that note.
The program moves on to the next note.
 4. Input text for this note and hit [Tab] again.
P Lyrics can also be added automatically, see below.
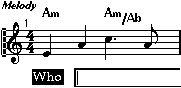
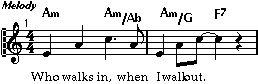
When you first enter lyrics, it will probably look crammed, since the words take up more space than the notes (the lyrics are also selected just after entering the last word, which make them look a bit odd when overlapping). To remedy this, use Auto Layout to automatically adjust the measure widths (see page 283).
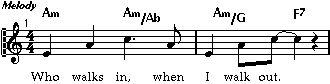 Before and after using Auto Layout.
Adding a Second Verse
To insert a second line of lyrics, proceed as follows:
1. Enter the new lyrics above or below the existing verse.
2. Select all the words that should be in the new verse.
3. Pull down the Score menu and select “Move to Verse” from the Text Functions submenu.
Another submenu appears, listing Verse 1 to 6.
4. Select the appropriate verse from the submenu.
To indicate that the words belong to another verse, they are automatically displayed in another color. However, all verses will print in black as usual.
Each voice can have it’s own lyrics. If you for example have a vocal arrangement with several voices, you can add lyrics to them, one by one.
1. Click or double click on the Lyrics Symbol in the “Other” Palette, so that the Pencil tool is selected.
2. Make sure the right voice is selected (on the Score Toolbar).
3. Click on the first note in the selected voice.
4. Enter the lyrics for this voice, with [Tab] as described above.
If you select a number of notes and hold down [Alt] when clicking with the Pencil to add text to them, this text is added to all notes. This allows you to for example add fingering or “handing” (left/right) to a number of notes at the same time.
Moving LyricsIf you want to move the lyrics up or down, for example to make room for a second verse, proceed as follows:
1. Hold down the [Shift] key and double click on the first word in the lyrics. All lyric “blocks” get selected.
2. Drag one of the lyric blocks up or down.
All selected lyric blocks are moved accordingly.
Adding Lyrics from the Clipboard
If you want to prepare your lyrics in another program, you can import them into Cubase VST the following way:
1. Create the lyrics in another program.
You need to put either a dash (-) or a [Tab] sign between each syllable!
2. Copy the text to the Macintosh clipboard.
3. In Cubase VST, select the first note to which the lyrics should be added.
4. Pull down the Score menu and select “Lyrics from Clipboard” from the Text Functions submenu.
The lyrics are added, starting at the selected note.
If you have copied lyrics to the clipboard as above, you can also add them to an empty staff - automatically generating notes in the process:
1. Set up the lyrics and copy them to the Macintosh clipboard.
2. In Cubase VST, open the empty staff in Score Edit.
3. Use the Snap pop-up to specify how closely spaced you want the generated notes.
4. Set the Song Position to where you want the lyrics to start.
5. Pull down the Score menu and select “Fill with Clipboard Lyrics” from the Text Functions submenu.
A dialog appears.
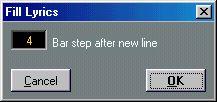
6. If your text is separated into lines, use the “Bar step after new line” to determine the minimum distance between lines in the text.
If you for example set this to 4, there will always be at least four bars between the beginning of each text line. If the text is not separated into lines, you don’t have to care about this.
7. Click OK.
Now, notes are inserted, starting at the Song Position and spaced according to the Snap value. Each note will have a “lyric block” attached to it.

Since this symbol is in the Layout section of the Palette, you should note that it is part of the Layout layer, not the staff. The text’s position isn’t tied a note, bar or staff position. In other words, it doesn’t matter if you move other objects on the page, the Page Text stays where you put it.
Inserting the same Text to all PagesIf you hold down [Alt] when clicking with the Pencil, the text you type in will be added to “all pages” from the one you are currently editing and onwards.
Just as Page text, this is stored in the Layout layer. In all other ways it is exactly the same as regular Text (see above). This means it is tied to the bar and staff position. If you move the bar or the entire staff, it moves with it.
Inserting the same Text to all Grand StavesIf you hold down [Alt] when clicking with the Pen, the text you type in will be added to all grand staves you are currently editing.
This type of text is inserted by selecting “Glob. Text” in the “Global Symbols” Palette. It is stored in the Layout layer and has the same properties as System Text, but with one special feature: Like the other Global Symbols (see page 199), you can decide for which Tracks in a layout you want the Global Text to be displayed. This is done by ticking the “Glob.” column for the Track in the Layout Settings dialog.
P Don’t confuse Global Text Symbols with the Global Text items for which you can make settings in the Preferences–Score–Global Text dialog. If you have certain words that you use a lot, you can “store” these on the Words palette. This will save time, since you don’t have to type the same word several times.