When preparing for entering notes into a score, you will probably want to start out by setting the desired Key, Clef and Time Signature for the Staff. The text below assumes you are working on one Track only. If you have multiple Staves, you either make this setting independently for each Staff or for all staves at once. See page 68 for details.
Normally, all these symbols appear at the beginning of each staff. However, you can control this by using the Real Book option (see page 265) and by Hiding (see page 266).
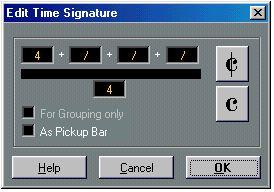 The Time Signature dialog with a 4/4 signature.
2. If the piece is in 4/4 or 2/2,you can select common time/cut time directly by clicking one of the two symbols at the right side.
This will set the Time Signature to 4/4 or 2/2, respectively, but also give you a common/cut time symbol on the staff.
3. If the piece is in any other time, set the numerator and denominator above and below the line, respectively.
The Numerator can consist of several numbers for composite Time Signatures. However, if the piece is in a simple time signature you only need to fill in the first number above the line. The more advanced options are described below.
P All Tracks share the Time Signature! In other words, when you set the Time Signature, you do this for all Tracks in the Arrangement.
If you need to enter half a bar somewhere (for example) you have to make a Time Signature change (for example from 4/4 to 2/4 and back again). On page 116 you will find out how to input Time Signature changes.
Composite Time Signatures and the Grouping OptionFor Composite Signatures, the Numerator can be made up of up to four groups. For example, ”4+4+3+/” on the upper line and 8 on the lower, means the Time Signature is 11/8.
The reason for dividing the Numerator into several numbers is to get beaming and tied notes displayed correctly automatically. This does not affect the Metronome or anything else, only beams and ties. For more information on Beaming, see page 161.
If “For Grouping Only” is not activated, the numerator will show all the numbers entered. If it is activated, it will show the sum of the numbers entered, as for “simple” Time signatures.
 “For Grouping Only”, Off and On.
Note that Cubase VST tries to preserve the denominator when you insert a composite signature with “For Grouping Only” activated. This means that if you have a 4/4 Time Signature, and change it to a composite value (3+3+2 eighths for example), the Time Signature will still be displayed as 4/4 instead of 8/8.
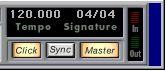
Setting the Time Signature from the Transport BarThe Time Signature on the Transport bar.
 You can also set the Time Signature directly on the Transport Bar, as described in the main Cubase manual. Please note the following:
 • The Time Signature box on the Transport Bar always displays the first Time Signature Event in the Master Track. When you change this value you are in fact editing the first Time Signature event in the Master Track.
• You can not create composite Time Signatures from the Transport Bar.
You can also add, edit and delete Time Signatures by editing the Master Track (which is described in its own chapter). Please note the following:
• The Score always shows the Time Signature events in the Master Track, regardless of whether or not the Master Button is activated. Likewise, any Time Signatures you create in the Score Edit will be shown in the Master Track.
• You can not create composite Time Signatures from the Master Track.
A dialog appears.
 Double clicking on a clef brings up the clef dialog.
2. Use the scroll bar to select one Clef.
P This does not work if Auto Clef is activated in the Staff settings dialog box, see below.
2. Locate the Key/Clef section.
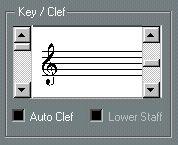 The Key/Clef section of Staff Settings.
3. Use the left scroll bar to select one of the available Clefs.
You will find out how to insert Clef changes on page 116.
4. Click the “Prev” and “Next” buttons or use the Up and Down arrow keys on the computer keyboard to step around among the staves and make settings for each one. The name of the Track you currently make settings for is displayed in the window title.
5. Click OK or press [Return], to close the dialog.If you have a Split System (see page 114 and page 134) you can of course set different Clefs for the Upper and Lower Staff.
1. Open Staff Settings.
2. Select a Clef for the upper staff.
3. Activate the “Lower Staff” check box.
4. Set a clef for the Lower Staff.
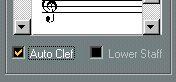 Auto Clef activated in Staff Settings.
In the Staff settings dialog you will also note one option called Auto Clef. If this is activated, the program will automatically select a Treble Clef or a Bass Clef for the Staff, depending on in which range the notes in the Part fall.
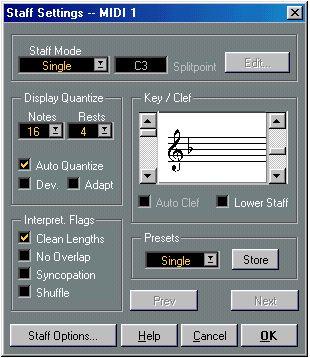 The Staff Settings dialog box.
2. Use the right scroll bar in the Key/Clef section of the dialog box to select one of the Keys.
3. Click the “Prev” and “Next” buttons or use the Page Up and Page Down keys to step around among the staves and make settings for each one.
The name of the Track you are currently making settings for is displayed in the window title.
P
If you want to set all staves in the Score to the same key (which you probably do), there’s a short-cut: Select the desired key for one of the staves, hold down [Alt] and click OK.
Setting The Key For A Split System
You might have a Split System (see page 114 and page 134) with two staves.
1. Open Staff Settings.
This will make the Lower staff automatically be set to the same key.
3. If you need to set a different key for the Lower staff, activate the “Lower Staff” check box and set a clef for this.
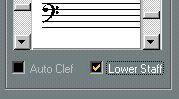 The Lower Staff check box.
Directly in the Score
If the current key is anything but C major/A minor (no accidentals) you can set the key directly in the Score:
1. Double click on one of the current accidentals at the beginning of a staff. Double click in this area
A dialog appears.
2. Use the scroll bar to select a key.
• If you wish, you can set a Display Transpose value in this dialog.
You will find out how to insert Key changes on page 116.